The 2016 MacBook is capable of driving a 4K display at 60 Hz via a single USB-C cable. Such a feat is achievable via an easy-to-apply IOKit patch.
One of the great things about the new Intel hardware inside of the 2016 MacBook is that it’s capable of supporting 4K resolution at 60 Hz. The jump in refresh is a big deal, as anyone who’s tried to put up with running a 30 Hz refresh rate can attest to.
Operating at 30 Hz results in jerky and choppy cursor movement, and in some cases can induce headaches after prolonged use.
Sadly, the MacBook only supports 30 Hz out of the box for 4K resolution. It’s not immediately clear as to why this is, but on its support page, Apple makes it known that 4K resolution is limited to 30 Hz.
The good news is that it is possible to enable 60 Hz at native 4K resolution and 1080p (HiDPI/Retina) resolution on a 2016 MacBook. In fact, I just did so on the LG 27UD88 4K USB-C monitor that I recently reviewed. Watch the step-by-step process in our video tutorial for the details.
Disclaimer
As to why Apple did not enable 60 Hz resolution out of the box on the 2016 MacBook, I’m still not sure. The Intel Core M chip, along with the Intel HD Graphics 515 integrated graphics, support 4K resolution at 60 Hz.
Apple may have a valid reason for holding back 4K @ 60 Hz. Perhaps it has to do with heat or some other vital system aspect. Maybe Apple wants to sell more MacBook Pros. Perhaps it plans to release a future OS X upgrade with 60 Hz support in tow. In other words, if you decide to apply this patch, know that you are doing so “at your own risk”.
This tutorial should work with most 4K monitors and traditional DisplayPort connectivity as well, the USB-C cable used in my example is carrying DisplayPort 1.2 across its lanes. Be sure to check out Floris497’s mac-pixel-clock-patch-V2 GitHub page for more details and specifics on connectivity options and driver support.
Video walkthrough
How to enable 4K@60 Hz on 2016 MacBook
Step 1: Disable System Integrity Protection (SIP)
To disable SIP, reboot your MacBook and hold ⌘+R until you see the Apple logo. This will cause your Mac to boot into recovery mode.
Click the next arrow button on the welcome screen, and in the menu bar, click Utilities → Terminal.
At the Terminal Prompt type: csrutil disable; reboot
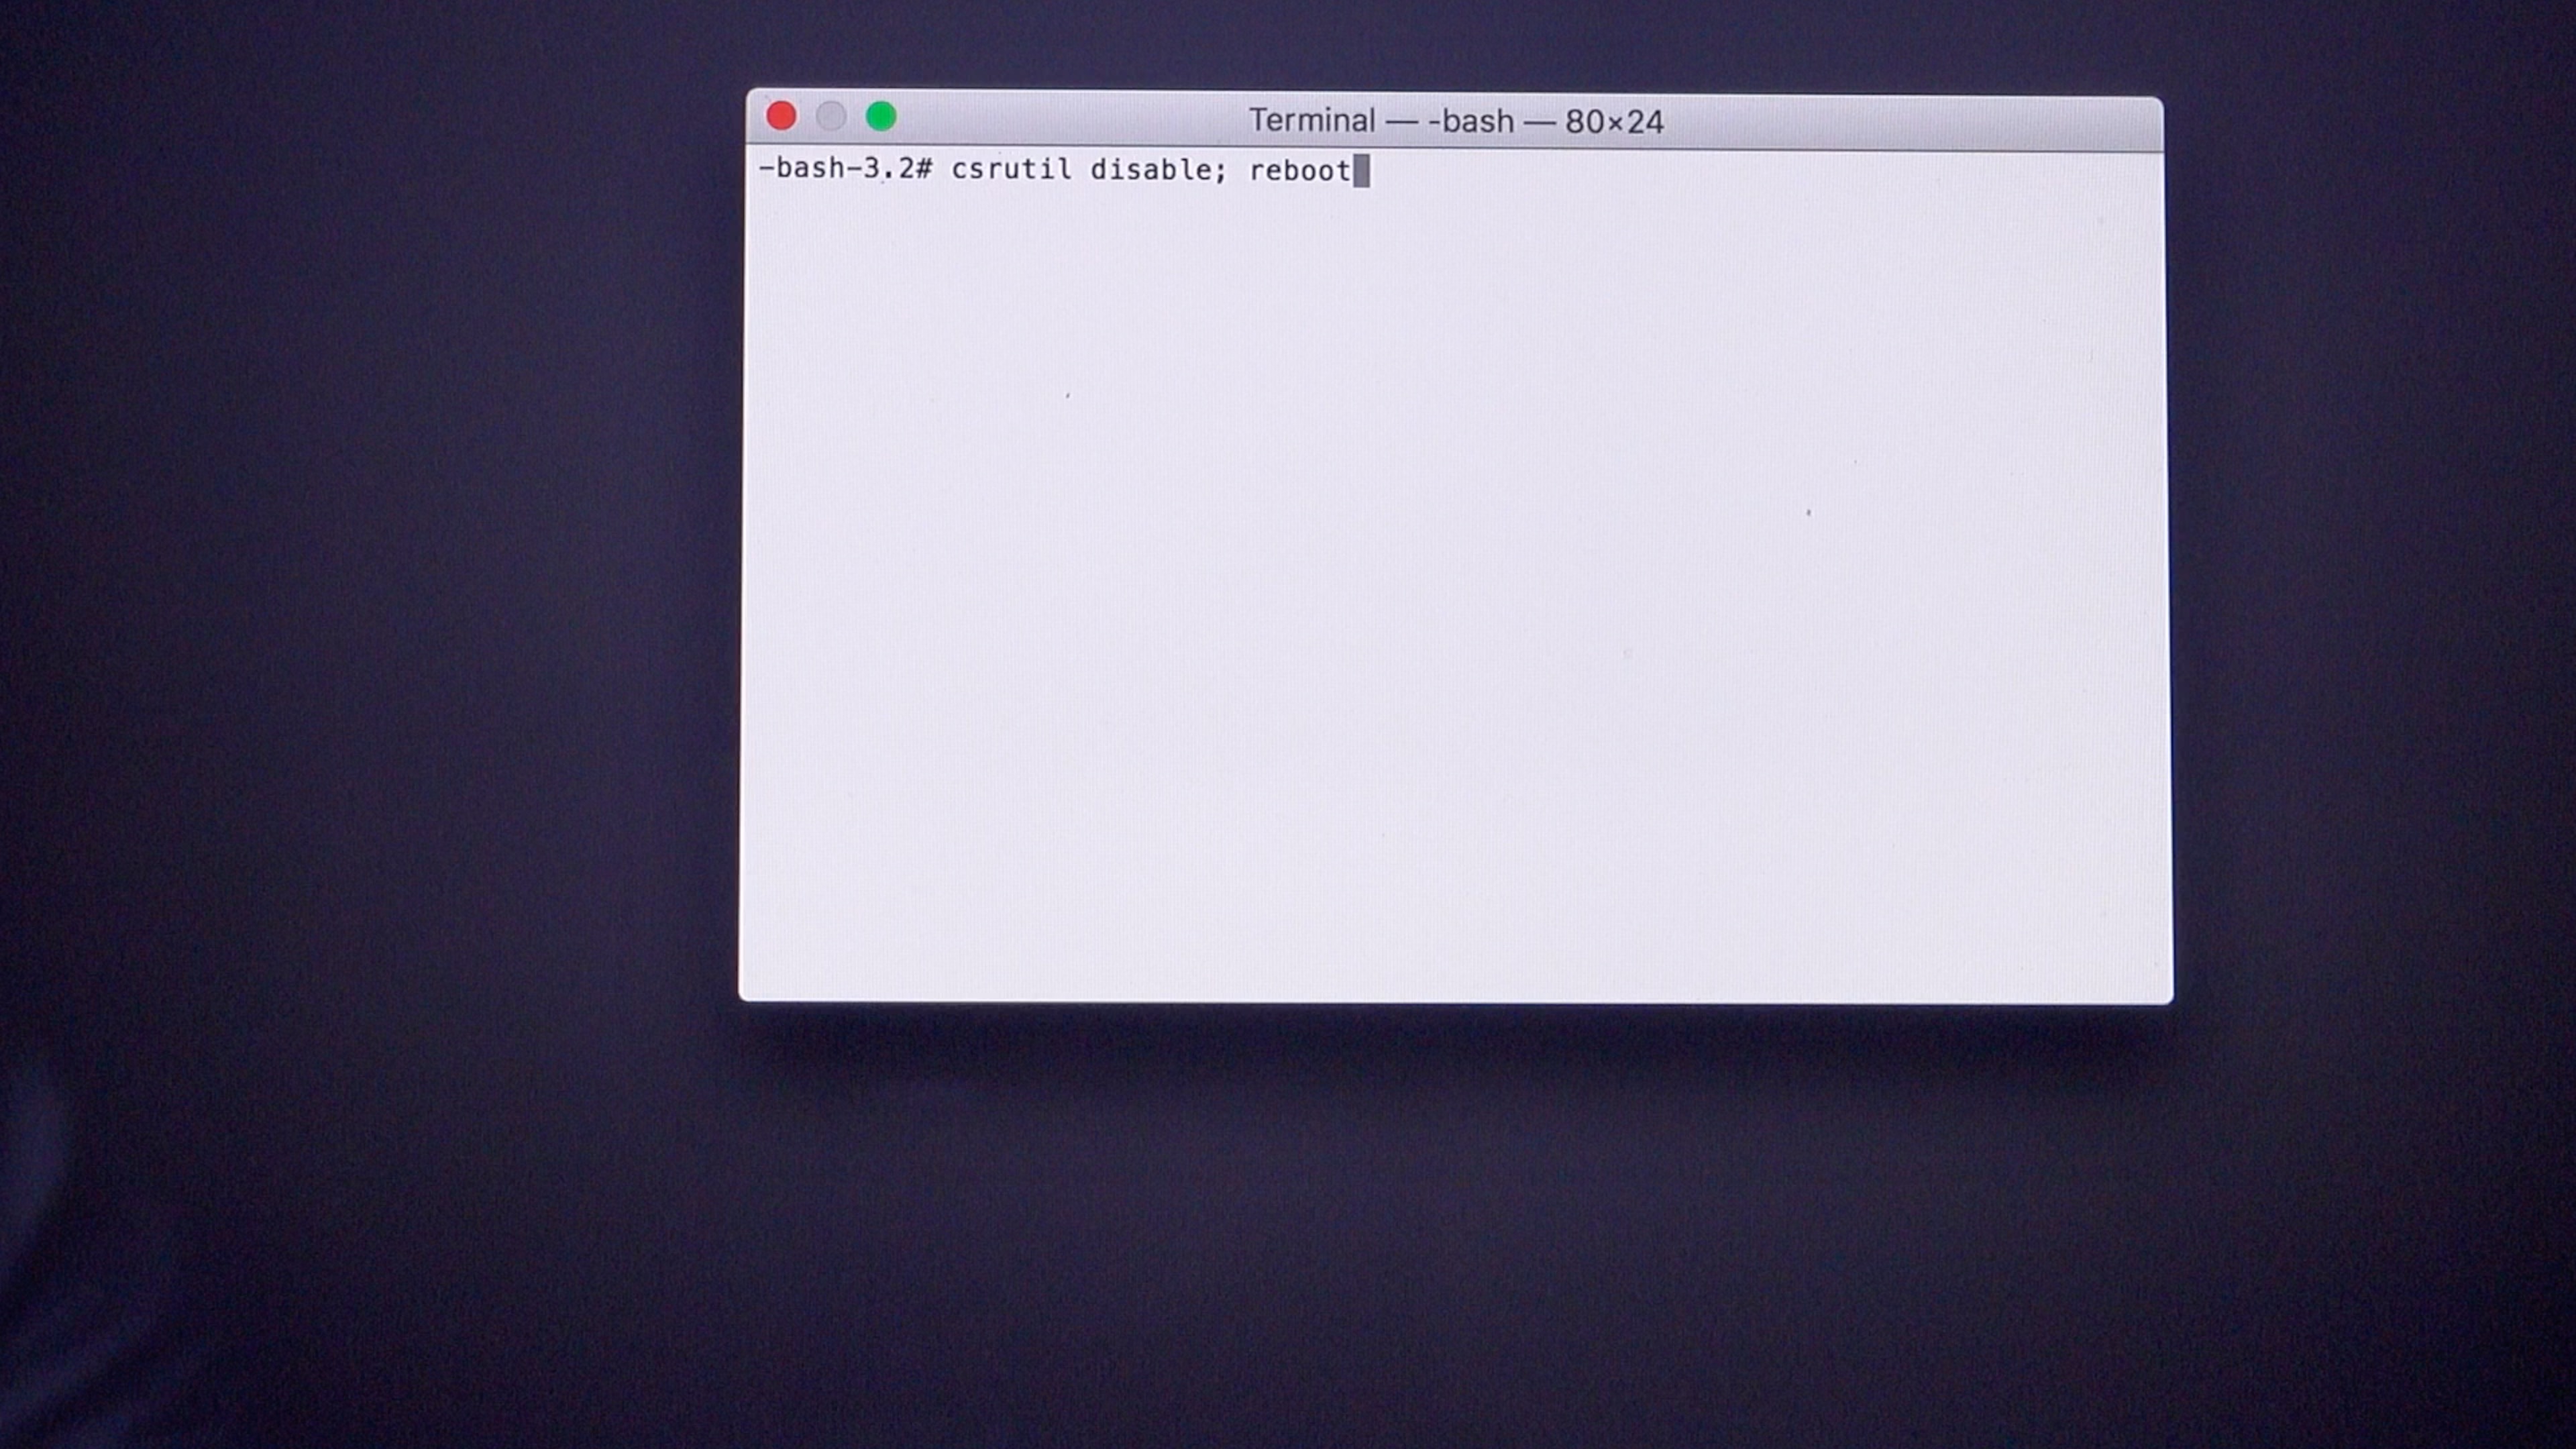
Press Return on your keyboard.
Step 2: Download the patch
Download Floris497’s patch. Click this link and right-click on Raw and select Download Linked File As. Save it to your desktop.
Step 3: Give the patch the needed permissions
Open a Terminal window and type the following: chmod +x
Drag the patch file from your desktop into the Terminal window and press Return on your keyboard.
Step 4: Apply the patch
Drag the patch file back into the same Terminal window and press Return on your keyboard.
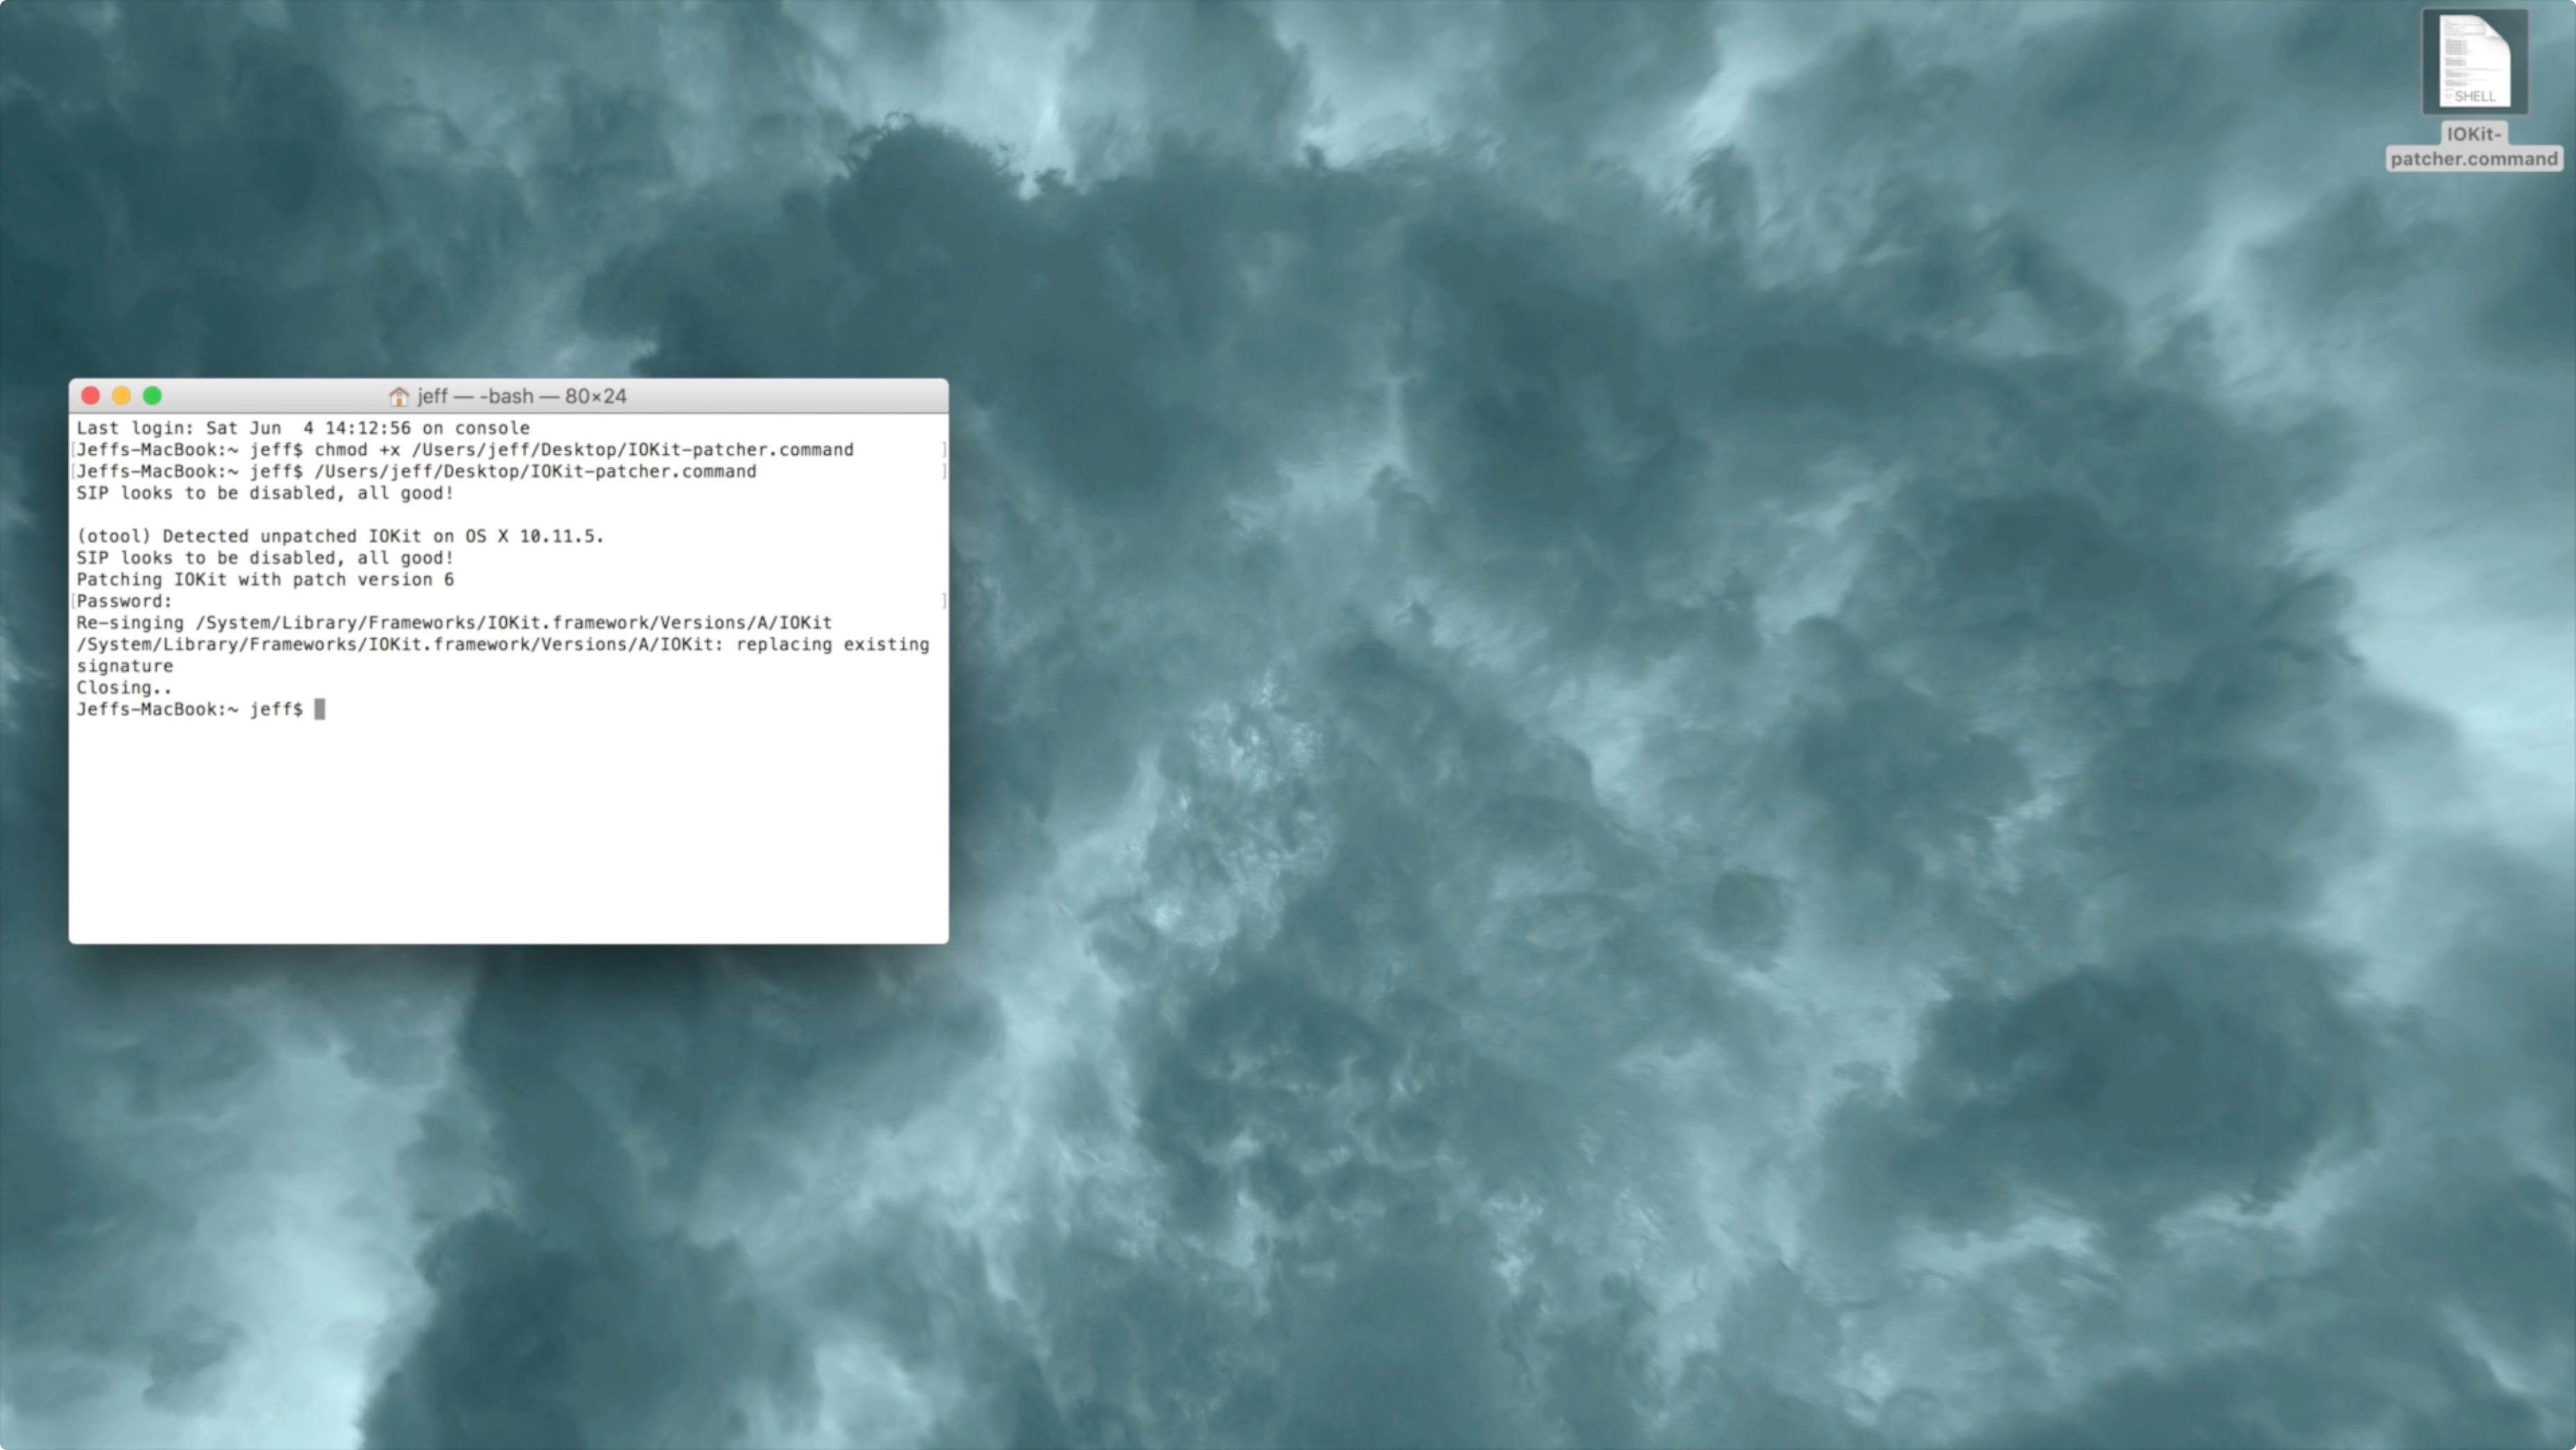
You will be prompted to enter your administrator password. Do this and press Return on your keyboard.
The patch should run successfully.
Step 5: Reboot your Mac
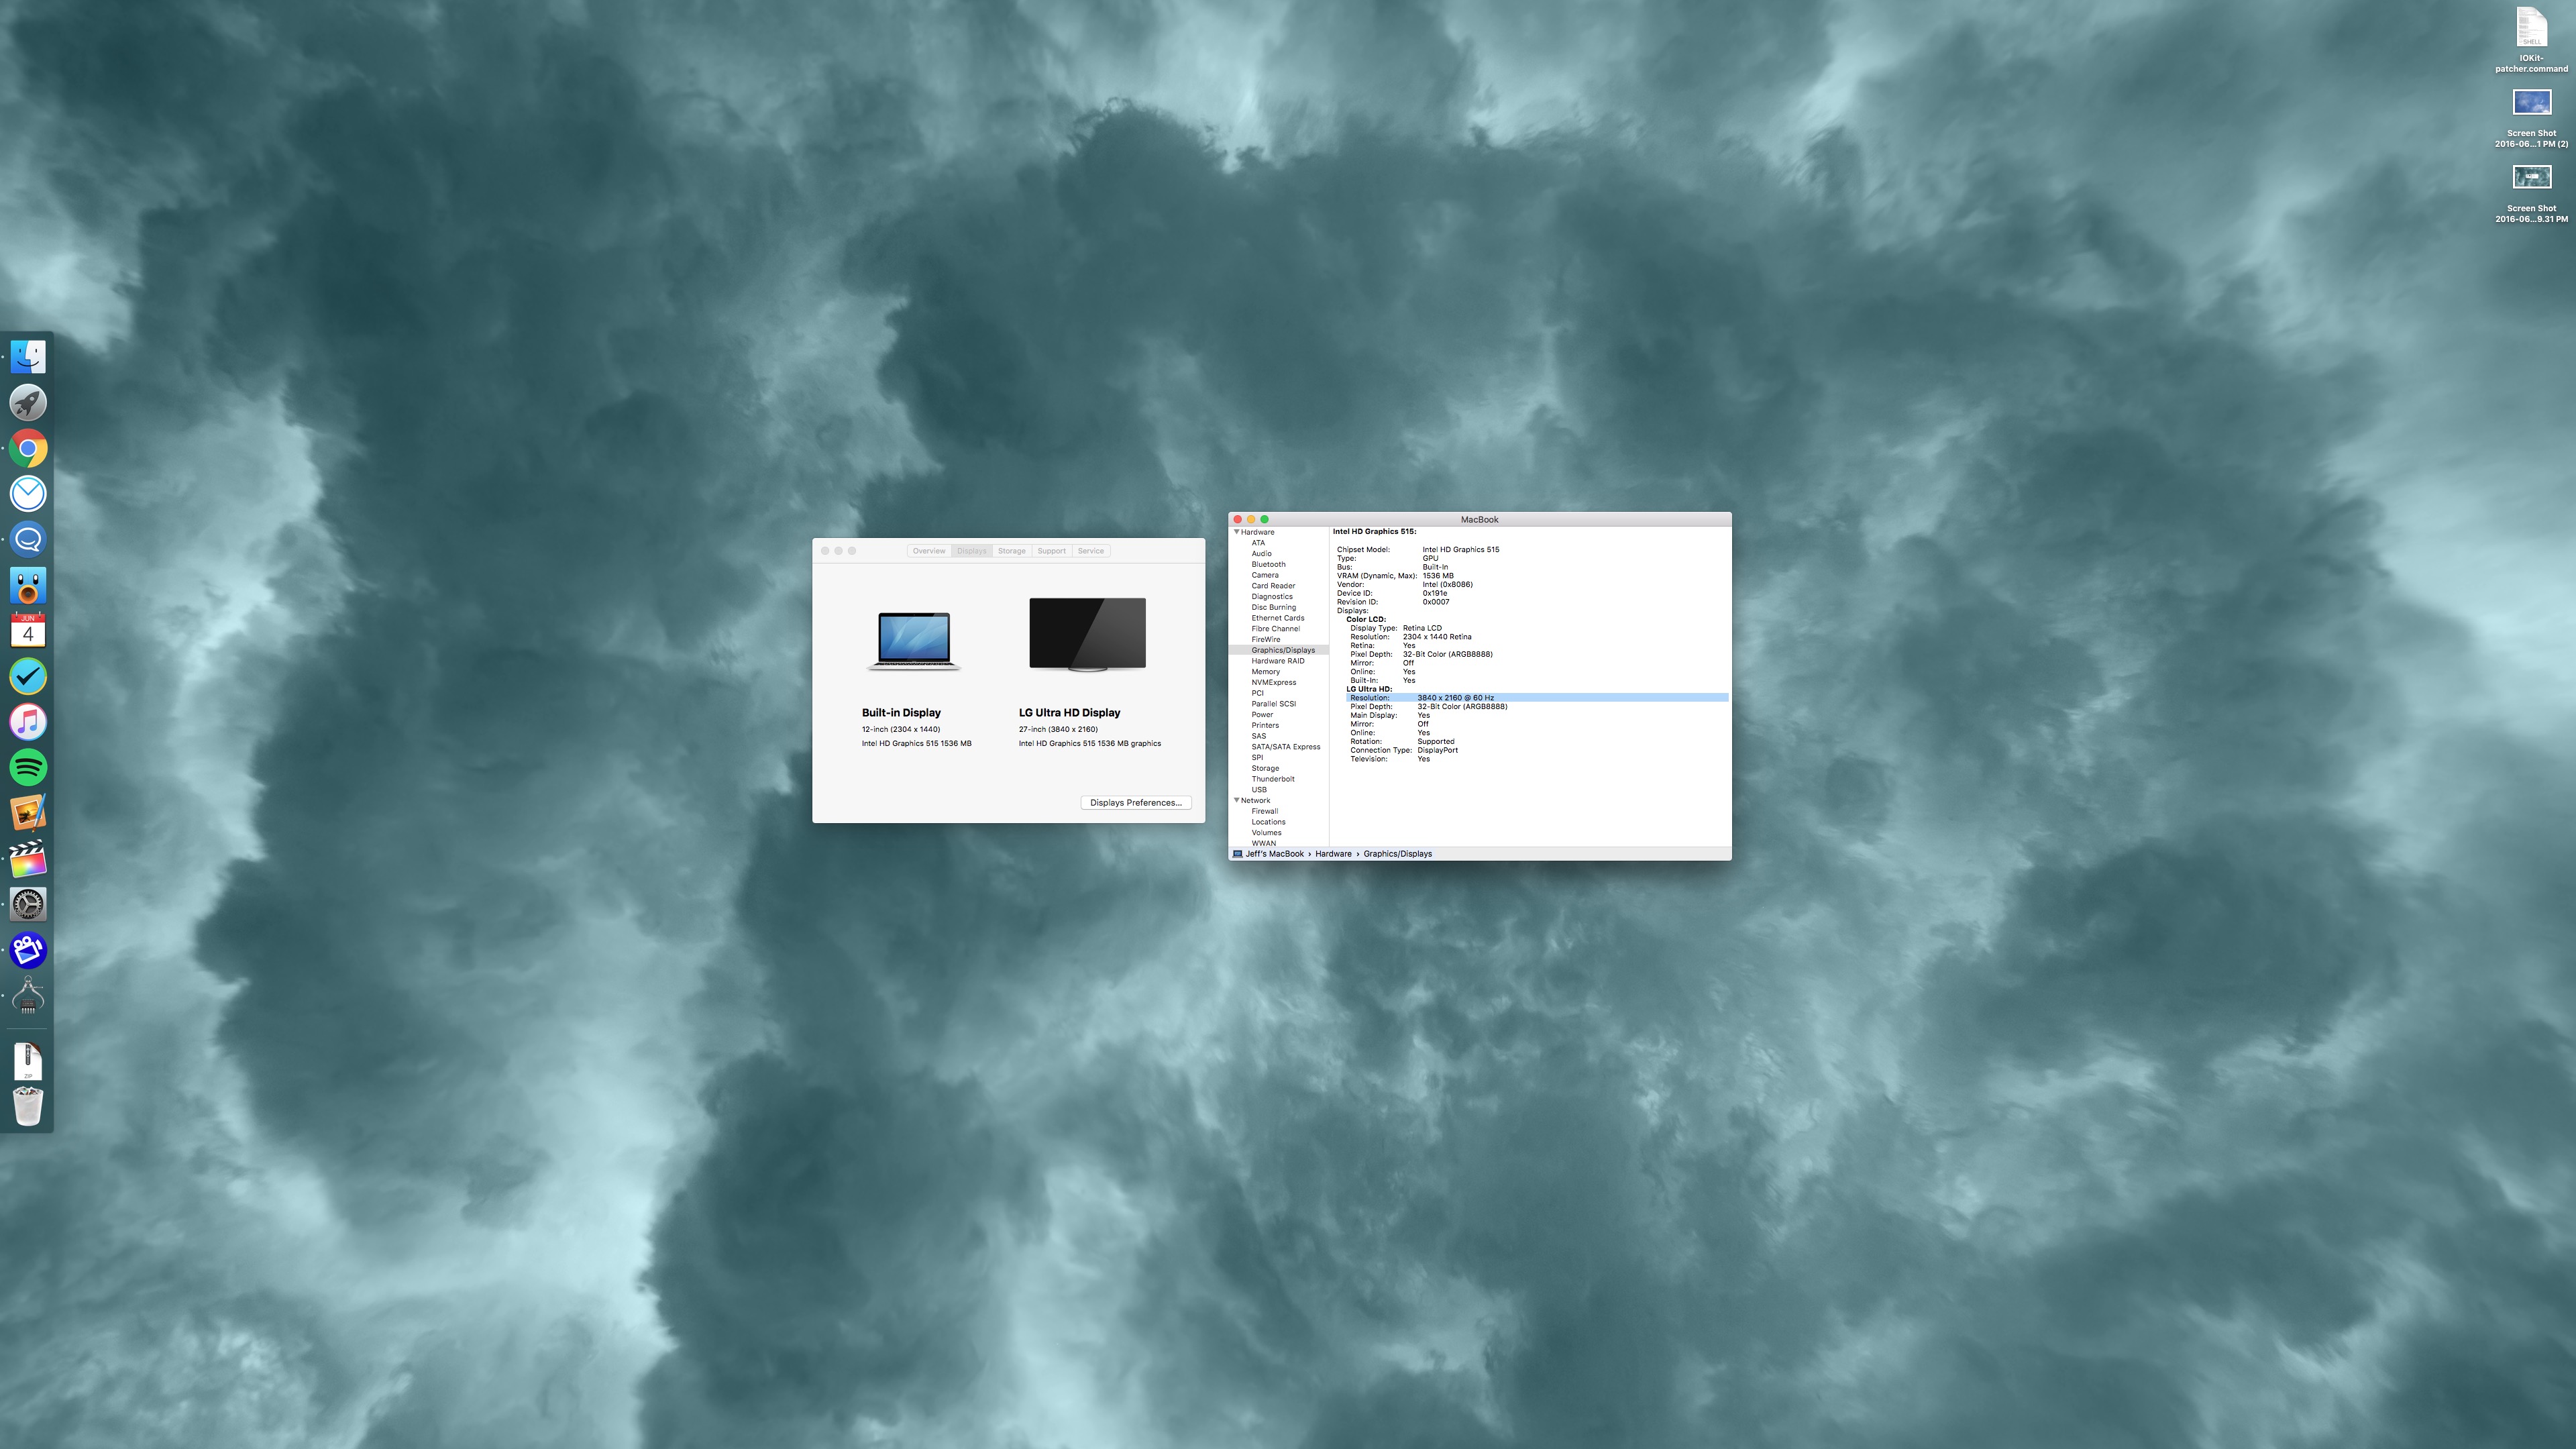
Step 6: Open System Preferences → Displays on your external monitor, and verify that “30 Hertz” is no longer listed. You’ll also notice that your cursor movement is a lot smoother. Be sure that you monitor supports DisplayPort 1.2 and it’s enabled, as this is a requirement for 4K @ 60 Hz when connecting via USB-C or a traditional DisplayPort cable.
You can also go to → About This Mac → System Report → Graphics/Displays to verify that your display is running at 60 Hz (1080p) HiDPI or 3840×2160 @ 60 Hz, depending on whether or not you chose to use a Scaled resolution in System Preferences → Displays. You can also use the famous “UFO Test” to ensure your display’s frame rate.
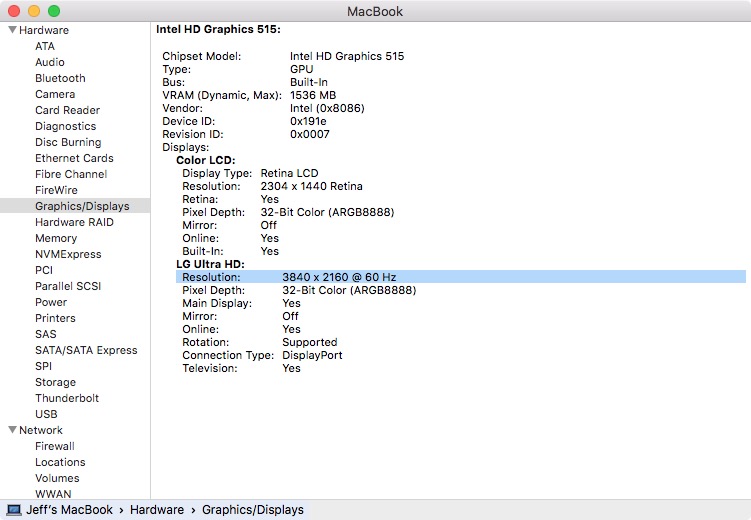
4K at 60 Hz!
Step 7: Re-enable System Integrity Protection (SIP)
Now that we’ve confirmed that the patch works, it’s time to enable SIP again. To enable SIP, reboot your MacBook and hold ⌘+R until you see the Apple logo. This will cause your Mac to boot into recovery mode.
Click the next arrow button on the welcome screen, and in the menu bar, click Utilities → Terminal.
At the Terminal Prompt type: csrutil enable; reboot
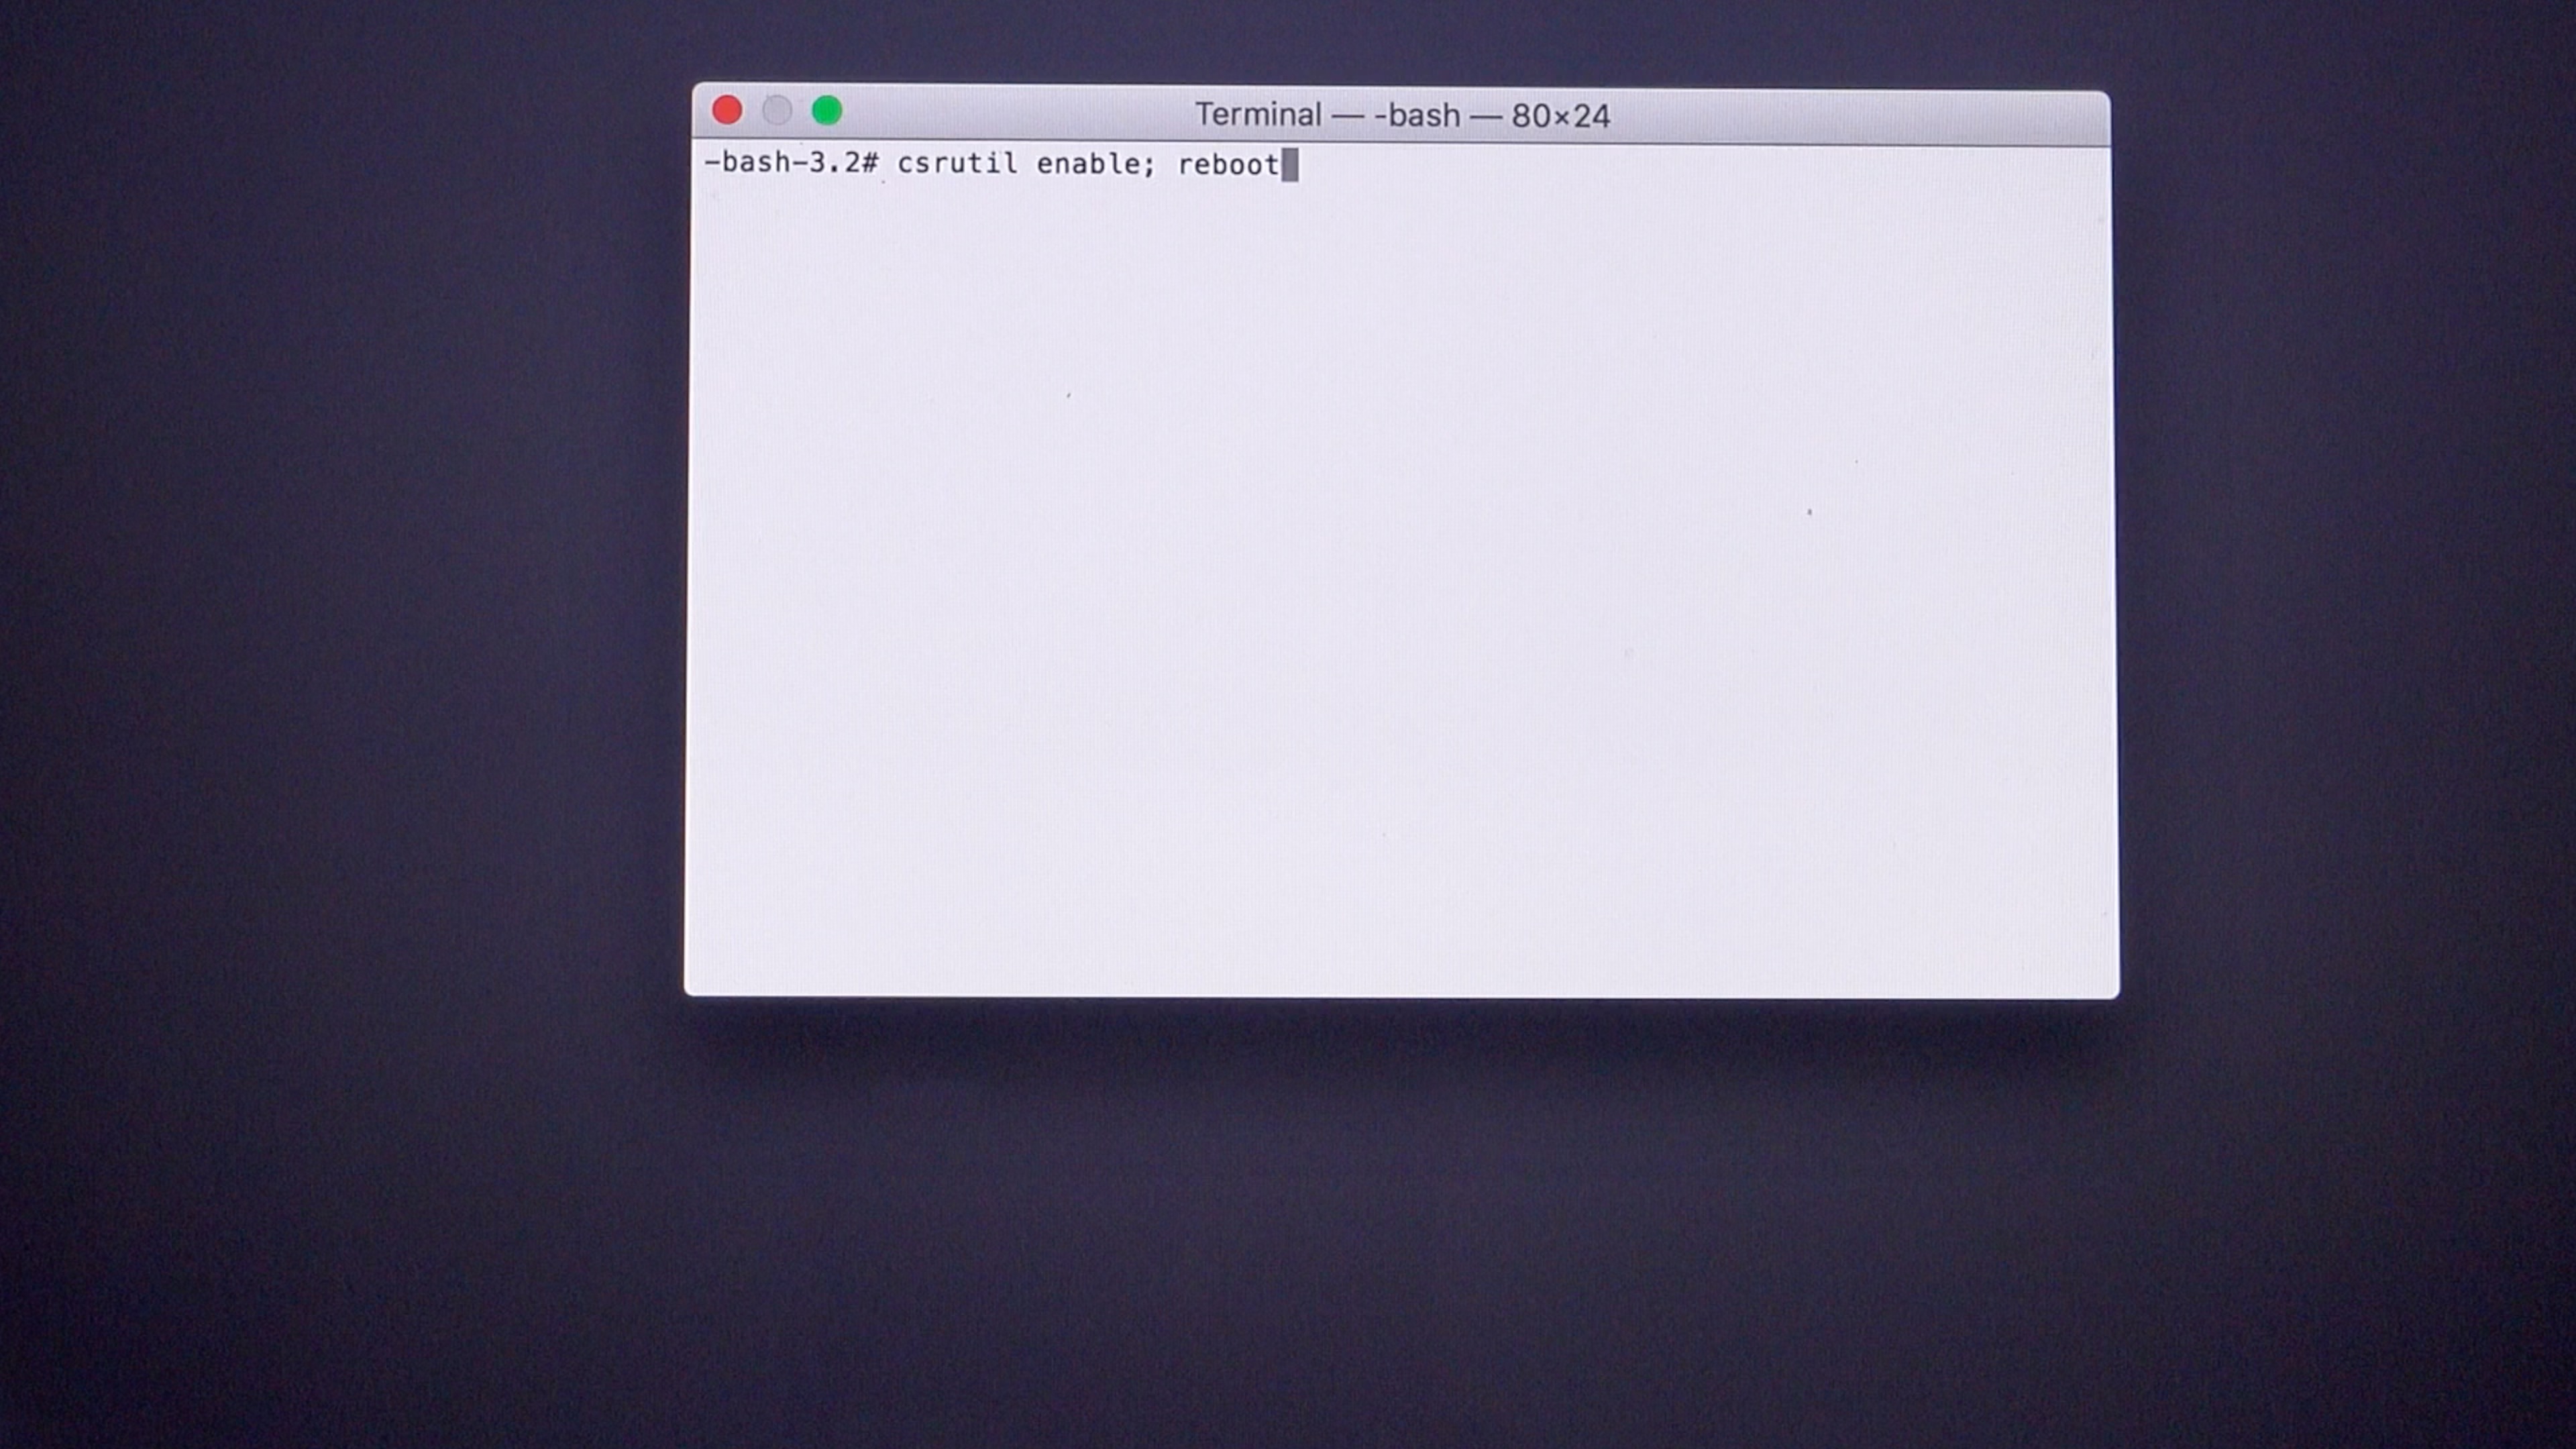
Press Return on your keyboard.
Reboot your Mac like normal.
Conclusion
That’s all there is to it. I’m actually typing this post on my 27″ 4K LG 27UD88-W, which is connected via a single USB-C cable. Needless to say, this display just got a lot more awesome thanks to this setup. So far, I’ve noticed no negative side effects from running my Mac at 4K 60 Hz.
The machine doesn’t appear to be any warmer than it normally is, but since we’re applying a patch not recommended by Apple, there’s always some risk involved. Needless to say, unless I run into any major issues, I certainly won’t be going back to 30 Hz.
Special thanks to Neurack in our LG 27UD88 review post for highlighting this patch’s existence. And, of course, special thanks to Floris Fredrikze, aka Floris497 for creating such an awesome patch.
Does this change your opinion of the 2016 MacBook any?
More 2016 MacBook coverage
FTC: We use income earning auto affiliate links. More.


Comments