
When I first wrote about using solid state drives (SSDs) to radically improve the performance of older Macs, high-capacity SSDs were just beginning to become affordable. Replacing a Mac’s 500GB or 1TB hard drive with a same-sized SSD required at least $250 back then, but the benefits were tremendous: even an aging machine became markedly (5x) faster, silent, and — unexpectedly — more fun to use. All for much less than the price of a new Mac.
Today, high-capacity SSDs are more affordable than ever. Replacing your old 500GB hard drive with a same-sized SSD from a reputable manufacturer costs only $150, while 1TB drives are under $330, each $100 less than only a couple of years ago. Once unthinkably huge 2TB and 4TB SSDs are now commonly available, too, albeit at eye-watering prices.
With this week’s release of macOS High Sierra, Apple has officially made SSDs its preferred Mac storage solution, introducing the new APFS standard to further optimize SSD performance over Fusion and traditional hard drives. So this is a perfect time to revisit the topic of SSD upgrades; if you held out before, now’s the time to jump in!
The Big Picture
For nearly a decade, SSDs have been acknowledged as the “future” of Mac storage. Even without changing a Mac’s CPU, GPU, or RAM, replacing the hard drive with an internal SSD instantly leads to much faster macOS performance, app loading, restarting, and file accessing. A Mac that once took over a minute to boot can now start working in seconds; Macs built with SSDs can awaken from sleep instantly.

Despite superior performance, high prices led Apple to slowly stagger solid state drive adoption across individual Mac product lines. The January 2008-vintage original MacBook Air was the first Mac with the option of a 64GB SSD (for a $1,300 premium over the laptop’s base price), and 1TB SSDs were going for roughly $4,000 — Apple didn’t even try to sell 1TB SSDs at that point.
Nine years later, dramatically faster and smaller SSDs with the same capacities can be had for less than a tenth of those prices, so every current Mac either has an SSD by default or as an option. Running cooler, quieter, and with superior energy efficiency than traditional hard drives, SSDs have fewer failures, and reputable manufacturers tend to warranty them for longer than their predecessors.
For instance, Samsung’s consumer drives generally have 5-year warranties, and if you’re willing to pay more, its PRO series drives have 10-year warranties, eclipsing all but the most expensive enterprise-class desktop hard disks. Not all SSDs are equivalent in reliability and performance, but ones from top-tier chip companies are pretty incredible.
Which Mac Models Can Be Internally Upgraded?
Good news first: most older Macs and even some current Macs can be easily user-upgraded to include SSDs. With limited expertise and only three tools, I was able to swap out my 2011 iMac’s old hard drive for an SSD in roughly 30 minutes. [Alternately, if your Mac has a SuperDrive, you may be able to replace that optical CD/DVD drive with the SSD, though it’s important to note that the SSD mightn’t run as fast due to slower Mac internal connections to the SuperDrive. Hard drive replacement is generally the best option.]
Bad news: the newer the Mac, the greater the likelihood that actually installing the drive yourself will be tricky. Apple continues to shrink its desktop and laptop machines, more tightly integrating the few remaining components inside, so you’ll want to follow an iFixit disassembly guide to safely open and close your machine. Owners of the very latest MacBook and MacBook Pro models shouldn’t bother going further; these laptops have hardwired SSDs that can’t be replaced, a trend that Apple may expand to future desktop Macs.
If your Mac is one of the following models, it can probably be upgraded with an SSD.
iMac: Up through 2017 (current) models
Mac mini: Up through late 2014 (current) models.
Mac Pro: Up through late 2013 (current) models
MacBook: Up through mid-2010 models
MacBook Air: Up through 2017 (current) models
MacBook Pro: Up through mid-2015 models
For Non-Upgradable Macs, Consider External SSDs
Ideally, you’ll install the SSD inside your Mac, squeezing maximum performance out of its chips without needing to power an external device. But if your Mac can’t be internally upgraded, or you’re squeamish about opening up your computer, you can buy an external SSD and connect it to a USB 3 or Thunderbolt port. You’ll see definite speed improvements for whatever files and apps you place on the SSD, though overall macOS performance won’t change unless you’re booting from the SSD itself.
Preparing Your Mac for an SSD
Before any hard disk to SSD swap, my advice is to run a complete Time Machine backup to an external drive — preferably one that’s connected with a cable rather than Wi-Fi — so all of your old hard drive’s contents will be ready to transfer over to the new SSD. I strongly recommend updating your Mac to the latest non-beta version of macOS it can run before beginning the backup process.
Once you’ve swapped the drives, hold Command (⌘) and R down on the keyboard when first restarting your SSD-equipped Mac. This will enable you to use Disk Utility to format the SSD. If your Mac can run macOS High Sierra or later, choose APFS formatting for the SSD; otherwise, choose Mac Extended + Journaled formatting. Then restore directly from your Time Machine backup. The restoring process will take hours, but you’ll come back to a fresh macOS install with everything pretty much as it was left on your old drive.
Alternately, you can install a new copy of macOS on the drive, then install only the apps and files you want. Achieve this after a Command-R boot by choosing Reinstall macOS from the macOS Utilities list, and selecting the new SSD as the destination for macOS. This will give you a completely fresh start, though your emails, app settings, and other files will need to be separately hunted down and brought over from your other hard drive.
For users with plans to swap an optical drive for an SSD, keeping the SSD as a non-boot drive, nothing needs to be done to prep software beforehand. Backing up your Mac is always a good idea before opening it up, but all you’ll need to do after the SSD installation is run Disk Utility and format the new drive, then transfer files over as you see fit.
However, if you plan to make the SSD your boot drive, follow the instructions above so you can enjoy the speed benefits of running macOS directly from the SSD. Once you’ve set up the SSD with macOS and your files, choose the SSD as your boot disk from the Choose Startup Disk utility, found in System Preferences (Startup Disk) or the macOS Utilities suite.
One brief note on TRIM, a topic that was a bigger deal when I originally wrote SSD guides; read about it (and third-party software) in greater depth here. In short, TRIM — automatic recycling of SSD space freed up by deleting files — is a background task performed by your Mac. It’s handled in the background by OS X, though for reasons unknown, Apple officially guarantees TRIM support only for its own drives. Under macOS High Sierra, the Samsung EVO drives I recommend here shouldn’t have any problems working perfectly with your Mac, but if you need a tool for another drive, Cindori’s TRIM Enabler 4 is an option.
iMac: Internal + External SSD Options
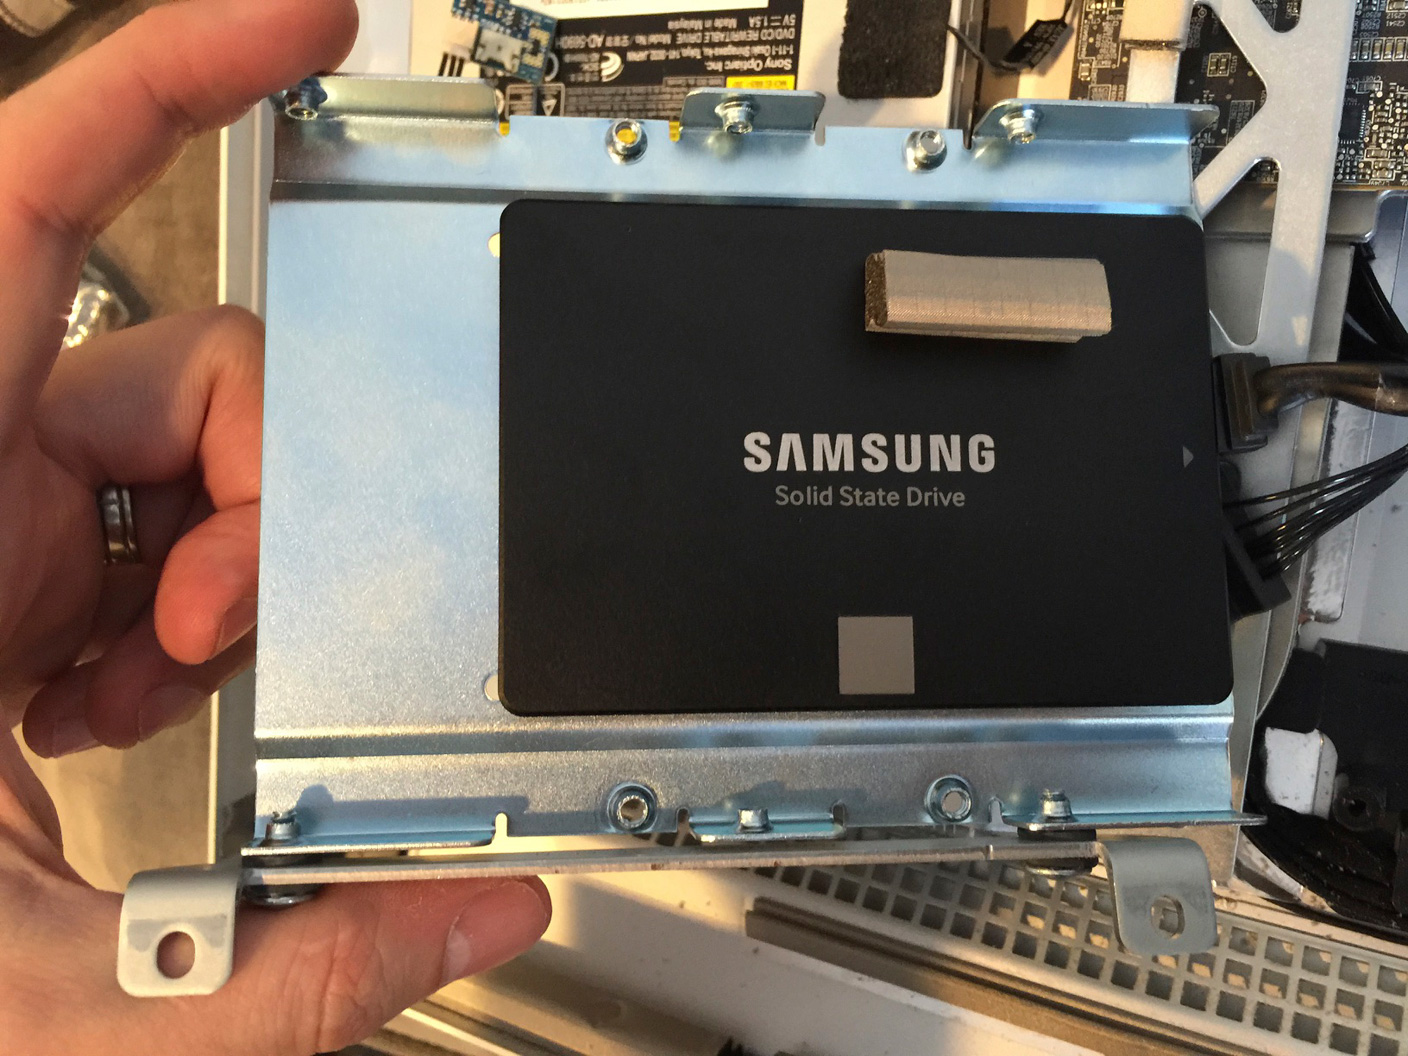
I’ll leave the specific iMac opening instructions to the experts at iFixit (this guide works for pre-2012 27-inch iMacs), but it suffices to say that the iMac isn’t super difficult to upgrade – iFixit suggests less than an hour of total install time, and I personally took around half an hour in total.
Before you begin, you’ll need several components: the SSD, a mounting bracket, an in-line digital thermal sensor, and a small collection of tools.
For the SSD, I recommend Samsung’s 850 EVO series (250GB/$100 and up), and NewerTech’s AdaptaDrive mounting bracket ($15) to secure the drive inside your iMac. Other World Computing/OWC now sells the thermal sensor and all necessary tools in $40 iMac model-specific bundles, a better deal than choosing and buying the parts separately. OWC’s videos walk you through installation, too.
Owners of SuperDrive-equipped iMacs also have the option of swapping the optical drive for an SSD. iFixit has model-specific SuperDrive replacement guides for the 21.5-inch iMac (late-2009, mid-2010, and mid-2011), 27-inch iMac (late-2009, mid-2010, and mid-2011), and earlier 17-, 20-, and 24-inch models that are about as far back as you should consider for possible SSD swaps. The guides omit only one step: placing the small SSD you buy within an adapter/caddy as large as the optical drive you’re replacing.
Some people skip the adapter and use pieces of double-sided tape to hold their SSDs in place, but if you’d like to use a mount to keep your SSD firmly within the old optical drive bay, this $10 Micro SATA Cables-branded adapter is inexpensive and praised for its fit in 27-inch iMacs. Alternately, this $19 Nimitz hard drive caddy is designed to fit a variety of 2009-2011 iMacs.
If you prefer to go with an external drive, I would recommend LaCie’s Rugged Thunderbolt + USB 3.0 SSD ($285/500GB) if you need a Thunderbolt interface, otherwise a much smaller and less expensive Samsung T5 USB 3.1 SSD ($200/500GB). which will be forward-compatible with USB-C computers.
Mac mini: Internal + External SSD Options

courtesy iFixit
Internal SSD replacement for the 2010 to 2014 “unibody” Mac mini requires considerably more effort and skill than the iMac. iFixit’s guides correctly describe many upgrades to unibody (metal-topped) Mac minis as being “difficult.”
This is the mid-2010 Mac mini guide, for which you’ll need a 2mm hex screwdriver, T6 and T8 Torx screwdrivers, a spudger, and a special Mac mini Logic Board Removal Tool, plus hours of disassembly and reassembly time.
You’ll need to disassemble the Mac mini’s chassis, fan, and antenna plate before disconnecting the logic board and hard drive — which steps become even more challenging on the current (2014 design) models. I would recommend that you seek professional assistance for an internal drive upgrade of this model, and seek out Transcend’s upcoming JetDrive 820, which promises 2014 Mac mini compatibility in 240GB ($230), 480GB ($400), and 960GB ($670) capacities.
Thankfully, earlier Mac minis are easier to open, requiring only a putty knife, Phillips #00 Screwdriver, and spudger. You can replace the hard drive, or instead remove the Mac’s SuperDrive optical drive, swapping the SSD in while preserving the original hard disk. This $19 Nimitz hard drive caddy is designed to fit 2009-2010 Mac minis.
The same sort of 2.5-inch internal and external drives can be used in the older Mac minis as on the iMac. While the 2010 Mac mini limits you to FireWire 800 or USB 2.0 — probably not worth the effort of adding an external SSD, for speed reasons — the 2011 model has a Thunderbolt port, and the 2012 version has USB 3.0 ports, making external SSDs more beneficial.
The Samsung T5 USB 3.1 SSD ($200/500GB) is a great choice if you have USB 3.0 ports; LaCie’s Rugged Thunderbolt + USB 3.0 SSD ($285/500GB) is a great pick for Thunderbolt.
Mac Pro: Internal + External SSD Options
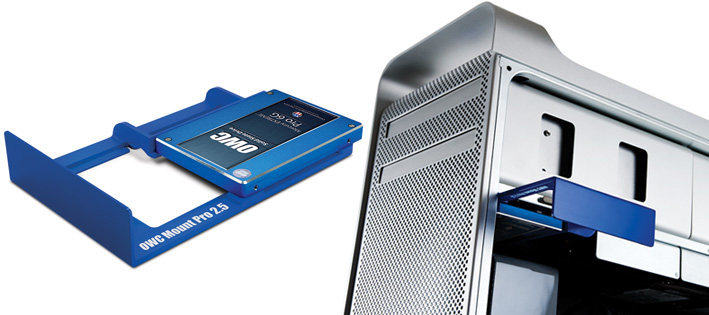
Current-generation (late-2013 design) Mac Pros ship with large, fast SSDs, making SSD swaps less critical. Regardless, Transcend will soon release the Mac Pro-compatible JetDrive 820, which promises up to 950MB/second speeds, and will be available in 240GB/$230, 480GB/$400, and 960GB/$670 capacities.
First-generation Mac Pros can definitely benefit from an SSD’s speed increase. As iFixit’s guide notes, the process of installing a first-generation Mac Pro hard drive is as simple as flipping a rear latch, pulling the Mac’s side panel and hard drive bay out, then using a Philips head screw driver to attach a hard drive sled to your new drive. But with an SSD, there’s another step: use the OWC Mount Pro ($23), which holds the tiny SSD within a custom-fit replacement for the Mac Pro’s hard drive bay.
The old Mac Pro’s physical size and multi-drive-ready internal architecture make it an ideal candidate for an internal SSD. But if you’re considering an external drive, you might want to think again; the aged model’s outdated USB 2.0 and FireWire 800 ports aren’t going to cut it.
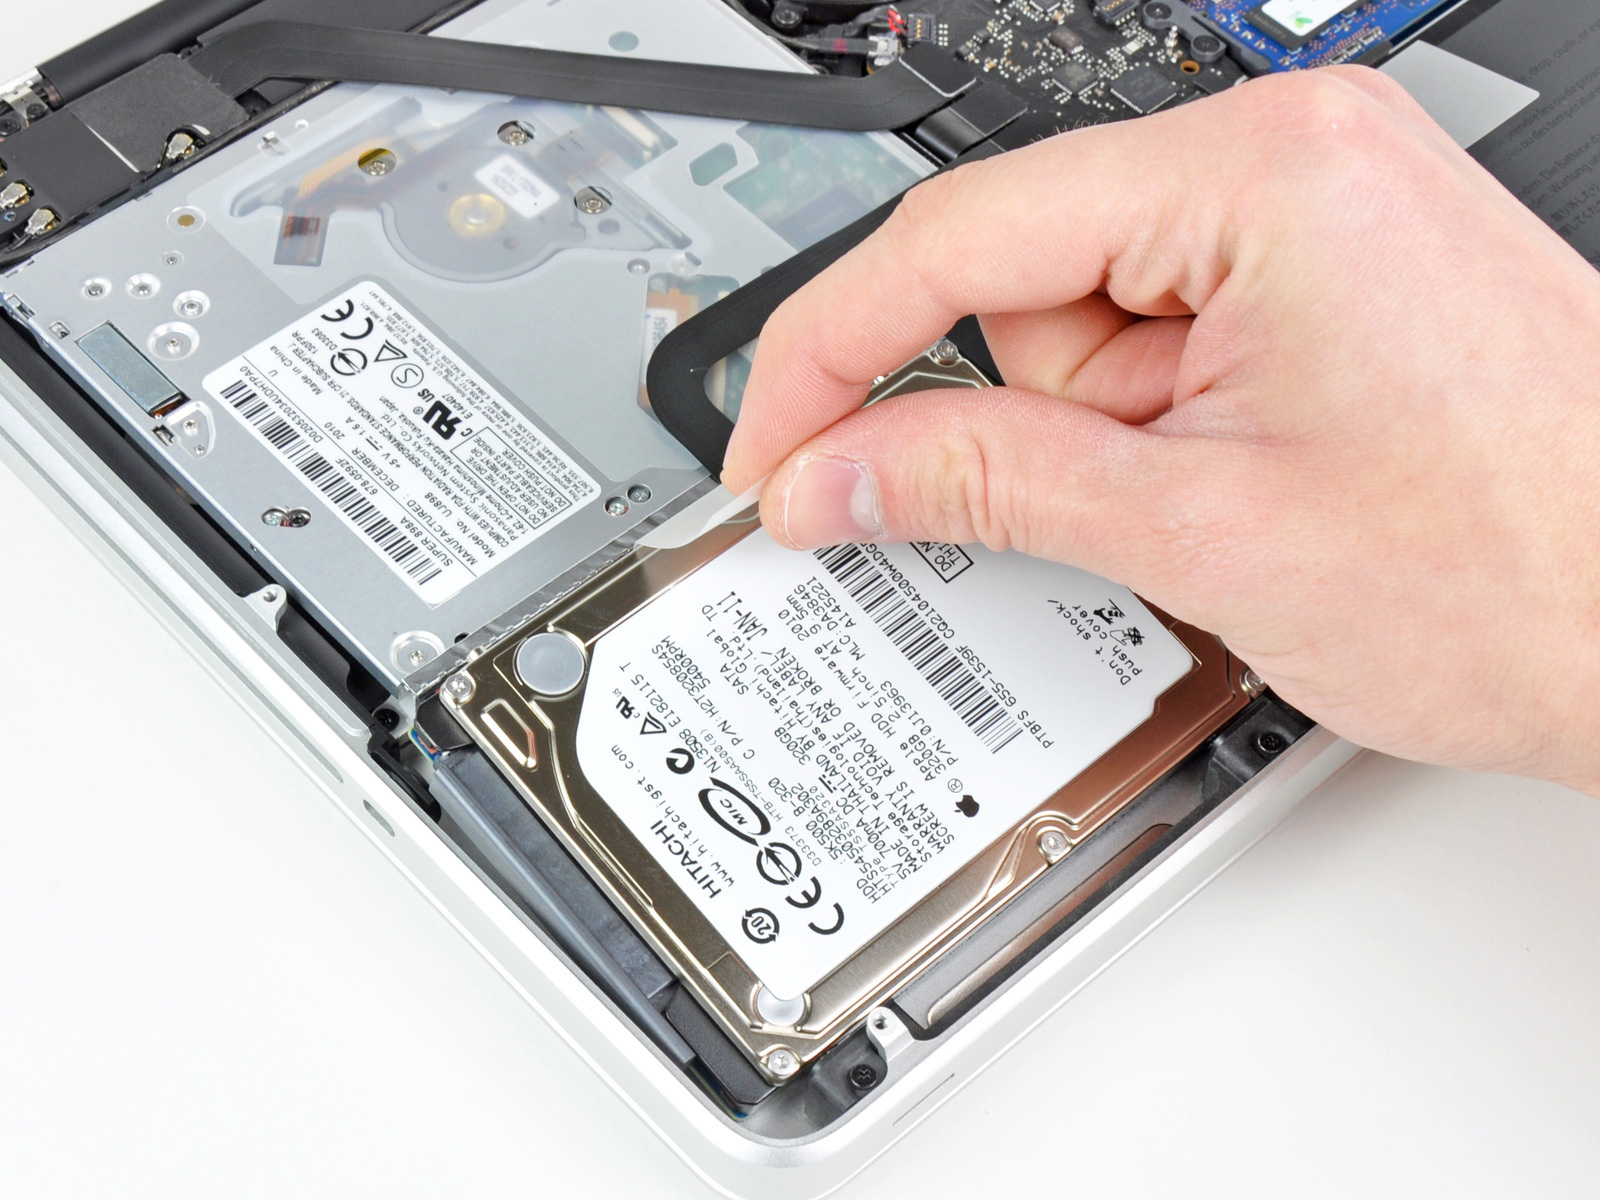
Old MacBook/MacBook Pro: Internal + External SSD Options
courtesy iFixit
Aluminum-bodied 13-inch MacBooks of 2010 or earlier vintage (not current 12-inch models) and MacBook Pros sold in 2015 or earlier can be upgraded with 2.5-inch internal SSDs. If you’re going to do an internal hard drive swap, the Samsung 850 EVO I previously recommended offers a superb combination of speed, reliability, and quality for the price.
As shown in these iFixit guides (MacBook Pro 13-inch 2009 / 2010 / 2011 / 2012, and MacBook Pro 15-inch), the hard drive swap process requires a Torx T6 screwdriver, one Philips #00 screwdriver, and a flat-head screwdriver (or spudger).
You just unscrew and remove the bottom cover of your MacBook, pull out the hard drive, replace it with the SSD, then reattach the bottom cover. It’s even easier for the short-lived 2008 metal MacBook, which has a pop-off bottom panel without screws for easier hard drive replacement.
If your MacBook has a SuperDrive, swapping it for an SSD is quite easy. iFixit publishes separate guides for the 13-inch unibody metal MacBook, non-Retina MacBook Pro 13-inch (mid-2010, early 2011, late 2011, and mid-2012 to 2015 model), the non-Retina MacBook Pro 15-inch, and MacBook Pro 17-inch, all of which involve one screwdriver, opening the bottom compartment, and disconnecting some connectors before reassembling the machine. To hold the new SSD in place within the former optical drive bay, this $9 ZXUY drive caddy works with the metal 13-inch MacBook and pre-Retina, pre-2012 13-/15-/17-inch MacBook Pros.
External options depend upon the ports your MacBook/Pro has, but again, you’re best off with the Samsung T5 USB 3.1 SSD ($200/500GB) if you have a free USB port, while LaCie’s Rugged Thunderbolt + USB 3.0 SSD ($285/500GB) will likely give you better speeds if you have Thunderbolt.
Retina MacBook Pro: Replacing Your SSD
There aren’t as many generations of the Retina MacBook Pro as there are for the MacBook Air, so the choice between SSDs is simpler.
- First-generation 15-inch Retina MacBook Pros (sold mid-2012 to early-2013) can use Transcend’s JetDrive 725 (240GB/$200, 480GB/$350-370, 960GB/$500), or OWC’s Aura Pro 6G (240GB/$170, 480GB/$280, 1TB/$516). Both come with the tools you’ll need to do the SSD swap, plus external enclosures. Expect 460-570MB/second speeds from these drives. [iFixit’s SSD replacement guide is here.]
- First-generation 13-inch Retina MacBook Pros (sold late-2012 to early-2013) can use Transcend’s JetDrive 720 (240GB/$210, 480GB/$370, 960GB/$500), or OWC’s Aura Pro 6G (240GB/$170, 480GB/$280, 1TB/$516). Both come with the tools you’ll need to do the SSD swap, plus external enclosures. Expect 460-570MB/second speeds from these drives. [iFixit’s SSD replacement guide is here.]
- Late-2013 to mid-2015 13-inch and 15-inch Retina MacBook Pros use newer SSDs with faster PCIe 3.0 connectors. Transcend’s soon-to-be-released JetDrive 820 promises up to 950MB/second speeds, and 240GB/$230, 480GB/$400, and 960GB/$670 capacities.
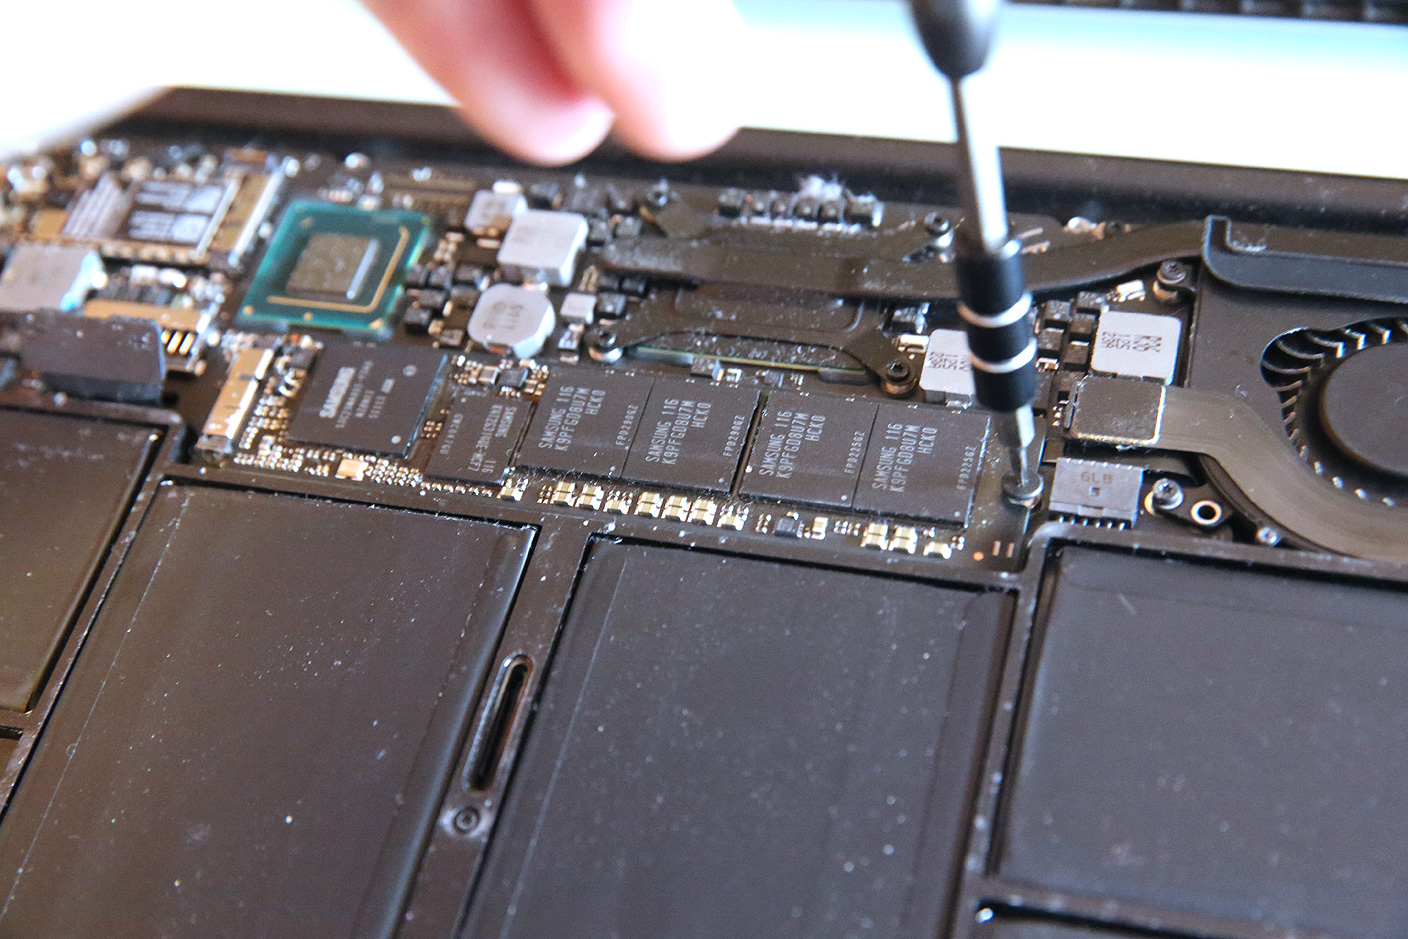
For the 15-inch Retina MacBook Pro, SSD replacement is virtually identical to the newer MacBook Airs: dead simple, with 10 undercarriage screws, a battery connector, and one interior screw to remove.
As noted above, the Transcend and OWC kits come with the screwdrivers you’ll need, as well as external drive housings to help you migrate your files. The original 13-inch Retina MacBook Pro requires quite a few additional steps; Apple significantly simplified the SSD replacement process for subsequent-generation 13-inch machines, bringing them to parity with the 15-inch model and MacBook Airs.
MacBook Air: Replacing Your Old Hard Drive or SSD
There are five key generations of the MacBook Air that use different types of solid state drives.
- First-generation 13-inch MacBook Airs (sold between 2008 and mid-2009) can be upgraded to a 1.8-inch SSD with a ZIF connector. On price, your best choice is a 64GB ($52) or 128GB ($84) KingSpec drive. Expect speeds in the 50-90MB/second range. iFixit’s guide to this MacBook Air can be found here.
- Second-generation 13-inch MacBook Airs (sold between 2008 and mid-2009) can be upgraded to a 1.8-inch SATA drive with between 120GB to 480GB of capacity. Other World Computing/OWC’s Mercury Aura Pro comes in 120GB ($125) or 480GB ($300) versions with promised read/write speeds in the 275-285MB range. iFixit’s guide to this MacBook Air is here.
- Third-generation MacBook Airs (11-inch and 13-inch, sold between late 2010 and mid-2011) use blade-style SATA III SSDs that look similar to RAM boards. The 240GB Transcend JetDrive 500 now sells for $232 on Amazon, with a 480GB model at $350, and a 960GB SSD at $690. They promise 460-570MB/second speeds. OWC’s Aura/Aura Pro series for this particular MacBook Air has had weaker reviews, but a 1TB OWC Aura drive for the same computer can be had for $494 through Amazon. iFixit’s guides for this 11-inch Air and 13-inch Air are here.
- Fourth-generation MacBook Airs (11-inch and 13-inch, sold starting mid-2012) should go with the Transcend JetDrive 520 models (240GB/$189, 480GB/$350, 960GB/$568), which promise 460-570MB/second speeds. iFixit’s guides for this 11-inch Air and 13-inch Air are here.
- Fifth-generation MacBook Airs (11-inch and 13-inch sold starting early 2013) switched to faster PCIe SSDs. Transcend’s soon-to-be-released JetDrive 820 is compatible with these and current MacBook Air models, promising up to 950MB/second speeds, and 240GB/$230, 480GB/$400, and 960GB/$670 capacities.
How easy is installation? Except for the older first- and second-generation MacBook Airs, the process is incredibly simple: you generally use a Pentalobe screwdriver to remove 10 screws from the Air’s bottom, then a Torx T5 screwdriver to unscrew one screw on the SSD, gently removing the old SSD, and then repeating the steps in the opposite direction to replace the screws.
This $8 JBtek kit includes both screwdrivers. Alternately, iFixit’s $30 64-Bit Driver Kit may be overkill for this particular situation, but it includes all the wacky screwdriver pieces you’ll need for other Apple projects.
The directions are more complex for Apple’s oldest 13-inch MacBook Air models: you instead need only a Phillips #00 screwdriver, but will have to pull 10 external screws, 13 internal screws, the full battery, and multiple cables before reaching the hard drive, then go in the opposite direction to close everything up. If you have one of these old machines, you’re probably best off seeking the services of a third-party Mac repair shop to do the SSD swap.
So, Can I Really Do This Myself?
After I published my first SSD swapping article, several commenters opined that they felt the upgrade was too difficult for regular people to handle on their own. In my opinion, reasonable people — given their particular skills, concern levels about technology, and Mac models — will differ on this subject.
I personally find 30 minutes of using a suction cup, screwdrivers, and tweezers a lot easier than remodeling a bathroom or changing a car’s tire. But you may feel otherwise, and some Mac models are more complex than others. There’s no shame in saying a particular DIY project isn’t right for you.
If opening your Mac isn’t up your alley, you have options. Amazon now offers an “Expert Installation” add-on for SSDs, currently priced at $100-$110 depending on city, with a promise that a technician will arrive at your location with “the right tools and experience to complete the installation quickly, correctly, and safely the first time.” Data transfer is also included in the price. You can add this to your cart at the time of SSD purchase.
Alternately, you can seek out a local Mac repair shop to do the hard drive to SSD swap. Be prepared to pay between $50-$100 (plus the cost of the SSD and possibly other parts), and transport your Mac to and from the shop in its original packaging to avoid damaging it in transit.
You’ll also want to make sure the shop has specific experience in Mac hard drive replacements, and is insured in the event something goes wrong, as these are the only potentially important differences between hiring someone else and doing it yourself.
Conclusions
From my perspective, adding an SSD to an old Mac is the best investment you can make to keep it going; you’ll begin to notice how much faster it is pretty quickly after the installation process is complete. The machine will resume from sleep instantly, reboot in seconds, and load apps as if they’re tiny. Large photo libraries will scroll with zips rather than chugs, and finding files will be a snap.
Until there’s a major breakthrough in macOS software development that demands a substantially better CPU or GPU, your old Mac will be a viable (and faster) daily driver — not bad for only $150 or so.
Check out 9to5Mac on YouTube for more Apple news:
FTC: We use income earning auto affiliate links. More.


Comments