
My Mac is now silent. After installing a solid state drive (SSD) with no moving parts, the drone of my iMac’s hard drive and fans has given way to such an absence of sound that I only hear the high-pitched squeal of my office lights.
My Mac is now fast. Even with 400GB of available space, OS X Yosemite’s constant hard drive accessing had brought my quad-core, 3.4GHz Core i7 machine to its knees. Now I’m seeing five times the hard drive speeds, apps are loading instantly, and my iMac feels as responsive as the MacBooks and iPads that beat it to the SSD game.
Last week, buoyed by (finally!) reasonable SSD prices and a desire to try a DIY project, I walked through the steps to replace a prior-generation iMac’s hard drive with an SSD. Similarly excited readers have pointed out that older MacBooks and certain other Macs are also easy to upgrade… but at least one Mac (surprise: the Mac mini) is not. So below, I’ll show you some great SSD options that you can install yourself, ask a tech-savvy friend/repair shop to handle for you, or choose as external solutions.
The Big Picture
It’s hard to believe, but back in 2008, Apple offered a 64GB solid state drive upgrade to the original MacBook Air for a whopping $1,300 premium over the laptop’s normal price. At that time, a consumer 1TB drive cost around $4,000, and Apple wasn’t even attempting to sell one.
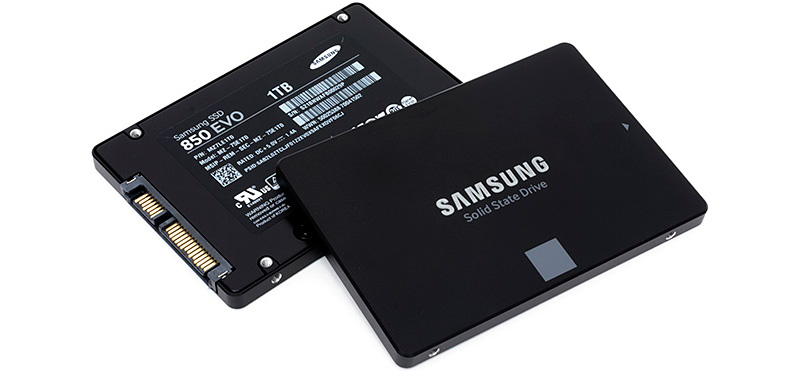
A lot has changed even over the past year. SSDs are faster, more reliable, and a lot more affordable. Today, excellent quality SSDs start at $60 (120GB), climbing to $120 (250GB), $231 (500GB) and $420 (1TB) — still not as cheap as traditional drives, but better. The Samsung 850 EVO I installed in my iMac is 5 times faster than the 1TB hard disk it replaced and has no moving parts, so it’s tiny, silent and cooler-running. It also has a five-year warranty and a longer expected lifespan than most hard drives; if you’re willing to pay more, the 850 PRO version has a ten-year warranty that eclipses all but the most expensive enterprise-class desktop hard disks.
Internal or External?
Although performance will vary based on the specific Mac you’re upgrading with an SSD, Macs released over the past five years will likely see bigger gains if you replace their internal hard drives rather than adding SSDs as external drives. A new SSD inside an older iMac, MacBook, Mac mini, or Mac Pro will lead to much faster OS X performance, app loading, restarting, and file accessing. But if you buy an external SSD and connect it using something faster than USB 2 or FireWire 800 — say, a spare Thunderbolt or USB 3 port — you’ll see definite speed improvements for whatever files and apps you place on the SSD.
My personal advice would be to consider an internal solution, if possible following a DIY hard drive replacement guide like the ones linked below. If you’re concerned about damaging your Mac during the replacement process, you can opt to have a tech-savvy friend or local Apple repair store handle the SSD replacement for you. And if you prefer an external drive — and don’t mind cutting the performance benefits down somewhat — there are some good, though more expensive options below.
MacBook/MacBook Pro: Internal + External SSD Options
courtesy iFixit
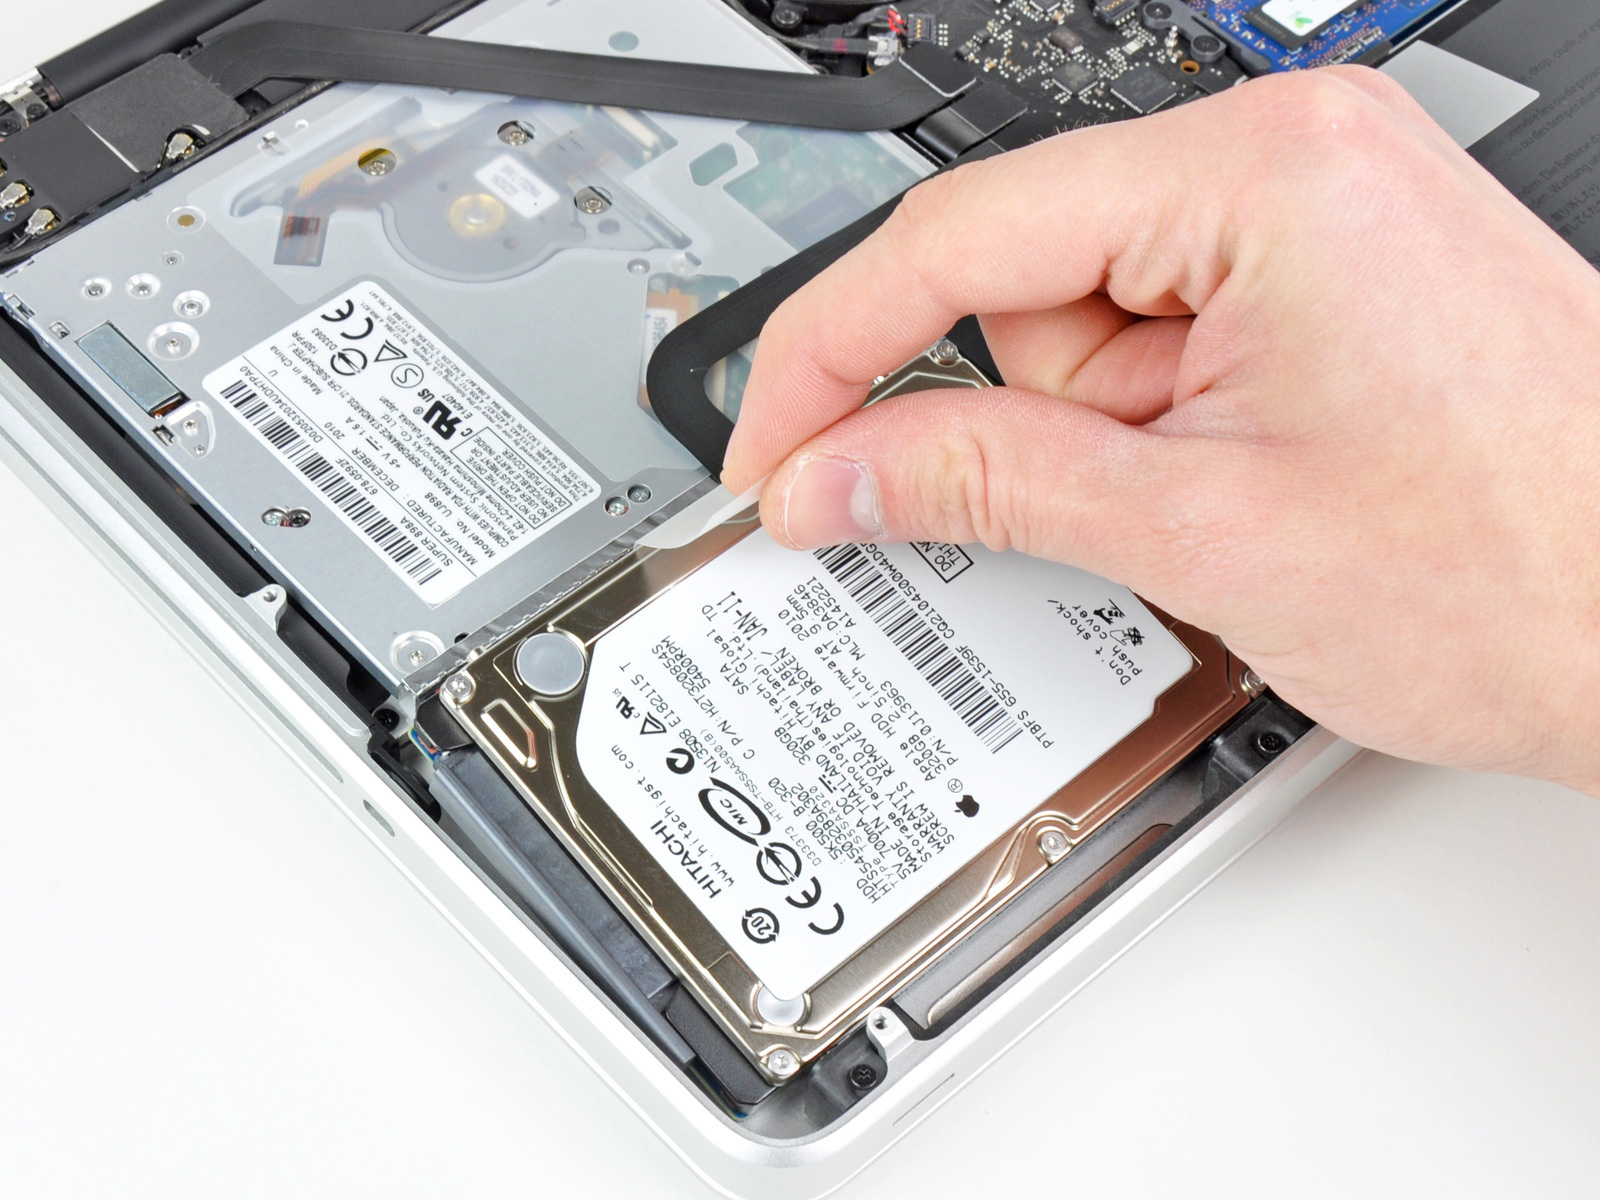
Aluminum-bodied MacBooks and MacBook Pros made in 2012 or earlier can be upgraded with 2.5″ internal SSDs, including the Samsung 850 EVO I carefully selected for my iMac. As shown in these iFixit guides (MacBook Pro 13″ 2009 / 2010 / 2011 / 2012, and MacBook Pro 15″), the process requires little more than one Torx T6 screwdriver, one Philips #00 screwdriver, and a flat-head screwdriver (or spudger) to accomplish. It’s even easier for the short-lived 2008 metal MacBook, which has a pop-off bottom panel for easier hard drive replacement.
Replacing the hard drive of the unibody MacBook Pro requires only a handful of steps: backing up your old drive (preferably using Time Machine), removing the bottom cover of your MacBook using Torx screwdrivers, removing the hard drive, replacing it with the SSD, then reattaching the bottom cover. For a variety of reasons, it’s even easier than the iMac hard drive swap I discussed in my prior article, and all you need is the screwdriver, the SSD, and the confidence to do it yourself.
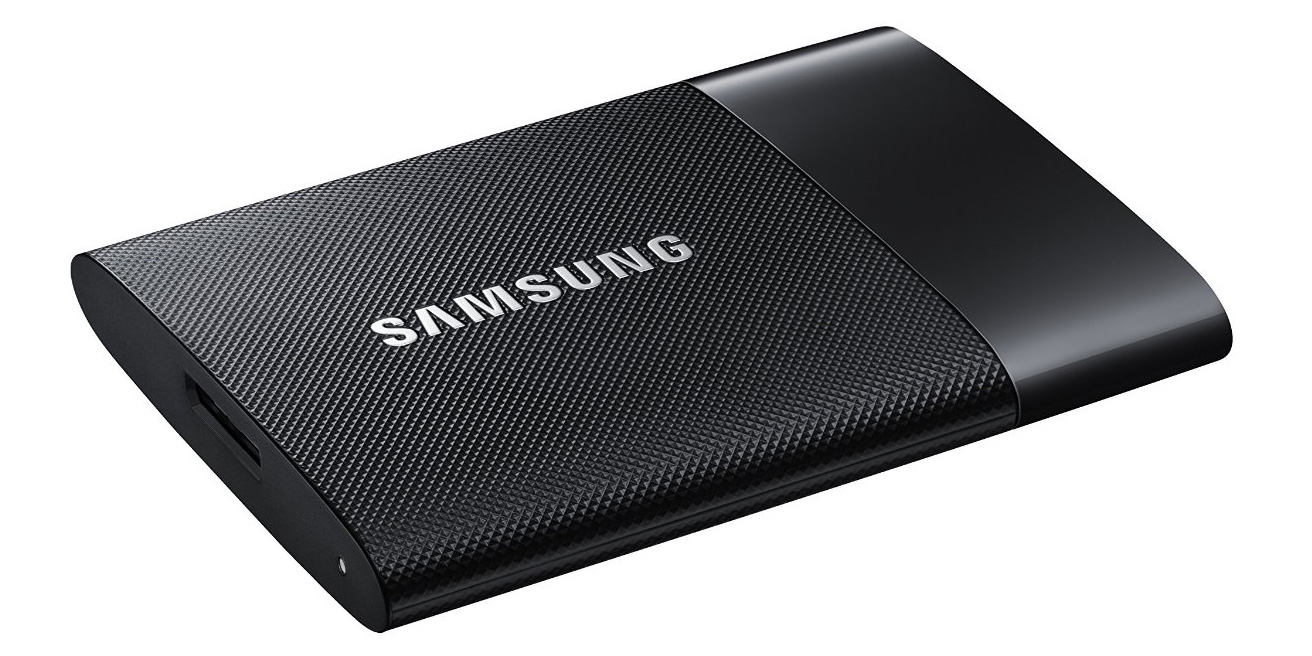
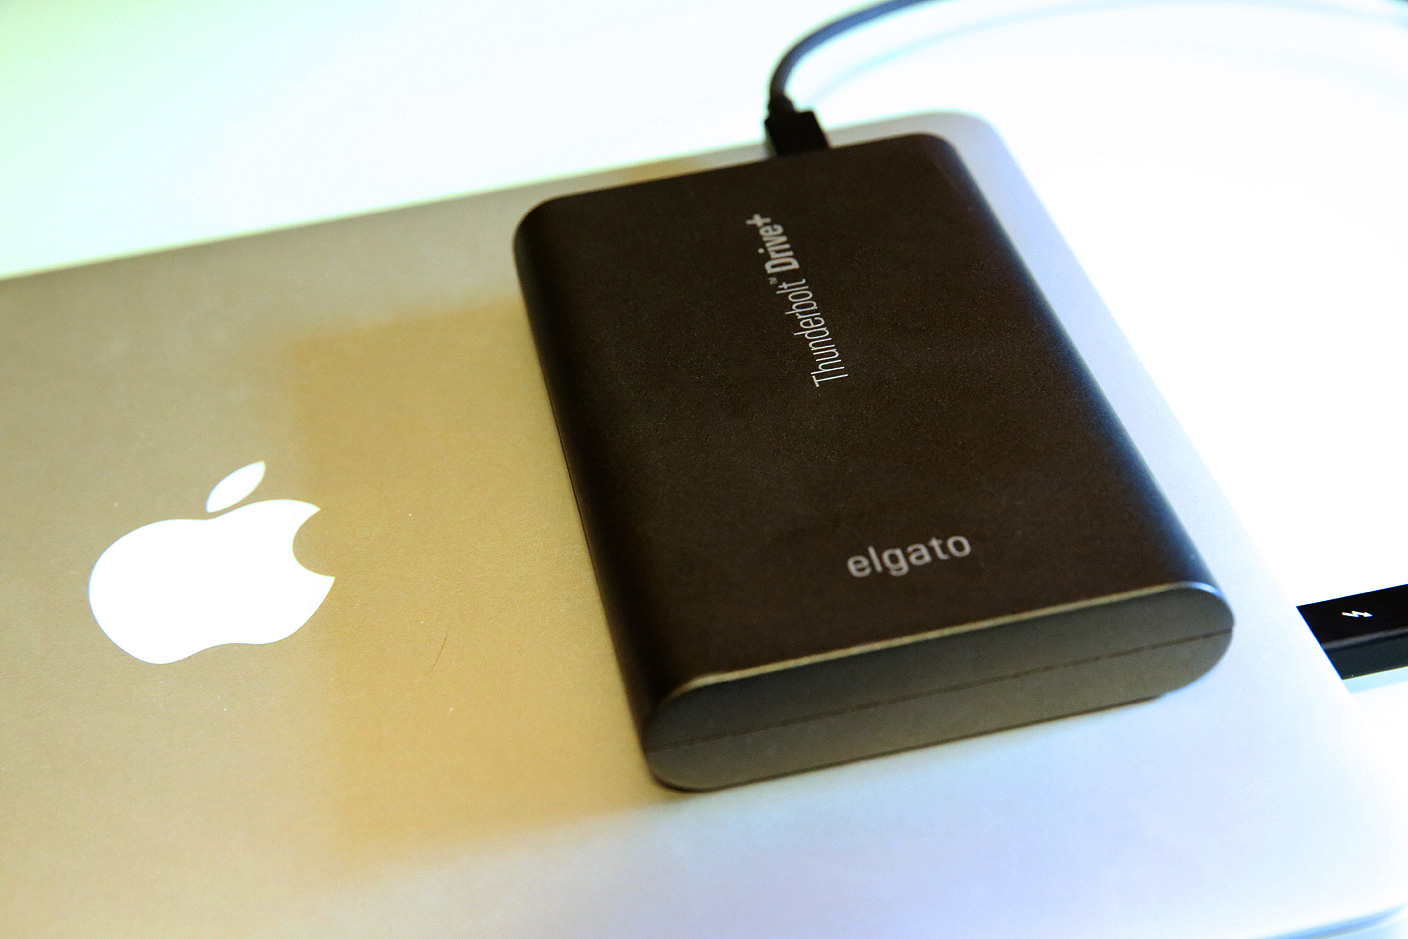
If you’re going to do an internal hard drive swap, there’s pretty widespread agreement that the Samsung 850 EVO ($60-$420) I previously recommended offers a superb combination of speed, reliability, and quality for the price. It has a 4.7/5-star rating on Amazon, versus the 850 Pro, which sells for more ($98-$555) and has a 4.8/5-star rating. By contrast, the most popular portable external SSDs right now are Samsung’s new USB 3.0-based T1 (250GB/$174, 500GB/$300, 1TB/$569, shown above), with 4.5/5-star ratings. If you’re willing to spend quite a bit more and have a free Thunderbolt port, Elgato’s Thunderbolt Drive+ (256GB/$425, 512GB/$780) has Thunderbolt and USB 3.0/2.0 interfaces.
Mac mini: Internal + External SSD Options

courtesy iFixit
Internal SSD replacement for the 2010 to 2014 “unibody” Mac mini requires considerably more effort and skill than doing so for the MacBooks and iMacs. You’ll need to disassemble the Mac mini’s chassis, fan, and antenna plate before disconnecting the logic board and hard drive — with steps that become even more challenging on the most recent 2014 models. My suggestion would be to leave an internal drive upgrade of this model up to a professional.
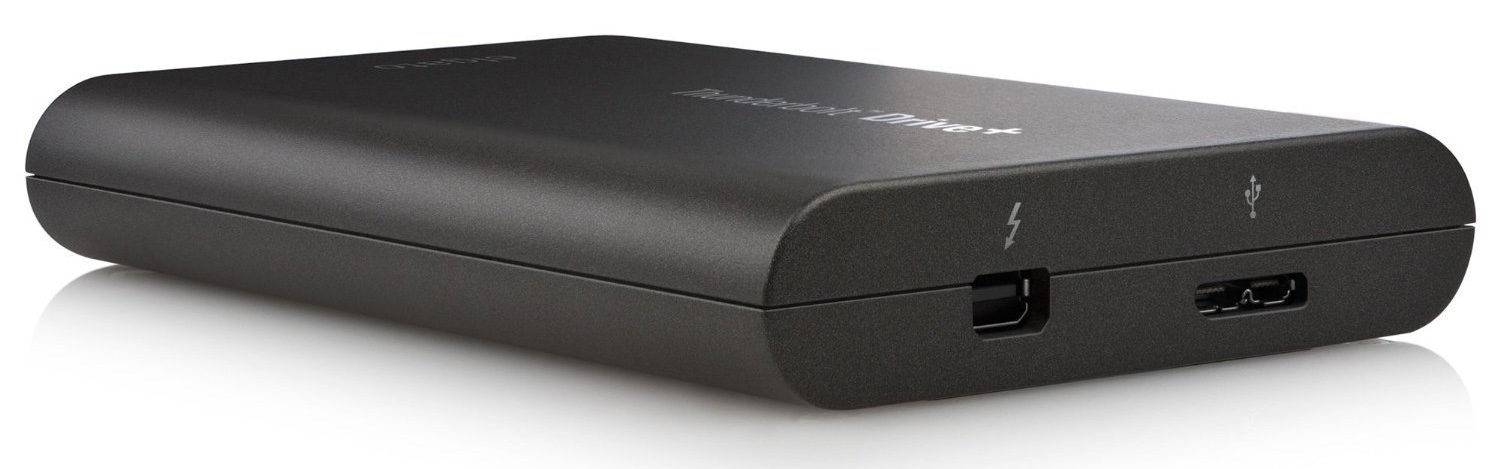
The same sort of 2.5″ internal drives can be used in the Mac mini as on the other Macs. While the 2010 Mac mini limits you to FireWire 800 or USB 2.0 — probably not worth the effort of adding an external SSD — the 2011 model has a Thunderbolt port, and the 2012 version has USB 3.0 ports, making external SSDs easier to add. If USB 3.0 is an option, go with Samsung’s T1 (250GB/$174, 500GB/$300, 1TB/$569). Thunderbolt-only users can consider Elgato’s professional-class Thunderbolt Drive+ SSDs, which just dropped in price: OWC offers them for $368/256GB or $628/512GB. Covered in aluminum housings and fully port-powered, these drives are the rare SSDs with a Thunderbolt interface, also including USB 3.0 and 2.0 compatibility. They have rare 5/5-star ratings on Amazon, where their prices are significantly higher (256GB/$425, 512GB/$780).
Mac Pro: Internal + External SSD Options
Current-generation Mac Pros ship with large, fast SSDs, making replacements highly unlikely for the time being, but first-generation Mac Pros can definitely benefit from the speed increase. As iFixit’s guide notes, the process of installing a new drive is as simple as flipping a rear latch, pulling the Mac’s side panel and hard drive bay out, then using a Philips head screw driver to attach a hard drive sled to your new drive.
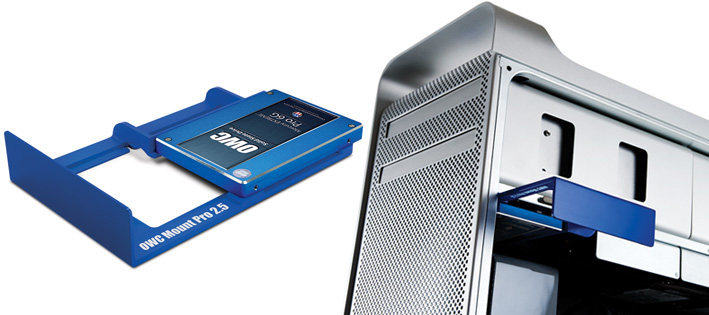
But with an SSD, there’s another step: you’ll need a 2.5″ to 3.5″ hard drive adapter bracket such as NewerTech’s AdaptaDrive ($15) to mount the tiny SSD inside a large hard drive bay. The company also sells the OWC Mount Pro (now only $18), which lets you mount the SSD on a custom-fit replacement for the Mac Pro’s hard drive bay. This is an easier solution, and the one I’d pick if installing an SSD in the Mac Pro.

The Mac Pro’s physical size and multi-drive-ready internal architecture make it an ideal candidate for an internal SSD. If you’re considering an external drive, you might want to think again. The built-in, outdated USB 2.0 and FireWire 800 ports aren’t going to cut it, and users have reported very mixed experiences adding USB 3.0 cards — somewhat better results with more expensive ones such as Caldigit’s FASTA-6GU3 Pro — to this computer. My advice would be to stick with an internal solution.
iMac: Internal + External SSD Options
I’ve discussed the iMac in much greater detail in my prior article, but the internal and external SSD recommendations are basically the same as for the MacBook Pro: the Samsung 850 EVO ($60-$420), Samsung 850 Pro ($98-$555), Elgato Thunderbolt Drive+ ($368/256GB, $628/512GB), or Samsung T1 (250GB/$174, 500GB/$300, 1TB/$569).
All Macs: Preserving Your Software (If You’re Replacing An Internal Drive)
Preparing your Mac’s old internal hard drive to be replaced is pretty easy. You can run a complete Time Machine backup to an external drive (preferably one that’s connected with a cable rather than over Wi-Fi), or complicate the process somewhat by using a complete drive cloning app.

In my opinion, going the Time Machine route is a better idea when starting fresh with an SSD, and it costs nothing. After backing the drive up, you just turn off and unplug your iMac, swap the drives, then hold Command-R down on the keyboard when first restarting your Mac. Any recent version of OS X will boot into Internet Recovery mode, enabling you to use Disk Utility to format the SSD (choose Mac Extended + Journaled), then restore directly from your Time Machine backup. The restoring process will take hours, but you’ll come back to a fresh installation of OS X with everything pretty much as it was left on your old drive.

If you want to go the more complex route, you can order this $13 (reg. $16) USB 3.0 to 2.5″ SATA III Adapter Cable, connect it to your iMac and SSD before opening up the machine, and run SuperDuper or Carbon Copy Cloner to transfer the old drive’s contents to the new drive. This will let you start using your iMac right away after the drive is swapped, without waiting hours for Time Machine, and for better or worse pretty much guarantees that every one of your files (and potentially plenty of cruft) will be exactly where it was before.
Should you want to swap an optical drive for an SSD, or add an SSD to a Mac Pro’s empty drive bay, nothing needs to be done to prep software beforehand. Backing up your Mac is always a good idea before opening it up, but all you’ll need to do after the SSD installation is run OS X’s Disk Utility and format the new drive.
What About Trim?
A number of readers have asked about Trim support for third-party SSDs, a topic that’s both important and potentially somewhat confusing. Trim — automatic recycling of SSD space freed up by deleting files — is a background task performed by your Mac. It’s handled in the background by OS X, though for reasons unknown, Apple generally provides Trim support only for its own drives.
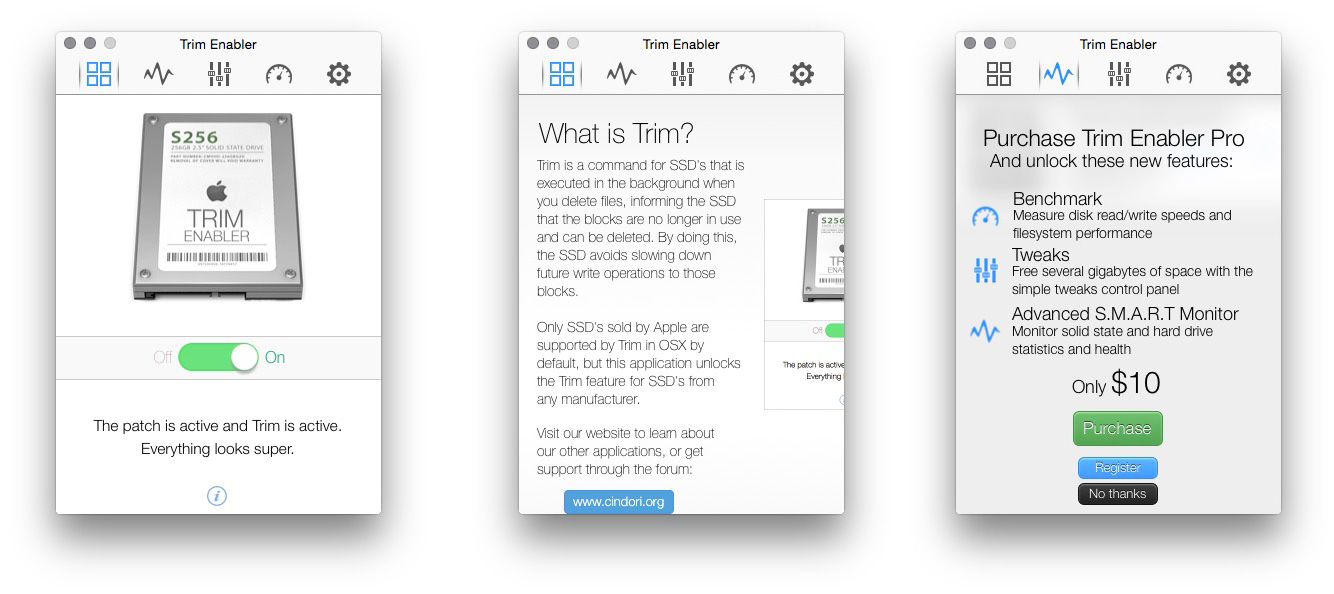
Cindori’s free application Trim Enabler (Pro version $10) enables Trim support for third-party SSDs under OS X, including the latest 10.10.2 and 10.10.3 versions. Please note, however, that Trim Enabler must be turned off each time you do a OS X system update (say, from 10.10.2 to 10.10.3); if you forget, you’ll see a gray box when the machine tries to reboot after an update, and you’ll need to follow these instructions to make the machine work properly again.
Conclusions
Whichever option you choose for your Mac will yield significant dividends. With an internal drive, 3X to 5X speed improvements across apps and other files are typical with SSDs of the caliber recommended above; using an external drive will deliver a nice improvement for whatever files you store on it. There’s no better (or more cost-effective) way to speed up an old Mac today.
FTC: We use income earning auto affiliate links. More.


I’m getting a Macbook. I can’t wait bc this will be a learning experience bc up til now I’ve had PC. I am definitely up for the challenge! :D
Maybe the price has come down enough. When I looked at this idea not long ago,I realized I wouldn’t solve the graphics problem of having a late 2009 iMac and trying to make use of the latest editions of Photoshop, etc. It might just be too long a wait for an upgrade.
Once you install the new hard drive, how do you install the OS?
Once you run the setup it will give you an option to format the drive. If you are not sure how to do that, just format the drive to Mac Journal before installing the drive.
If you’re on a recent version of OS X, just hold Command R when rebooting the machine, format the SSD, then restore from a Time Machine backup.
Very useful piece. OWC has some nice videos on installing SSDs for people who like those kinds of demos. I first installed one in a TiBook a while back and once you go SSD, you don’t go back to HDDs as primary boot drives.
I must say though, Apple’s fusion drives in iMacs are quite fast and are a nice “best of both worlds” solution for those who need lots of storage and want more speed than an HDD will afford.
I considered upgrading my Early-2011 Macbook Pro (Model: MacBookPro8,2) using a Samsung SSD. However, I couldn’t find any specific compatibility information so I called Samsung’s Customer Support line. The individual I spoke to told me that he couldn’t recommend installing any of their SSDs in a Mac because Apple doesn’t support the “Trim” feature and without it the SSD would eventually fail. In short, he talked me out of it.
I use a Samsung SSD on my OS X Mavericks mac mini. There’s a really inexpensive Trim enabler software called “Trim enabler” (go figure) which I use. Take a look at their website. I’ve heard it was trickier to make it work on OS X Yosemite but they seem to have solved it: http://www.cindori.org/status-of-trim-enabler-in-yosemite/
You didn’t mention TRIM not being supported on third party SSDs under OS X 10.10. What is the solution for that?
The only solution to the lack of TRIM support via TRIM Enabler with OS 10.10 is to disable kext signing. The author of TRIM Enabler says so, and he calls the disabling of kext signing “taking a sledgehammer to crack a nut”.
Jeremy (the author of this series) is obviously completely ignoring the lack TRIM in Yosemite with third-party SSD drives, as many others do. This will come back later to bite him when the write speeds slow down significantly because of the lack of TRIM. It will probably still be faster than a spinning drive, but the benefits of the SSD will be mostly lost at least when it comes to writes.
Unless you want to disable kext signing in OS 10.10 (Yosemite), go with Apple-branded SSDs, which are available on eBay. I would suggest building a DIY Fusion Drive using the existing spinning drive and an Apple-branded SSD (120 GB SSD should be just fine), which is possible with MacBook Pro and Mac Mini, and probably also with Mac Pro (but probably not with iMac due to the lack of space to accommodate two drives).
There’s also a European company that manufactures SSDs that fake their GUIDs to make them look like Apple-branded drives, which allows Yosemite to enable native TRIM support with these drives. Google “yosemite ssd trim support drives” and you will see that company half the way down the first page.
It’s not complete ignorance, rather it’s a question of whether to raise a topic with readers that will lead to a lot more confusion and potentially serious problems (inability to boot after system updates) than it’s worth.
There’s no ideal alternative right now for pure SSD users (unless you consider paying a $200 premium for a GUID-faked drive from an unknown company to be a good idea). My personal perspective: unless you are likely to forget to disable and reenable TRIM support every time you do a system update, it’s probably best to get the TRIM Enabler software and use it. But it seems a lot of people do forget to disable/reenable, causing the boot issues, so for the time being they would be better served to hold off on using TRIM Enabler and await a proper Apple solution, which is obviously overdue.
TRIM enabler works fine, and after updates it pops up to let you know that you need to turn it on again. Had a Samsung 840 evo in my machine for the best part of a year. Cloning a dual boot system was a pain in the balls but I added a year of life to the computer. My mid 2011 MBP does run hot with fan on high during CAD and other processor/gpu intesive tasks, so dont be surprised if this happens. I guess the extra speed of the SSD makes the machine work hard (lets hope the GPU stays stuck down this time).
Thanks for posting!
Jeremy’s posts inspired me over the weekend to make the switch. I overnighted from Amazon a 500GB Samsung Pro SSD for my 2011 iMac and the tools to open it up but chickened out. Yesterday, I ordered a RocketStor Thunderbolt drive dock, which surprised me by showing up today. Just put the two of them together, cloned the drive, and booted from it a few minutes ago. According to Blackmagic, I am now hitting 368 write and 453 read. This is definitely like getting a new computer. Everything is so much faster. If you are like me and are scared to crack your mac open, this is a great way to proceed.
Picture of my setup. Will stick it in my storage cabinet later on.
/Users/matt_moss/Desktop/RocketStor.jpg
Hello. How do you feel about the Fusion Drive solution for adding SSD speed with HD storage at a low price. Is there some specific reason that going SSD is a better option? A 2TB Seagate SSHD is $100 on Amazon, for example.
I have replaced drives before but never on a mac. How do I use the time machine backup to boot the new drive?
To extend your updates beyond things like the SSD card, check out http://www.detoxyourmac.org. I work from home, it is great, but even if it is from home it is still work and it still needs to get done. So my Mac, I have it because it is fast, gets the job done and comes back for more. This will prevent that from ever stopping.
Thank you for this article. I went through a similar exercise last year with a 2008 iMac. My tips and links are here: http://www.mpainesyd.com/filechute/BOOT_OSX_SSD.pdf
In particular, booting off an external drive works well but there are several steps to set it up correctly.
http://www.cindori.org/software/trimenabler/ looks like a solution to the TRIM issue is just $10
Yup. You don’t even need to pay $10, the free version enables TRIM perfectly fine – the $10 version just adds extra features like the ability to test read/write speeds.
The only thing to be aware of is that every 10.10 update turns TRIM off again. But the app recognises this and pops up telling you to turn it on again – easy.
We who have discovered OWC Data Doubler years ago think this somewhat late to write about. For new MBPs there is unfortunately nothing to other to keep an external SSD disk in a thunderbolt casing.
Can you install an SSD to a black MacBook? Or is that too old of a laptop to install?
I want this answer as well…I have the final version of the black MacBook and would love to update that bad boy…
You can install one in just about any system. The speed benefits will vary depending on the speed of the interface between the drive and the computer. There are even IDE/PATA drives out there for 8-12 year old systems. If you’re getting one for an older system, you may not want to get the latest and greatest drive, as the system won’t benefit from its increased speed.
It is great and i did it to my mac mini and its a major improvement
I added my 2011 iMac using a Seagate GoFlex Thunderbolt Dock. It’s an external bay that connects to your Thunderbolt port and accommodates any standard 2.5″ SATA drive. I simply added a 120GB SSD to it. Works great, and I love knowing that once larger size SSDs become more affordable I can simply swap out the drive on the dock without having to take anything apart.
OW also offers, for MacPro users, the Mercury Accelsior_E2 , a PCI express based solution.
http://eshop.macsales.com/shop/SSD/PCIe/OWC/Mercury_Accelsior/RAID
I think I recall there was also a method of using the second optical drive bay of an SSD, but suspect it require some wiring skills and may not have worked as a boot drive.
Follow up to my previous post. Halfway down this page are instructions for installing SSD in the Mac Pro’s second optical drive bay.
http://macperformanceguide.com/Mac-InstallingSSD.html
This applies to the 2009 and newer models and is pretty simple. Further down on the page deals with earlier models. Moving ones iTunes library to another drive is something many of us have already done. but you can also move the Home folder, freeing up space on the SSD and perhaps saving some money. SSD really only needs System, Library and Applications. Moving Home folder instructions:
http://www.jcsenterprises.com/Japamacs_Page/Blog/00E03B83-1ADA-406E-A940-396D39F598EA.html
If you’re using an SSD that doesn’t need OS TRIM support, like the OWC SSD or the Samsung 850 Pro series, then there’s no need for the TRIM enabler. Before you purchase, consider this and the advantage of not having to complicate your setup.
Hi Nosiycrow, so i have a MacPro mid 2012 and just purchased the 850 Pro 1TB and sled. I am planning to backup pc on time machine, remove primary boot drive, insert ssd, hit command-r when starting, format drive and then restore from time machine back up. This should work right? If so, why is everyone talking about trim and enabler etc?
Thanks!
For MacBook Pro users on all models of 2011 (and I think up to 2014???) considering using OWC Data Doubler solution with SSD plus spinning drive in the case as well. A little known youtube offered by OWC shows what you need, the tools you need, how to do it, and all steps in getting the MacBook Pro up and operating. It is about a 30 min job (after you have backed up the computer) See: http://youtu.be/Ou-heXnkPP4?list=PLA0228B8FB5B9E0D6
My early MBP 8,2 has a 240 GB SSD + 750HDD. I removed the optical Super Drive and enclosed in a separate OWC case. Good luck, the results are well worth it
I did the same upgrade, can’t recommend it enough. I did it a while ago when it was $80 for a 120GB SSD and have since upgraded to a 250GB EVO. For even more, upgrade the RAM. My MacBook Pro is way faster than it was when I bought it. Boots in 12 seconds and Photoshop opens within 2 seconds compared to at least a minute on a HDD.
Hello,
Just installed 240GB SSD to my MacBook described before (hold Command-R down on the keyboard when first restarting your Mac. Any recent version of OS X will boot into Internet Recovery mode, enabling you to use Disk Utility to format the SSD (choose Mac Extended + Journaled), then restore directly from your Time Machine backup.)
Sorry but this is not working as is giving me a QUESTION mark after holding R-Command. So I put the Installer CD and choose to do it from BackUp but the SSD is not recognized at all?! Everything is connected right (I tried this with MacBook and MacBook Pro).
Not sure at this point how this gonna work…
Any advice?
My mistake. Instead 240GB/3GB, I bought 240GB/6GB, which is not compatible with older Macs. So be sure to check compatibility first. ;)
It should be backwards compatible. You do need to format it properly for the drive to be seen as viable. Use Disk Utility, format to HFS+ journaled and make sure the Partition Map is GUID.
Anybody tried/had success replacing the optical drive with the old harddrive on a 2012 MBP? I want to do a 120gb SSD as a boot drive and use the old drive for storage but internally.
Suggest you use the OWC data doubler solution. Follow the instructions in the YouTube video I set out in comments on Feb 19
Do I need to be concerned with installing an in-line digital thermal sensor like you mentioned in the previous article about iMacs? I am working with a late 2011 MacBook Pro and I wasn’t sure if I’d need to install this as well. If so, how do software alternatives (smc fan control) compare to installing a sensor? Thanks!
hello guys,
I am considering to upgrade my iMac 27″ 2010 model i already have 12 gb or ram now want to get the 850 EVO will this new drive really speed up my applications open and closing them?
thanks,
joe
I just bought 2015, mac air with 128gb. I already can tell its gonna be tight. I am trying to see if its worth buying the 256gb one for 200 dollars more. I want around 250-500GB on it. What would be the the best method, as I like having the air I do not want nor need the pro, and external hard drives are an option for me. Price is a major factor as well.
I have been using a crucial ssd for a couple of years, enabling Trim with the free app, but when upgrading to Yosemite, my Macbook (2009) would grind to a halt in a few weeks, making it unusable, so I gave up on Yosemite, for about 8 months, but just this week I decided to go back to my original shipped HDD, Yosemite now runs like a dream, so might be worth considering before shelling out money on a new drive, just a thought, its possible of course to install an SSD and enable Trim, but it could all go wrong and not boot at all if Apple decide to update and mess up the Trim/Kext settings…
It’s a great feeling to restore life to a machine that you have left for dead because of hard disk sclerosis. I did this using the iFixIt hybrid drive and my machine is acting like it’s brand new. Well worth it. I also used the iFixIt toolkit which Jeremy has previously recommended.
Is Trim Enabler required for a Hybrid Drive? Does anyone know? I have a 1 TB iFixIt drive. Thanks.
Replaced my Mac OEM Hitachi drive with an SSD two days ago, but the Time Machine restoration was uneven: some files were from earlier in 2015 (July, October), some were current. I’m not aware of having chosen a particular backup set at any point. I manually restored files from Time Machine, but was not happy to do so. Operator error? Time machine flaw?
On the plus side, the upgrade is much much faster, and I am very happy with it and the additional storage.
I got a brand new 240gb sandisk ssd and I am just going to replace a failed hdd on my mac mini 2012 – will I need to format the new disk first? Cheers…
If I install the Samsung Evo 850 250gb on my 13″ macbook pro 2010 will it work? I’ve researched that this SSD with Sata III is backwards compatible to Sata II and I understand that the speed will be limited Sata II. In AUS, the Samsung EVO 850 250gb is currently selling for $130AUD and the alternative by OWC are selling their OWC Mercury Electra 3G SSD 240GB for $180AUD.
Hello friends!
Recently I purchased a Samsung 850 EVO 1TB SSD to use in my 13″ mid 2010 Macbook Pro (running OS version 10.12.2, 2.4 GHz Intel Core 2 Duo, 16 GB 1067 MHz DDR3) and the drive would not mount, neither with the SATA cable (which, forgive my ignorance, I think is the internal cable that connects an HD to the motherboard) nor an external drive adaptor. The hard drive my Macbook came with, however, is recognized by both.
I sent the SSD back to Samsung stating it did not work, received another and had the same problem. From what I can understand based on what I’ve read, these SATA cables are delicate, and even if they work with older drives, they may not be compatable with something like the Samsung 850 EVO. Contrarily, I’ve also read the Samsung 850 EVO should work perfectly with my Macbook.
If anyone could offer advice, I would greatly appreciate it!
Thank you kindly.
I tried the Samsung and it didn’t work with my mid 2010 Mac Pro 5,1 West so I bought a Crucial 512 solid state compatible with 3 gps and I now have it, two 4 tb regular drives, and my old 250 mb solid state working the four inside slots, and a 5 tb and 4 tb connected by usb on my desk outside the main computer. I use the 5 tb for backup. So that gives me about 8.8 tb inside the computer, and nine outside. I run 32 gb ram and 10.11.6 el capitan.