I’ve been wanting to do a series on iPad video editing for some time, and I feel that time is right with the maturation of LumaFusion into a powerful app for editing videos on iOS. LumaFusion, as I’ve stated in the past, is the most comprehensive video editing tool available on the platform, and should be the choice for anyone who’s seriously into editing videos via iPad on a recurring basis.
In this initial walkthrough, I step through many of the basic project settings in LumaFusion. This includes creating a new project, adjusting basic preferences, renaming, duplicating, deleting projects, and so on.
By the end of this tutorial, you should have a firm grasp on how to use projects in LumaFusion, which will adequately prepare you to tackle other basic areas of the app, including managing the timeline and source viewer. We’ll be back soon with additional LumaFusion tutorials, with the goal of eventually establishing a full comprehensive video-driven guide to the app.
Table of contents
- Video walkthrough
- Who should buy LumaFusion?
- Who shouldn’t buy LumaFusion?
- Compatible devices
- How to find help and support
- How to toggle touches
- How to create a new project
- How to get back to the project viewer
- How to preview a project
- How to rename a project
- How to change project settings of current project
- How to change global project settings
- How to duplicate a project
- How to delete a project
- How to add notes to a project
- How to change project color tags
- How to sort your projects
- How to search your project library
- How to export a project
- How to import a project
- Getting familiar with the layout
- How to adjust the layout
- Conclusion
Video walkthrough
Subscribe to 9to5Mac on YouTube for more tutorials
Who should buy LumaFusion?
LumaFusion is for anyone who needs an advanced multitrack video editing app on the iPad or iPhone. It’s not just that you can create 4K projects with multiple video and audio tracks, it’s that you can edit these videos using advanced techniques and tools.
Features like Ripple Edits and Slip Edits are here, as is the ability to edit a clip’s scale, rotation, and opacity. You can even keyframe various values throughout the app to add animation to your videos. And that, folks, is just the tip of the iceberg.
LumaFusion is available on the App Store for $19.99, and at that price, I consider it to be a great value.
Who shouldn’t buy LumaFusion?
Apps like iMovie work well for simple projects that don’t require much editing or customization. If you simply plan on piecing together multiple clips of video, and perhaps add in some music before sharing with your audience, then iMovie, which is free, may be sufficient enough to meet your needs.
Compatible devices
Although it’s my opinion that LumaFusion is best suited for the latest iPad Pro hardware, it will work with older iPads that are capable of running iOS 10 or higher. Being a universal app, it even works with the iPhone.
If you plan on taking video editing on the iPad seriously, however, then I strongly recommend opting for the highest storage capacity device that you can afford. Full HD media, and especially 4K media, can be very large in size, quickly filling up devices with lesser storage amounts.
How to find help and support
LumaFusion includes links to tutorial videos and support forums for users in need of assistance. Simply tap the Help and Settings button in the upper right-hand corner of the app and select the forum or video links. You may also use this button to submit an email to LumaTouch, the developers of the app, to ask for help or to provide feedback.

LumaTouch includes links to tutorial videos in its help section
How to toggle touches
Inside the Help and Settings section, there is an accessibility setting that allows you to display touch feedback within the app. Simply tap the ‘Show Touches’ option to enable touch feedback for a visual touch indicator as you navigate around LumaFusion. You can hide touches the same way.
Toggling touch indicators
How to create a new project
LumaFusion features a single library that contains all of your projects. Projects are thus the lowest level building block within the app. A project contains three key elements — a timeline, browser, and source viewer — and these are used to build your project into a final video composition.
Creating new projects is easy in LumaFusion
To create a new project, launch LumaFusion, and tap the Project Viewer button. You’ll now see a list of all projects currently in your LumaFusion library. Tap the + button in the bottom left-hand corner to begin a new project.
You’ll first be asked to name your project and provide a couple of basic settings. After providing the name, adjust the framerate value to your liking. The framerate value should be the same value that you used to shoot the footage that you plan on editing with LumaFusion. If you are using video shot with the stock Camera app, then you should choose a framerate of 30. Other popular framerates are 24 and 60.
Adjusting settings for a new project
You’ll also need to select the Frame aspect ratio. One of the most common aspect ratios is 16:9, which is what the default Camera app on the iPhone uses.
After the required data is provided, tap the Create Project button to create your new project.
How to get back to the project viewer
If you ever want to get back to the project viewer to manage or switch projects, simply tap the Project Viewer button at any time.
The project viewer is only one tap away
How to preview a project
You can play back a project to preview it directly within the project viewer. Just tap the project that you wish to preview and tap the Play button to begin project playback in the source viewer. You can even use your finger to scrub through the project timeline right from the project viewer.
You can scrub through a project while in preview mode
How to rename a project
If you wish to quickly rename a project that you’re currently editing, simply tap the name of the project at the top of the source viewer window. Doing so will invoke a rename pop-up box.
Renaming a project
Unsurprisingly, you can also rename projects via the Project Viewer using the same methodology. Simply tap the name of a project while in the Project Viewer to rename the selected project.
How to change project settings of a current project
To alter current project settings, tap the Settings button at the top of the Source Viewer window, and tap ‘Project Settings’. From there, you can quickly adjust the framerate and frame aspect ratio.
Changing project settings on the fly is easy
How to change global project settings
If you tend to use the same settings with every project that you create, you may find it beneficial to adjust LumaFusion’s global project settings. Global settings influence each new project that you create. For example, if you always shoot at 24 frames per second, you can set the global frame rate setting to 24 and each new project will automatically default to 24 frames per second.
Global settings affect all new projects
There are other global settings to consider, such as Fit Mode, and Preview value. We’ll cover those settings in future tutorials.
How to duplicate a project
Duplicating a project can be easily accomplished via the project viewer. To duplicate a project, open the project viewer, tap the project that you wish to duplicate, and tap the Duplicate Project button. This will create a duplicate project right below the already-existing project with an incremental number appended to the project name.
Easily duplicate projects from the project viewer
How to delete a project
To delete a project, select the project that you wish to delete (selected projects feature a blue border) in the project viewer and tap the Delete button. Tap the Yes button to confirm the project’s removal.
Be careful when deleting projects, as they cannot be recovered
How to add notes to a project
You can add notes to any project by tapping the Note button next to the project name. Notes are handy for adding details about an area you wish to edit within the project, or for any other reason.
Add notes to your projects to help remember important ideas
Notes can also be searched within the search interface, and sorted on via the project sort options. When a project contains a note, the note icon will feature a blue tint, and a portion of the text of the note will be printed next to the note icon.
How to change project color tags
To the left of each project name rests a button that allows you to assign a project with a specific color tag. There are six different colors to choose from, and like notes, color tags can be searched on and sorted via the project viewer.
Color tag your projects to help with organization
How to sort projects
In the bottom right-hand corner of the project viewer rests the Sort button. Tapping the Sort button will reveal a list of different sort options for arranging your projects.
Sort is a handy tool for finding specific projects
Sort options in LumaFusion include things like Title, Creation Date, Duration, etc. Items can be sorted in ascending or descending order, and it’s even possible to sort filtered search results.
How to search the project library
If you have a lot of projects in your project library, you may find that searching is faster than trying to manually scroll through the list of projects. Fortunately, LumaFusion features a handy search option in the project viewer. Simply tap the magnifying glass button in the bottom right-hand corner to open the search panel to quickly filter through available projects.
You can search on all sorts of metadata within LumaFusion
How to export a project
Once you finish a project in LumaFusion, you’ll find a bevy of export options at your disposal. The app allows you to export a full movie, audio only, a project archive, or an image snapshot from the currently selected frame.
There are several options within LumaFusion’s export panel
Each of the export options contain associated settings, making LumaFusion a powerful way to both share and archive your work. We’ll go more in-depth with the export options in future tutorials, but just know that the majority of common export scenarios are accounted for.
Movie exports feature lots of settings to configure
How to import a project
If you have a LumaFusion project stored on a remote cloud location, you can use the Import button within the project viewer to import the project into your library. Simply tap the Import button, and select from one of the available external cloud options to locate the project you’re looking for. External sources include Dropbox, Box, Google Drive and OneDrive.
You can also copy projects directly from other apps, like iCloud Drive/Files
You may also use AirDrop to copy a project directly into LumaFusion or you can go the old school route and use iTunes File Sharing via the desktop iTunes app on Mac.
Getting familiar with the project layout
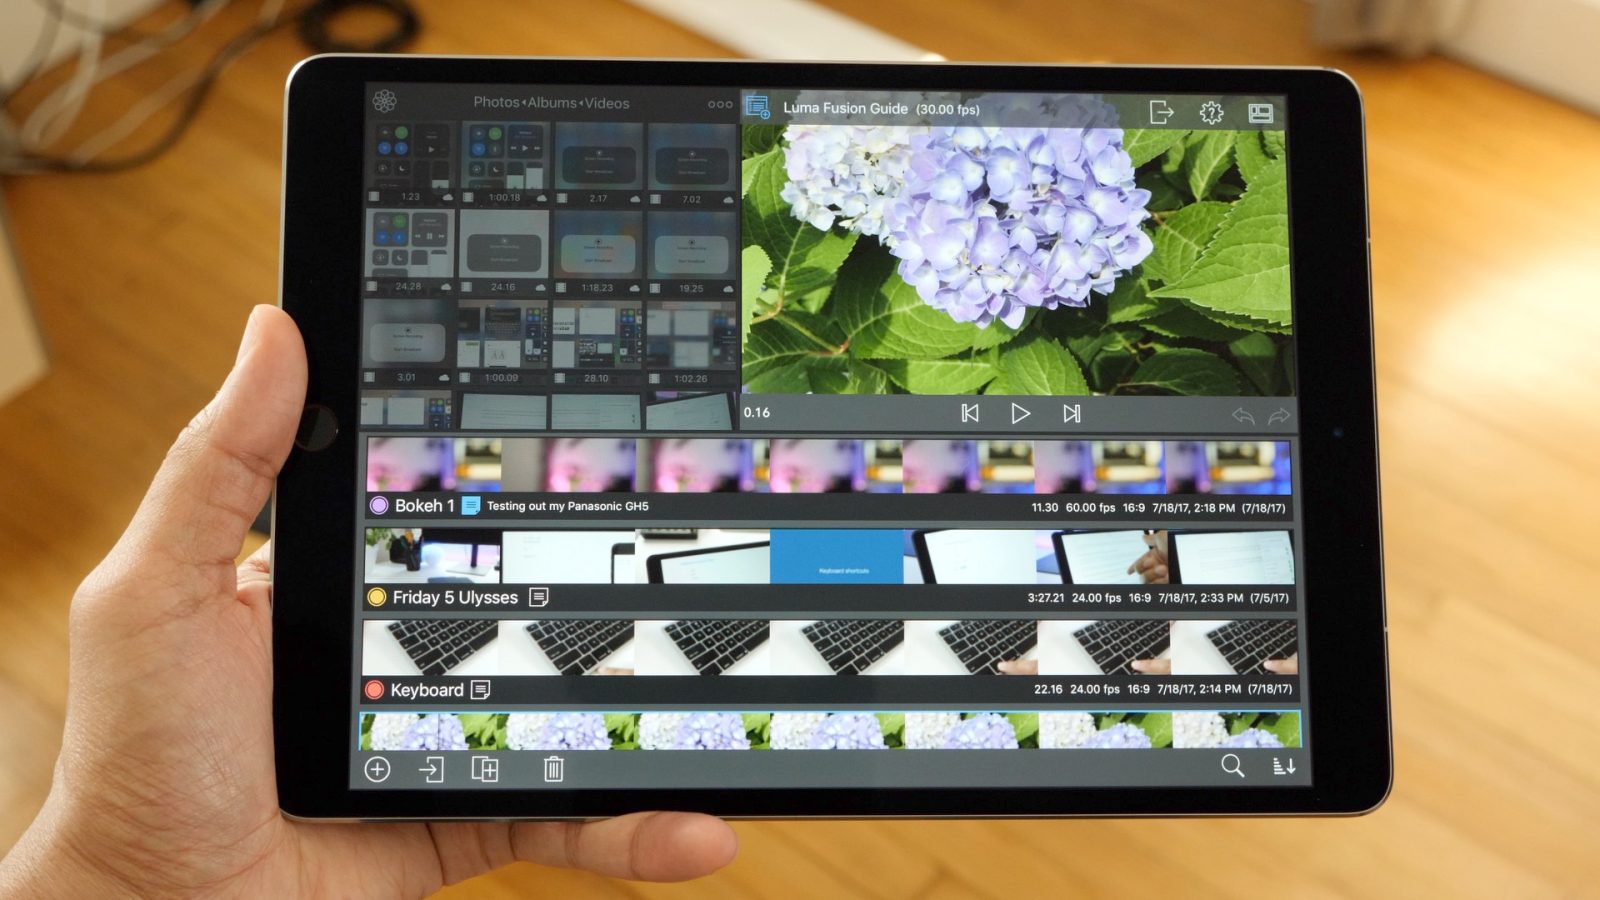
The basic LumaFusion project layout includes three essential parts: the Browser, Source Viewer, and the Timeline. We’ll explore each of these items more in-depth in the future, but for now, just remember the following basic rules:
- Browser: Where you find all of the media you may wish to use in a project.
- Source Viewer: Where you can preview media that you wish to use, along with viewing your in-progress project.
- Timeline: Where you arrange the various media and assets that make up your project.
Getting familiar with LumaFusion’s layout is essential
How to adjust the layout (landscape and portrait)
You can adjust the placement of the various items within LumaFusion’s layout by utilizing the Layout button. This button, which is located in the upper right-hand corner by default, allows you to rearrange the Browser, Source Viewer, and Timeline according to your needs. And depending on whether you’re viewing LumaFusion in landscape or portrait mode, the layout options and positions may change.
Adjust layouts to best suit the task at hand
Conclusion
Getting the concept of projects down is perhaps the most important, yet basic part of learning LumaFusion. Remember that projects are the lowest organizational level within the app, because as of now, LumaFusion provides users with a single library in which all projects reside.
Now that you have a basic idea of how projects are created, sorted, searched, and managed, you are prepared to learn about other important facets of LumaFusion. These include the browser, timeline, editor, and more.
As you’ll likely grow to appreciate, LumaFusion is an extremely deep app. At $19.99 on the App Store, it provides a great amount of value to iOS video editors.
We’ll be back with additional companion tutorials in the following weeks. If you like this type of guide, and/or if you have any constructive criticism, please let me know in the comment section.
FTC: We use income earning auto affiliate links. More.


Comments