I mostly control smart home devices via Siri, and even Steph has become a convert to the idea since we got HomePods.
But while both Siri and the Home app make things very simple for us, things are trickier for guests – which is why I decided to put an old iPad to work …
Siri is tricky for guests because you have to know what all the devices are called. And we have a lot of them!
Even for us, it took some effort and experimentation in naming lights before we could reliably remember what they were all called. We also had to invent some non-existent rooms to assist.
For example, we have a lot of Hue lighting in the living room, so for the two overhead lights we decided to put them in a fictitious room called the Dining Room (which in reality is combined with the living room). Then when we want a lot of light, aka the overhead lights, we can just say ‘Siri, switch on the dining room lights.’
Equally, setting up guests with access to the Home app isn’t entirely straightforward. They of course need an Apple device to run it, so Android owners are out of luck. And even if they have an iPhone, you need to authorize them and de-authorize them afterwards.
To add to the complications, we’re planning on doing either apartment swaps for holidays, or using a service like Trusted Housesitters to have someone take care of the cats while we’re away. Which means we may not be here when they arrive, leading to the potential that – for whatever reason – they find they can’t control anything.
Which was when I realised we had a spare iPad. When I got my 12.9-inch iPad, Steph inherited my 10.5-inch one – leaving her old iPad Air surplus to requirements. They aren’t worth that much these days, so that made it a pretty economic option to repurpose it as a home control panel.
Set up
Set up was a five-step process.
First, I got a magnetic mounting kit to attach the iPad to a wall – or, in our case, the end of a bookshelf. This has a metallic sticker you affix to the back of the iPad, and a magnet you fix to the wall.
Second, I needed a 10-foot long Lightning cable, to reach from the nearest power socket and go behind the bookshelf. If I were wall-mounting it instead, I’d have used a cable raceway to hide the cable from site, but in this case it was already hidden by the bookshelf.
Third, I set the iPad to never power down: Settings > Display & Brightness > Auto-Lock > Never.
Fourth, I made sure the Favorites in the Home app only had things they will actually need to control, which means that all Scenes and devices are visible on a single screen.
Finally, I wanted to ensure visitors could only use the Home app, so I used Guided Access to achieve this. Settings > General > Scroll down to Learning > Guided Access > On. This lets you set a passcode (which I kept the same as the iPad one). You then just open the Home app and triple-click the Home button to lock it into the app. The only way out is to triple-click it again and enter the passcode, so if they don’t know that, the Home app is all they can use.
Use
The location of the control panel – between living room and winter garden – makes it as convenient as normal light switches. Anyone who doesn’t have a smart home of their own will be used to getting up and walking to a nearby switch, so this is really the same thing.
But the magnetic mount means that they can also easily remove the iPad from the bookshelf and keep it next to them on the sofa, just as long as they remember to put it back on to charge afterwards. So there they get the remote control benefits also.
Although primarily intended for guest use, it’s also quite handy for us. It’s easy to leave lights on in other rooms and not notice, but given we spend most of our time in the winter garden, we walk right past the display any time we go in or out, so it’s easy to see if anything is lit up when it shouldn’t be.
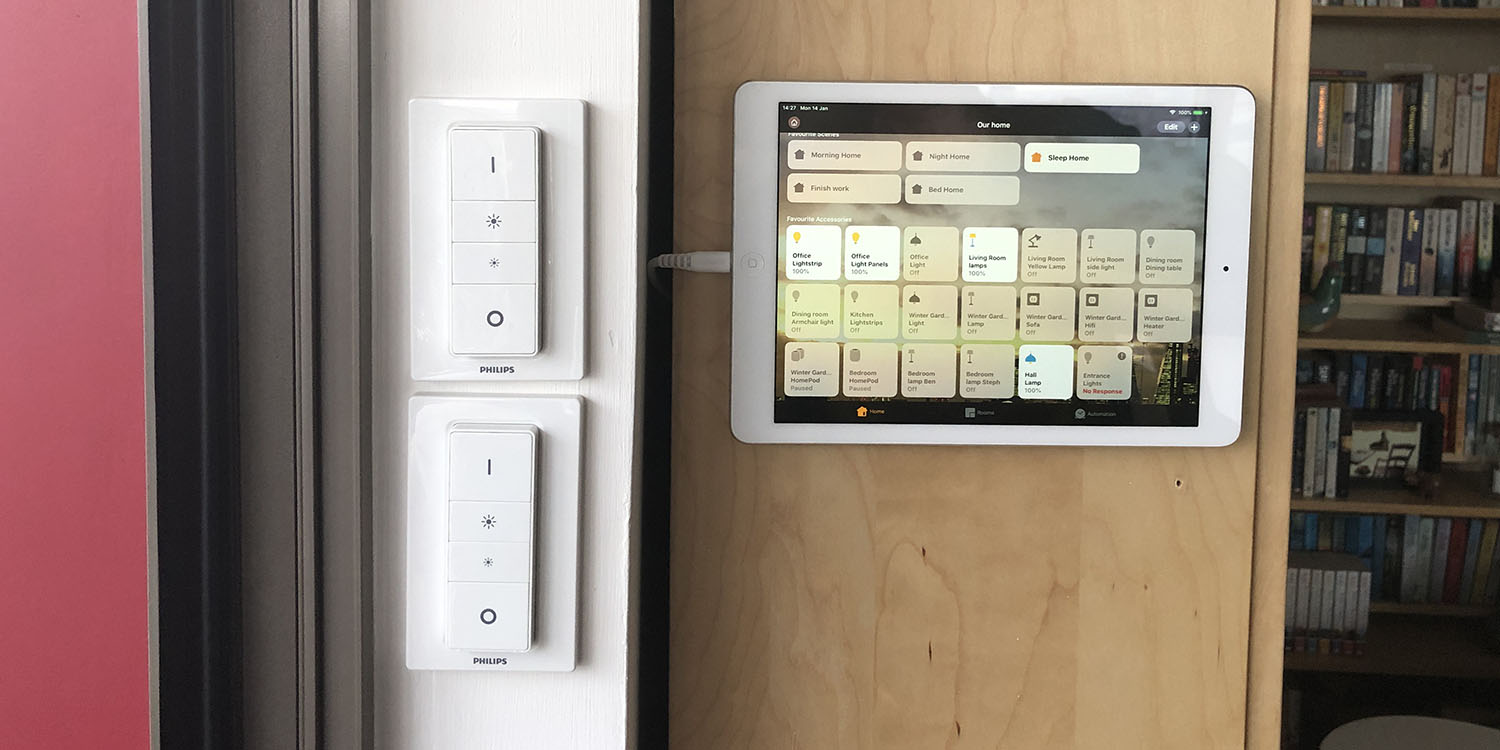
Plus Steph wanted switches anyway, which is why we have the two Philips Hue dimmer switches you can see in the photo above, one controlling the winter garden, the other the living room. The iPad takes over their job, freeing them up for use elsewhere.
Our blinds aren’t yet HomeKit-compatible. Currently we use Alexa (on two Echo Dots) or the PowerView app, but we also have a couple of physical remotes which guests can use. The heating takes care of itself.
Summary
We could have sold the iPad for around $150, so effectively the project has cost us that plus the mag-mount and cable, which is a total of around $180. Time-wise, it took maybe 15-20 minutes to get it all set up.
For that, we’ve got a control panel which is handy for us, and a smart home which is now easily controllable by non-tech people regardless of whether they use Apple or Android themselves.
Have you done something similar, or are you now tempted to? Let us know in the comments.
Related features:

Check out 9to5Mac on YouTube for more Apple news:
FTC: We use income earning auto affiliate links. More.


Comments