Over the years, building ‘Hackintosh’ computers has become both a lot easier and more popular. For those unfamiliar, a Hackintosh is essentially a machine running OS X on non-Apple approved and manufactured hardware. There are many reasons to build a Hackintosh instead of buying a Mac directly from Apple. They can be more expandable, faster, have more features and configurations, run quieter and can be a great learning experience. One of the biggest reasons to go down the road of building your own, however, is price. It’s no secret that Apple charges a premium for its products, especially if you don’t need some of the hardware (Thunderbolt for example). And thanks to the ongoing growth of the Hackintosh community, the process has become very easy over the past few years.
Back in 2011, Seth took a stab at building a Hackintosh. He originally intended on it being an affordable, baseline model without many bells and whistles. He ended up building a $750 ‘beast’ that competed with the best iMacs of the day, though. Now, it’s my turn to make an attempt at building a Hackintosh, but with an added twist. I am building one capable of performing on par with the highest-end Macs and capable of powering a 4k monitor. And, I want it took look ultra-sleek on the outside and be absolutely silent. I don’t want to be able to hear the hard drive, fans, or anything else –essentially nonexistent in my office. Most of all, I want to do it on a budget of about $1500, not including a 4k display.
Let me preface this with something, though: I have never built a computer, Windows or OS X. In fact, up until this project, I was pretty clueless as to what went into building a computer. So if I am able to successfully build this machine, pretty much anyone can. My best friend for this project was easily tonymacx86.com, which we have praised in the past for its clear breakdown of compatible parts and software guides.
Let’s start by discussing the parts that I decided to use for this build.
Full parts list at Amazon:
- Intel Core i7-4770K Quad-Core Desktop Processor 3.5 GHZ – $320
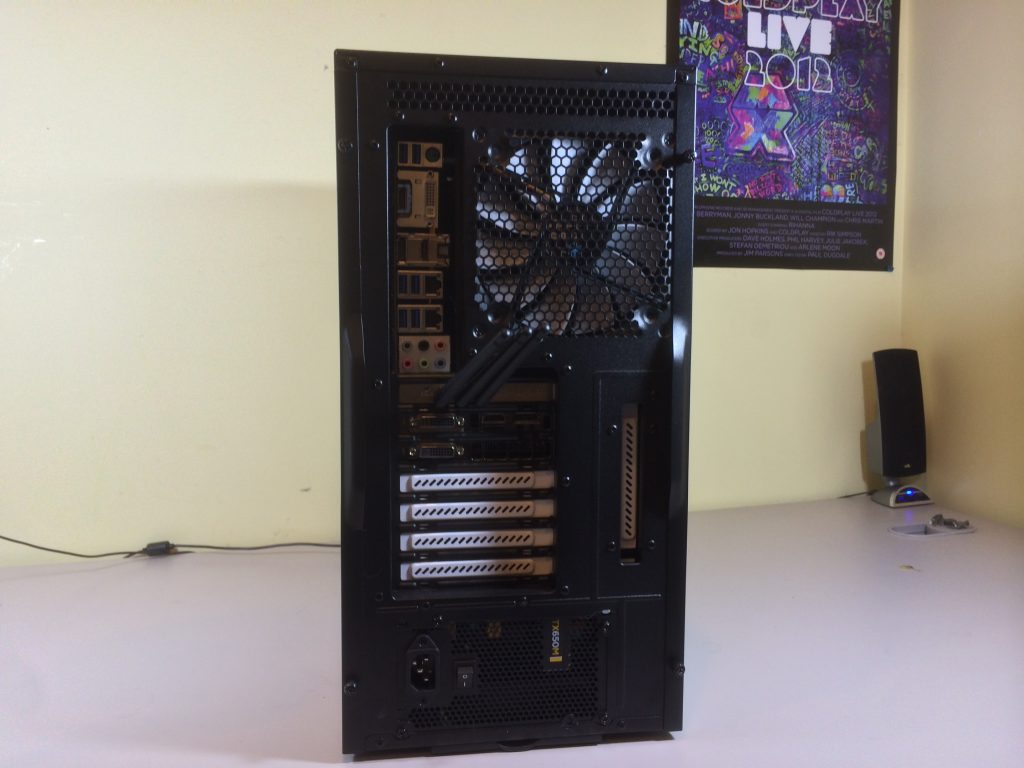
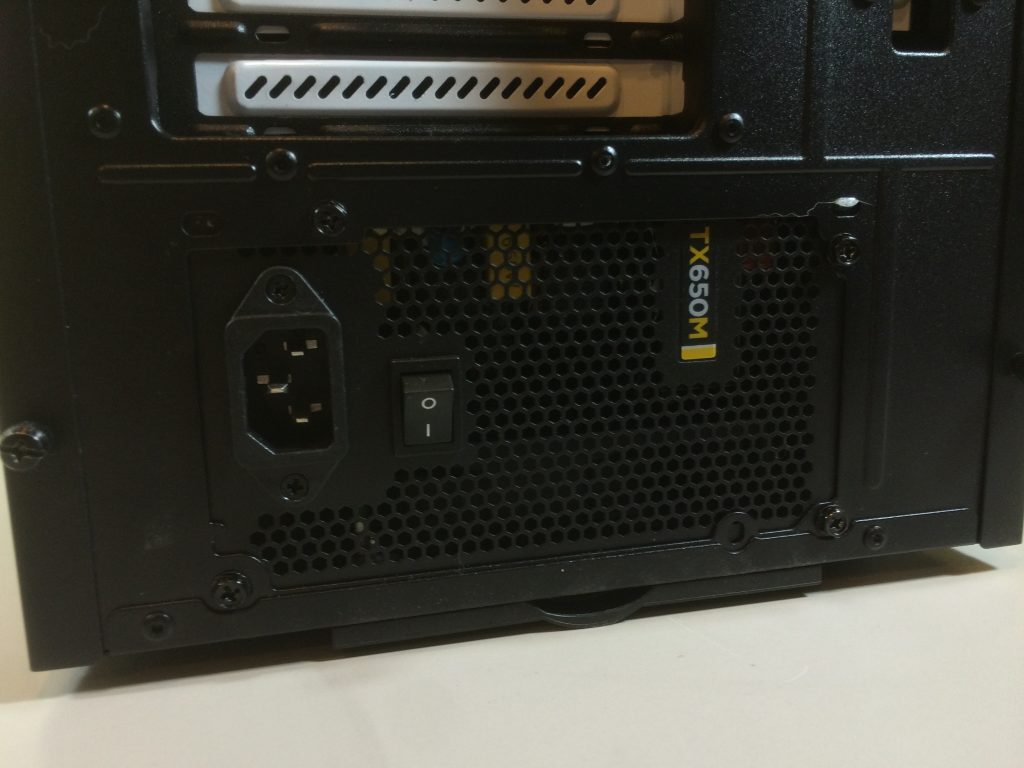
- Corsair Enthusiast Series 650W Fan – $99.99
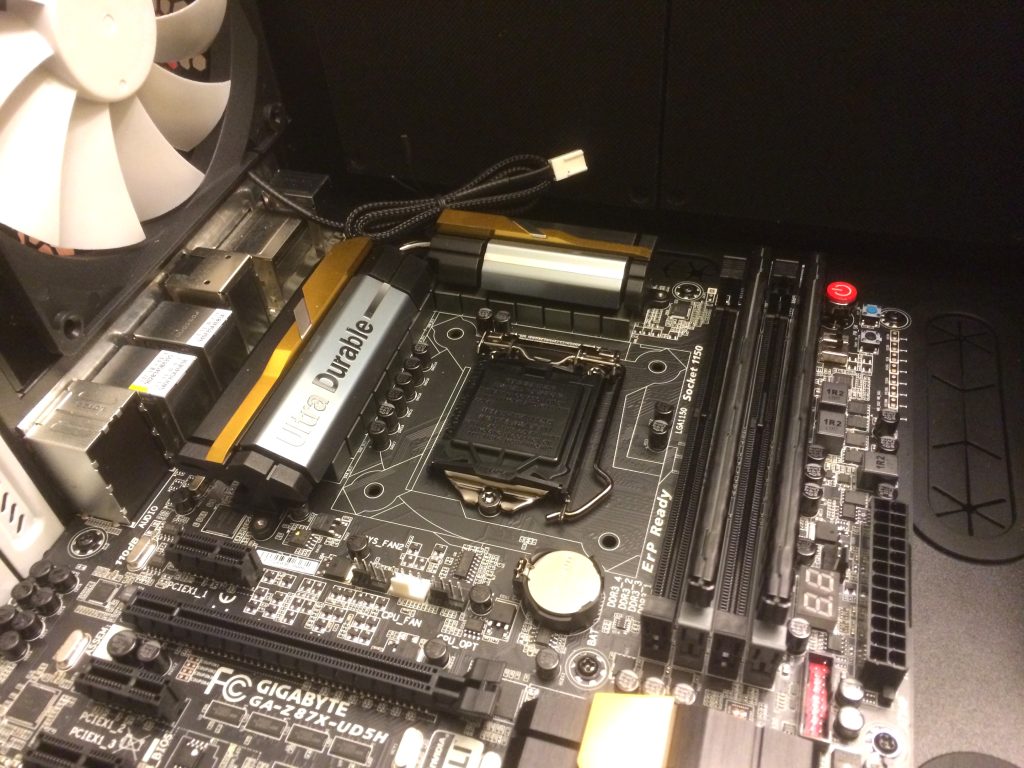
- Gigabyte GA-Z87X-UD5H Z87 LGA 1150 Motherboard – $222
- TP-LINK TL-WDN4800 Dual Band Wireless PCI Express Adapter – $43
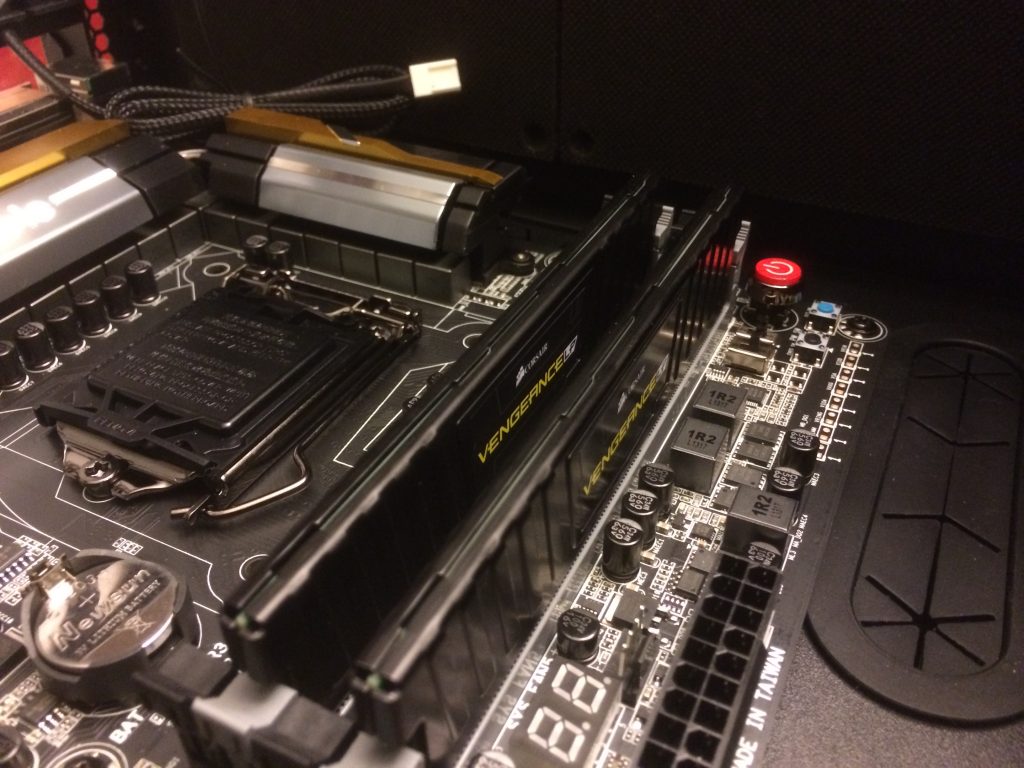
- Corsair Vengeance 16GB DDR3 RAM – $160
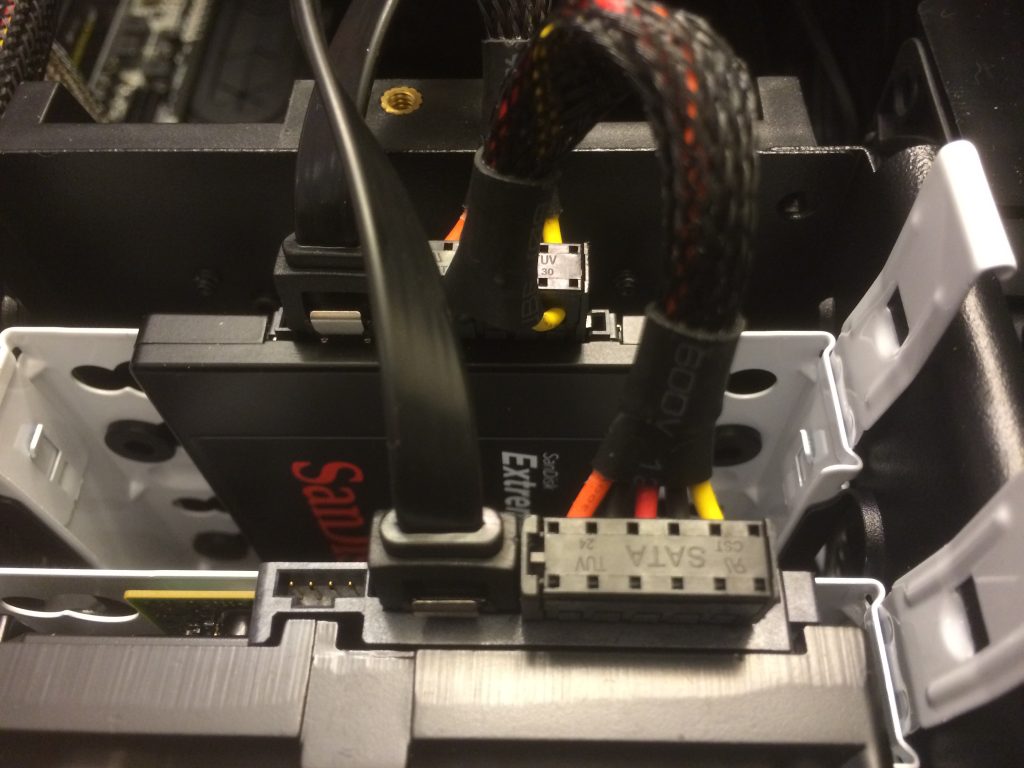
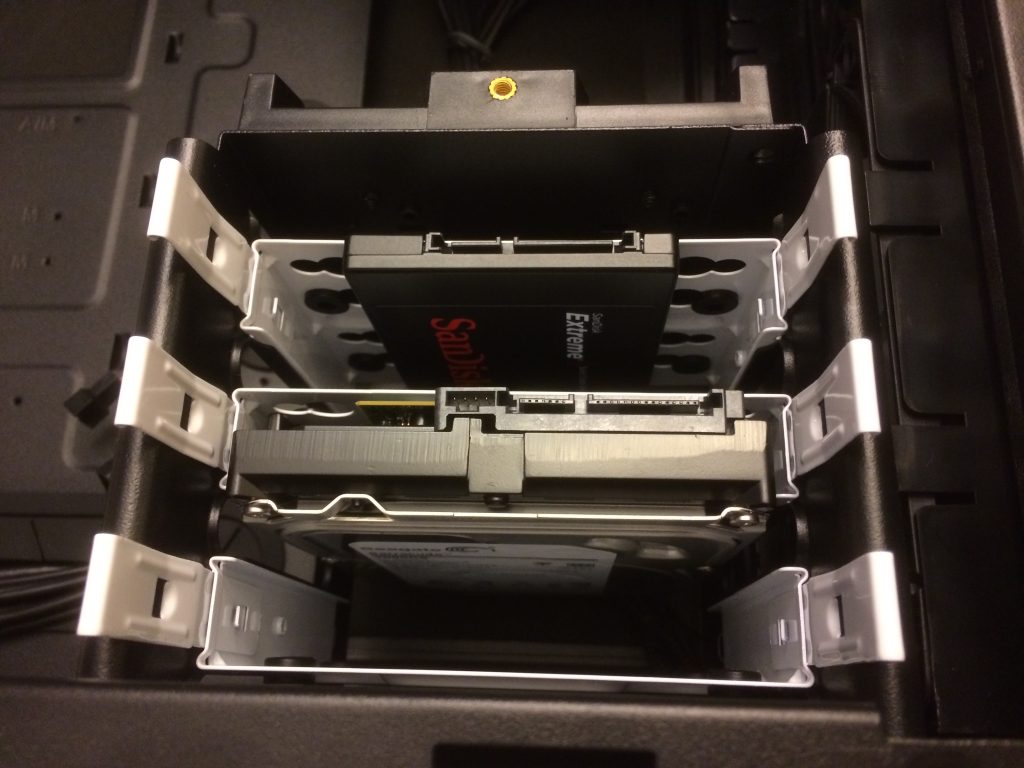
- SanDisk Extreme SSD 120 GB SSD – $117 (or any SATA 3 SSD)
- EVGA GeForce GTX760 Graphics Card – $265
- Seagate Barracuda 2 TB HDD – $80 (or any 1-4TB SATA3 HDD)
- Fractal Design Define R4 Case – $132
- Seiki 39-inch 4K Display – $499 (Varies wildly though)
Total cost without display: $1439. With 4K display, under ~$2,000…
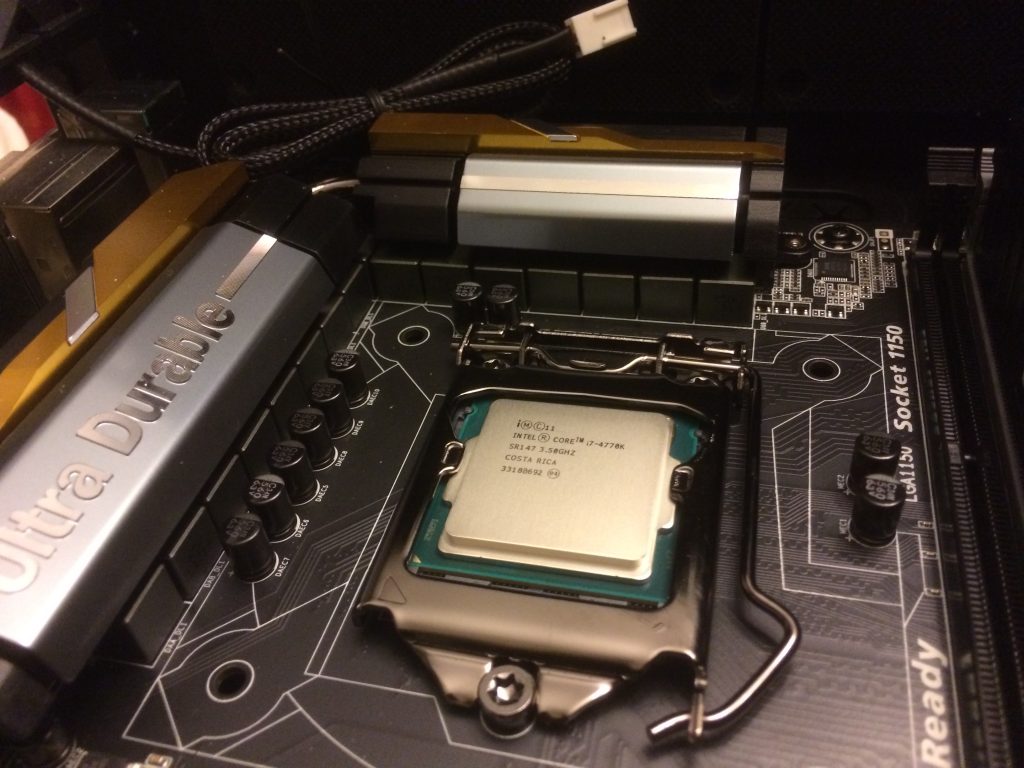
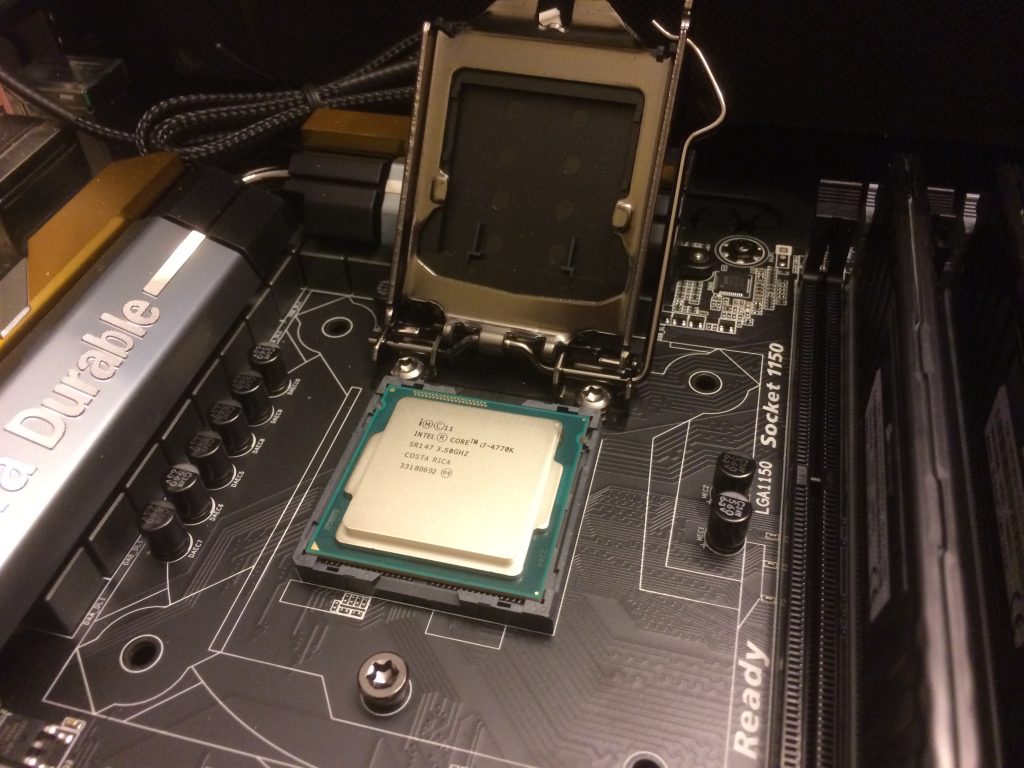
First off, for a processor, I chose the quad-core Intel Core i7-4770K chip, clocked at 3.5GHz. This processor runs $315 on Amazon and is one of the most highly supported and praised processors for a Hackintosh. Plus later on, I can overclock it if I choose to. Next up, I went with 16GB of Corsair Vengeance DDR3 RAM. You can always go with more, as the 4770K processor supports up to 32GB of memory.
In terms of storage, I decided to go with both a solid state drive and regular spinning hard drive. The SSD will be used for the operating system and apps, for a quick boot and quick performance, and the spinning drive for media storage. I chose the 120GB SanDisk Extreme SSD. In retrospect, I wish I had gone with a tad more storage, but I can always update it at a later point. For the spinning drive, I chose the 2TB Seagate Barracuda.
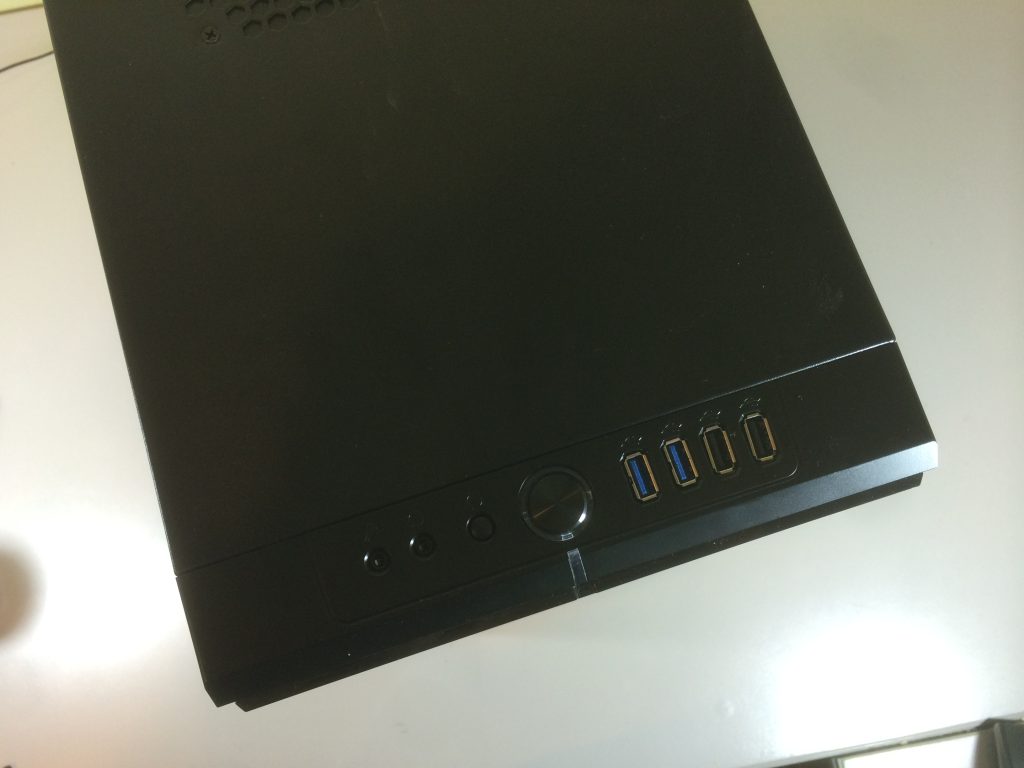
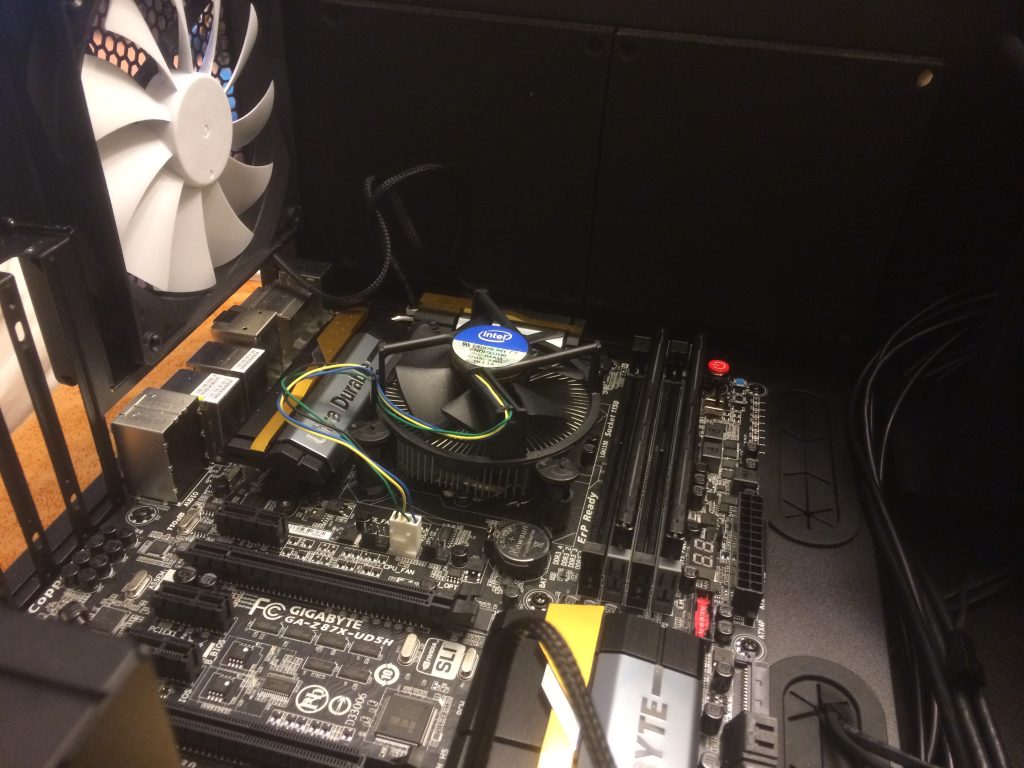
For a motherboard, I chose the Gigabyte GA-Z87X-UD5H Z87 LGA 1150 board. The big thing here is making sure that the LGA numbers matchup between your processor and motherboard. In this case, mine did. This motherboard has support for 10 USB ports, 8 of which are USB 3.0. There’s really not much to say about it, except for the fact that it has plenty of ports and a GUI-based BIOS, which can be seen as positive or negative, depending on your preference. It was a positive for me, being relatively clueless within the BIOS.
For a graphics card, I went with the EVGA GeForce GTX760. This card received excellent reviews and is known to work very well with Hackintoshes. I thought about going for something with more power, but decided that I for my use cases, it wasn’t worth the money right now. One of the big things about building your own computer, however, is that you can upgrade individual parts at anytime, so I will definitely do that at some point.
As I noted above, I intend for this machine to be capable of easily powering a 4k monitor, so obviously I needed something to test this with. In order to be somewhat budget-conscious, I chose the Seiki 39-inch 4k display. While not the best display on the market by any means, it’s definitely nothing to slouch at. But more on that later.
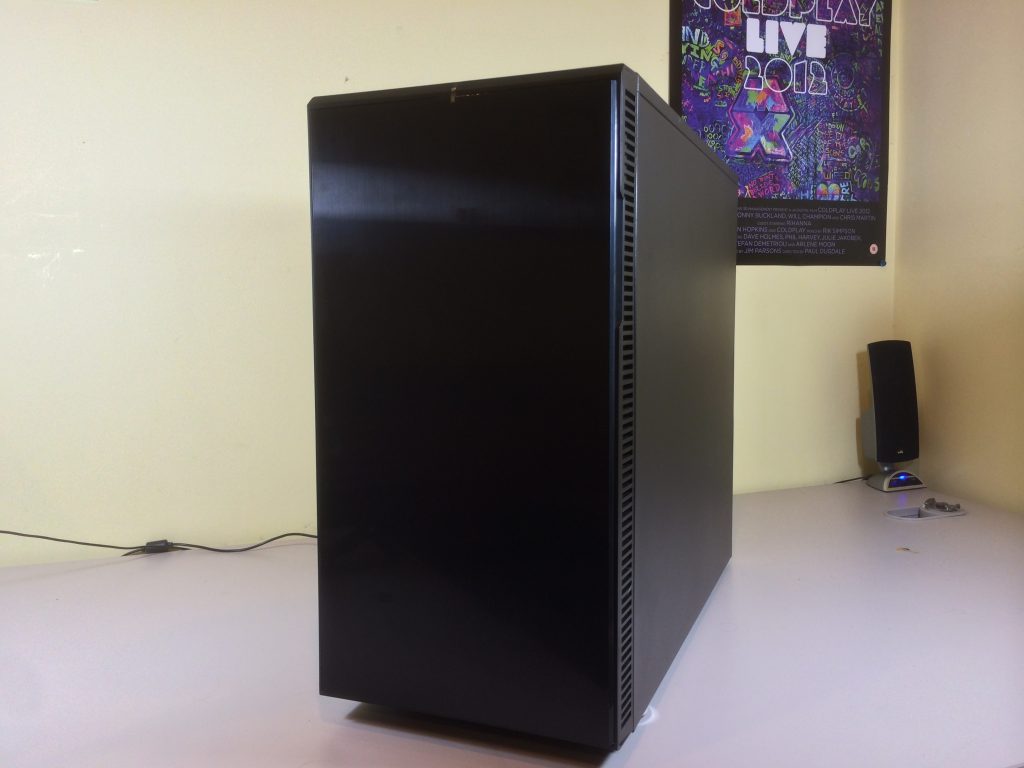
Finally, one of the most important aspects for me personally, was finding a good case, and I definitely succeeded with that. I chose the Fractal Design Define R4 case in Black Pearl coloring. From the outside, the case is very sleek and clean, which is exactly what I wanted. Two of the biggest selling points of the case are its insulation and its claim to be totally silent.
Building It

Once I got all of the parts, it was time to put them together, a process that was totally foreign to me. Needless to say, I was a bit intimidated at first, but once I got going, there was nothing too challenging at all.
I’m not going to go into full detail on putting the machine together, but I will say this: The manuals that come with the components, as well as Google, are your best friend. Especially the manuals for the motherboard and case.
When I first got the case, I was shocked at the size and weight, but this turned out to be a great thing. Once I slid off the side panel and begin planning the process, it became clear to me that more room is better than less. I started out by putting in the two storage drives first. This was incredibly simple and involved just attaching the drives to two of the many bays within the case. Then I laid the power supply in the case, using the case manual as a guide.
Next, it was time to place the motherboard in the Design Define. This process was relatively straightforward. I first had to put 10 pegs in the bottom of the case. All of the holes were clearly marked and labeled. Then, I simply had to line the motherboard up with those screws, lay it over them, and then screw it into the pegs. Next came installing the RAM, which was incredibly straight forward, as all I had to do was pull back the ends and slide the RAM right into the board.
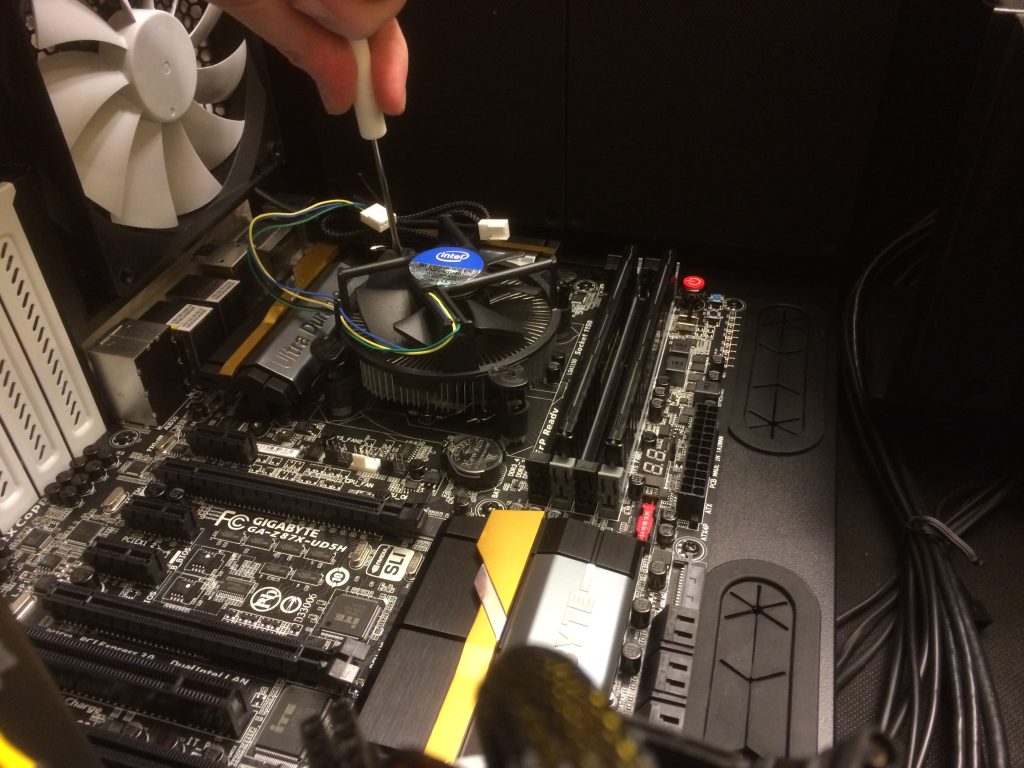
After that I installed the Core i7 processor, which, while the most expensive piece of the build, was also the smallest. After I installed the processor, I placed the included processor fan over it, and tightened it to the motherboard. Then came the task of inserting the graphics card, which intimidated me at first, but actually just involved plugging it into the motherboard and making sure the ports were accessible from the outside of the case.
Having put all of the components onto the board, it was now time to plug everything in. This was easily the most tedious task, and really, the only challenging thing about the entire process. It still wasn’t hard, it just took a lot of reading and brain power. After triple-checking that everything was plugged into the correct port, I put the side of the case back on and prepared for the big test of whether it would power on or not. Sure enough, it did power on correctly the first time and it was off to the races to install OS X…
Installing OS X Mavericks
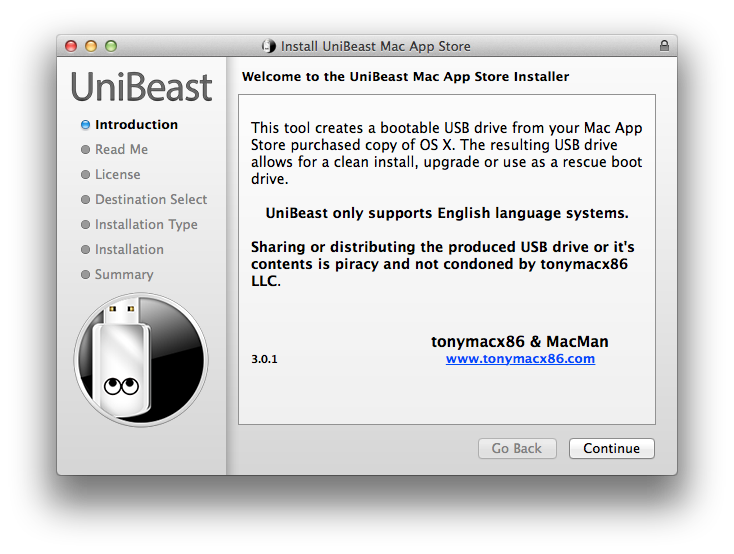
This is arguably the easiest part of building a Hackintosh. Thanks to tools like UniBeast, making a bootable flash drive of OS X Mavericks is very, very easy, although you need to have another Mac to install it from.
First, I downloaded UniBeast from TonyMacX86.com, as well as the free copy of Mavericks from the Mac App Store. Once both downloads were completed, I launched UniBeast and inserted a 16GB flash drive (though anything 8GB or larger will work).
- Purchase OS X from the Mac App Store.
- Prepare a USB drive with Disk Utility
- Create a bootable USB drive using UniBeast
- Boot from the UniBeast drive and install OS X
- Use the UniBeast created drive to boot the new installation
In order to boot from the USB drive, I had to change my BIOS settings to look for it first, but once you do that, the OS X install process is exactly like any other Mac. I formatted my SSD into two partitions for my install, one larger 70GB partition for OS X, and a smaller, 50GB partition for Windows 8. The install took roughly 25 minutes, and then it booted right into OS X Mavericks. Don’t get too excited, though, because there’s still a few last things to be done.
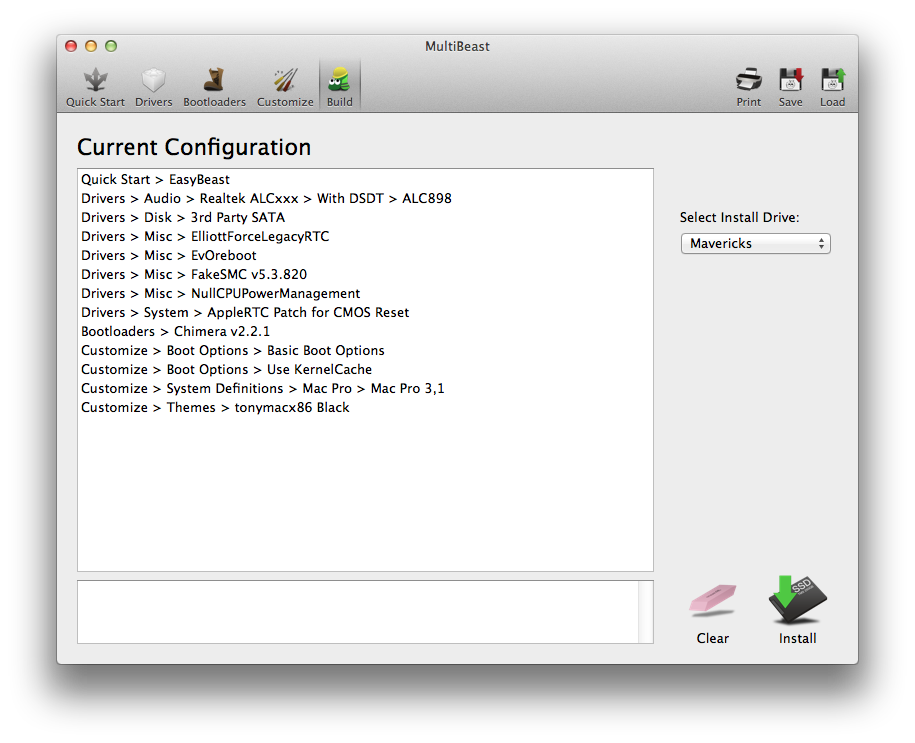
I now downloaded MultiBeast from TonyMacx86 and opened it. MultiBeast is the ultimate tool for making your Hackintosh bootable without a flash drive and helping you find the correct drivers. Luckily, the only drive I ended up needing was for audio. I simply chose the “EasyBeast” option from MultiBeast, as well as the drivers for my audio, which if you use the same motherboard as I do, is the Realtek 898.
After the install process with MultiBeast was complete, I rebooted to find sound working perfectly and that I could boot without the USB drive plugged in.
Annoyances/Bugs
One major bug I ran into at first was not being able to download any apps from the Mac App Store. After researching for a while, I found a simple Terminal process to run in order to fix it.
cd /Library/Preferences/SystemConfiguration
cp NetworkInterfaces.plist ~/NetworkInterfaces.plist.bak
sudo rm NetworkInterfaces.plist
Another problem I had was my front USB 3.0 ports not working, but as it turned out, I had forgotten to connect those to the motherboard. Oops.
I’ll keep this part updated with any more bugs I run into (hopefully not that many).
But now, let’s talk 4k.
Powering a 4k Monitor
Seth reviewed the Seiki 39-inch 4K TV in detail earlier this week, and for the most part, I agree with everything he had to say about it. My Hackintosh was able to easily power the display, as well as another 1080p monitor at the same time. I could have multiple 1080p videos playing at once, with no issues whatsoever. The display was essentially plug and play. All I had to do was change the resolution in System Preferences on the Mac.
The mouse lag, which can be totally attributed to the 30Hz capability, is incredibly annoying at first, but once you get use to it, it’s totally okay. The GTX 760 graphics card I put in the Hackintosh was able to handle outputting a 4k resolution without any issues at all. I never experienced any lag related to graphics at all, and 4k videos played back perfectly without any hitches.
Would I recommend the Seiki 39-inch TV as a monitor? No. The 30Hz drawback is just too big for many people, myself included. The big thing for me, however, is the potential. Using OS X at a 4k resolution was absolutely amazing. The amount of content I could fit on one screen is a game changer, and needless to say, everything looked incredibly crisp and sharp. 4k is going to be huge in the future. Or if you get the right monitor and have a computer capable of powering it, it can be huge now. I’m definitely going to be on the lookout for another 4k monitor for daily use. And the fact that my Hackintosh is totally capable of handling it is great.
Wrap-Up
So, was this Hackintosh a success? Yes. Without a doubt. I could not have asked for this project to have gone any better. As someone who’s never built a computer before, let alone a Hackintosh, I was pretty intimidated by the task at first. But once I did my research, I was totally comfortable the entire time. This is a beast of a machine and it’s definitely going to be my daily driver for a long time to come.
I absolutely love the case I got. It’s absolutely silent and looks incredibly slick from the outside and was really easy to work with on the inside. Best of all, I still have plenty of room to expand make this Hackintosh even more of a beast down the road.
One of the biggest things I got out of this was the potential of 4k. It’s going to be huge, maybe not immediately for consuming content, but for a monitor, you cannot beat it. The amount of information you can fit in one area is amazing and going back to anything with a lower resolution will be a major challenge, which is why I’ll be keeping an eye on 9to5Toys for some sweet 4k monitor deals.
FTC: We use income earning auto affiliate links. More.

How is this on 9to5Mac? Seriously?
Why not?
Fuck this hackintosh stuff. Really. OS X is for Apple Macs, not for shitty PC towers.
Great article!
We’ve owned Macbooks, Airs, iMacs and iPhones. After having a hard drive fail in a two year old iMac and finding out that the connector to it is proprietary I would think twice now about buying another desk top and build my own.
BTW, the proprietary drive cost twice as much as a regular one because Apple decided to have a head sensor built into it unlike all the other similar Hitachi drives of that size and make. THAT makes me seriously consider building my own mac and the newer iMacs are almost impossible to fix on your own unlike a do-it-yourself box.
All Fanboyism aside, building your own PC is an incredible learning experience – it was great for both my self and my son who still talks about it and carries the knowledge of what’s happening inside his computer.
Do you think the next Steve Jobs/Woz types are going to be people who never open their computers to see what’s inside?
Also, this kind of article is a shot across the bow to Apple: they can try to ignore their market and the current economy, but they do so at their own peril. The new Mac Pro is really neat looking, but I’m just not going to shell out $3000 for one. I don’t have that kind of cash. I’d put down the cash for a mini…but the thing is a year out-dated. And hasn’t seen a price adjustment since the Intel-based mini shipped (and I bought one) in 2006. This isn’t something that has just happened in the past year, Apple has been ignoring this Hackintosh market for nearly half a decade (going back as far as the Core 2 and Dell mini 9 for me).
Apple can do what they want, but I think they’d do themselves a solid if they’d sell a $99 “Hacker” subscription that offered OS X and the ability to “license” your Hackintosh. EMBRACE this community, like they did with Bootcamp. For the $99 give users pre-release software and can file bugs, just like a Developer. They’d make back in two years the amount of money they clear on a Mac mini; considering these folks are never going to buy a Mac Pro, it isn’t a lost sale of that profit level. They could run a website similar to TonyMacx86 that lists available, unsupported Kexts and DSDTs, as well as host forums. (Their current support forums are crap, so how hard could it be?) They could even offer a “special” “You CAN Go Home Again” deal for $100 back on a new Mac mini or MacBook.
But in no way should people be dripping tears for “poor” Apple over this Hackintosh phenomena. Anyone who does completely misunderstands the history of Apple computers. (Though that puts those fanboys in good company, apparently, with Apple itself.) I’m glad to see it make bigger headlines.
Let me just start by saying I was a Hackintosh owner. When I successfully built my Hackintosh I also thought it was easy and fun. But then things started to fall apart quickly. Problems would arise on a regular basis. App Store stopped working suddenly, as did iMessage. Some apps required some serious tinkering before they would work. And for each OS X update I had to apply patches to get things working again. Now I just use Fedora on the PC and it’s far stabler than any OS X version on it.
This is why I can’t recommend building Hackintoshes. It’s a fun learning experience, but I don’t see how much more fun it is when you start to treat it as a serious computer, like the article suggests. But then it really isn’t a “complete learning experience” when all you do is to click here and there to have something patch things for you automatically without understanding the underlying principles (What are drivers? Why do I need to use a custom boot loader? etc). If you want a “complete learning experience”, I would suggest that you put other operating systems on it, like millions of Linux OSes freely available, rather than one that is never meant to be used on a PC tower.
Furthermore, this site is an Apple-oriented site. I thought most of the author would pretty much buy into Apple’s “It just works” philosophy. Apparently this isn’t the case, as the story author seems to suggest that it’s simply a cheaper alternative that would work for everyone. I find it appalling to see 9to5Mac condoning the act of building Hackintosh that is a lot more trouble than it is worth.
It’s not fanboyism. It’s about having a standard.
I have been running an hackintosh for over 2 years now and have not ran into the issues you referred to above. The App Store issue is caused by NIC registration and once cleared usually does not come back. Also the issue with updates is not much of a big one these days. I have done updates with no issues. There have been ones back in 10.7 and 10.8 that I would lose audio but that is s simple fix. As for learning experience, I feel it is a great one for someone to get their feet wet especially if they are a mac user. The things you will learn from reading post on the community forums are worth it and for $1000 you can have a beast of a machine is nothing to frown upon.
typo. “EVGA GeForce GTX70′
Nice build, very informative and inspiring, thanks!
So… basically… you are encouraging people to break OS X EULA… Classy.
I think the EULA is to prevent people from selling it. I don’t generally feel, and you may disagree, that Apple is after hobbyists who already have multiple Macs and paid for copies of OSX who want to build a computer for themselves.
Excellent post – thank you! Keep us updated on how it goes!
A sole 4k display? The new mac pro does 3… Where the hell are the apple 4k displays anyways?
So can a hackintosh, he just went for a bargain build, not pro. Big bang for buck. Hackintoshes already rival anything that trashcan can offer if you do go all out. And hopefully with it’s release, will be able to do even more when OS X is updated for those dual GPUs.
loling at the people getting all bent over a hackintosh article. It’s a thing. It has to do with Mac OS. It’s relevant. Take a deep breath, stroke your EULA, and move on to the next article.
Sure, next article will help switch from iPad/iPhone to Nexus. It’s a thing. It has to do with Apple so it’s a perfect place for it…
Sexier, modable, personalizable (is that a real word?), better performance, and above all else, so much cheaper. Apple can do one, this is a great idea and should be practiced more. It’s not like apple need the money….9 to 5 giving back to the people. Massive thumbs up to this post.
This is awesome. Keep it up and add some updates as time goes by. I totally want to to do this!
First of, I’m a hackintosh user.
It’s a great way to get a custom and quite powerful Mac without spending thousands of $$$ but it comes with a catch. Compatibility.
That means if you want to use your HackPro for serious work like video editing or animation, you’re better off saving up a few more bucks and getting a real Mac.
My build is quite similar to that with just a different mainboard and I get rendering glitches in Final Cut and Motion. The HDMI audio out only works sporadically and optical SPDIF completely failed last week.
So if you’re a tinkerer and familiar with unix, go ahead. Maybe you can get everything to work. Someone like me, who uses a Mac because it just works, is better off buying a real one.
I, for one, already have my credit card ready for tomorrow’s Mac Pro release.
Great write up! Congrats on building your first computer! One of the best articles I’ve read on this site.
Great article except for the $1,500 price tag. That’s more than twice what I would consider spending on a hackintosh.
lots of cheaper options out there. Check the TonyMAc site – good configs start at around $350
I just built a hackintosh beast myself. It’s a real beast. It really craps on the new “mac pro” geekbench scores too. I actually went over my process here http://forums.elitistjerks.com/index.php?/topic/132198-omegas-pc-build/ (with pictures). My tip with multibeast though, use custom. You likely installed way more than you needed to for the newer gigabyte boards. On mine all I had to install was audio kext. that’s it.
Also, even though the newer gigabyte boards don’t require a DSDT, using one fixes several more issues (USB3 voltage issues for one, PCI bus not reporting what’s installed, few other bugs). Great repos for making your own DSDT here: http://www.tonymacx86.com/dsdt/100182-pjalms-dsdt-patches.html with these instructions: http://www.tonymacx86.com/dsdt/107723-how-create-your-own-dsdt-using-maciasl.html (make sure you use just PJALMs gigabyte patch and then use the toleda’s Haswell graphics patches after, don’t use the out of date graphics patches written in the guide since they are not for haswell)
I prefer chamaelon over chimera though since you generally get updates quicker if you are more cutting edge and use the svn binaries. Still use unitibeast and multibeast for install though. Although I also use newer kexts when available. Such as latest fakesmc which has more sensor support and now has fan control being worked on.
Best response yet. If you put in the extra 3 or so hours it perfect you will not be disappointed.
After using my Hackintosh PC 3 years, I decided to buy a real Mac, because I think the sprit of the OSX is the TouchPad haha…
This looks to lack Thunderbolt support. Was this a consideration in the build? I heavily use my Thunderbolt port, mainly for storage.
Yes, I left it out simply because I don’t need it and motherboard’s with it built in are often more expensive than those without. Of course, if you need Thunderbolt, you can always simply buy a board that has it.
TonyMac – isn’t that old school. Check out http://quocomputer.com/shop/z77mx-quo-aos-i7-3770-combo/ This is the easiest motherboard to configure for an AOS system.
Good write-up, thanks!
I’m using a 4K Seiki (55in) as a monitor. Some of the lag you are seeing may be due to the default motion smoothing in the Seiki. If you turn this off, your mouse movements and such will look more real-time. As a programmer, all the screen real-estate is very useful and I don’t notice the 30Hz refresh unless I’m moving a window and notice it is not as smooth as on my macbook pro’s integrated display.
In short, go to Seiki menu and turn off MEMC (motion smoothing) and see if it helps you.
Greg.
With what did you connect your 4K display to your computer? I think Thunderbolt is one of the only connections you can have to establish a 4K connection. Did you use a HDMI connection?
yes Seiki only takes HDMI
dragging a window and noticing lag is kind of exactly what you would not want when buying a true 4k monitor, or any monitor for that matter. the fact that 1080p is on 90% of monitors and tv’s now, running at 60hz or better, and this 4k monitor down scales it to 30hz, should have told you that $400 could have been put to use on a better 1080p monitor. Lastly, Seiki? try another brand, a more reputable brand with warranties that actually work and last.
I have been running OS X on my Dell Optiplex 9010 for over a year now, and it is still rock solid. Ran Mountain Lion great, then installed Mavericks when it came out and that has been running perfectly as well. It is my main machine, and it has never failed me or had any weird issues come up. I have been hackintoshing for years, and if you have well supported hardware (hardware that is included in actual macs), there is little to go wrong.
Fully agree… my Hack here has been running smooth as silk since June ’14, now on a Gigabyte Z87X-OC with the i7-4790, 32gb, Samsung SSD, etc. The biggest issue I have these days is that the default browser keeps changing back to Safari… other than that, solid as a rock, and it runs like a raped ape. I love it.
Please can you specify the exact version of the graphics card
Omar Melo Calero, go to http://wiki.osx86project.org/wiki/index.php/Main_Page for research on what cards work.
that 4k display is only 30hz.. don’t wast the money, stay 1080p for a little while longer, maybe mid 2015 late 2015 when more models are released with better lighting and picture settings.
Do you have some benchmark for this hackintosh?
Nice and informative thank you. Just need to point out that the Apple brand would not have been around today if it were not for the tinkering and garage style home builds as this is classed as, so those MAC Lovers that are complaining about this article please read your history on Apple and then pass judgement!. Well done 9-5 for a glimpse of days past and potential forward thinking. I will be ‘hacking’ my G5 power PC case and possible other parts) to a new evolution in Apple history.
Is this outdated now?