In this hands-on tutorial, I’ll show you how to run Windows 11 for ARM using VMware Fusion Player 13, an application that includes a free personal license option. The downside to VMware Fusion Player, is that it doesn’t include 3D support for Windows 11 on ARM, but that may not be an issue for you if you’re just need to run a one-off app or other basic software.
If you’re looking to run games, in general, Parallels Desktop 18 remains the better option due to its support of DirectX 11. The downside to using Parallels for running Windows 11 on ARM? It is a paid application that requires a subscription for the version that most people will want to use. You can read and watch our full Parallels Desktop 18 Windows 11 on ARM tutorial for more details.

Table of contents
How to download the Windows 11 for ARM ISO using Parallels Desktop for Mac
Before Parallels Desktop 18 was released with support for Windows 11 for ARM, obtaining a Windows 11 ISO involved numerous time-consuming steps. You can read my full tutorial on Cellular if you’d like to see just how involved this process used to be, but it’s intense. Today, it’s much easier to gain access to a Windows 11 ISO, because Parallels provides one for you and conveniently saves the ISO to your Mac’s ~/Downloads folder. Although this ISO is intended to be used with Parallels Desktop 18, it can be used with other virtual machines, like VMware fusion, as well.
Video: How to install Windows 11 for ARM using VMware Fusion Player (free)
Subscribe to 9to5mac on YouTube for more videos
Step 1: Visit the Parallels Desktop for Mac installer page and click Download Free Trial.
Step 2: Open your Mac’s Downloads folder, and mount the image by clicking on Install Parallels Desktop.dmg

Step 3: Double-click Install Parallels Desktop and click Open.
Step 4: Uncheck Participate in Customer Experience Program (optional) on the EULA pop-up, and click Accept. The Parallels Desktop 18 application will then download and Install. You’ll first be prompted to enter your administrator password to continue. After entering your password click OK.
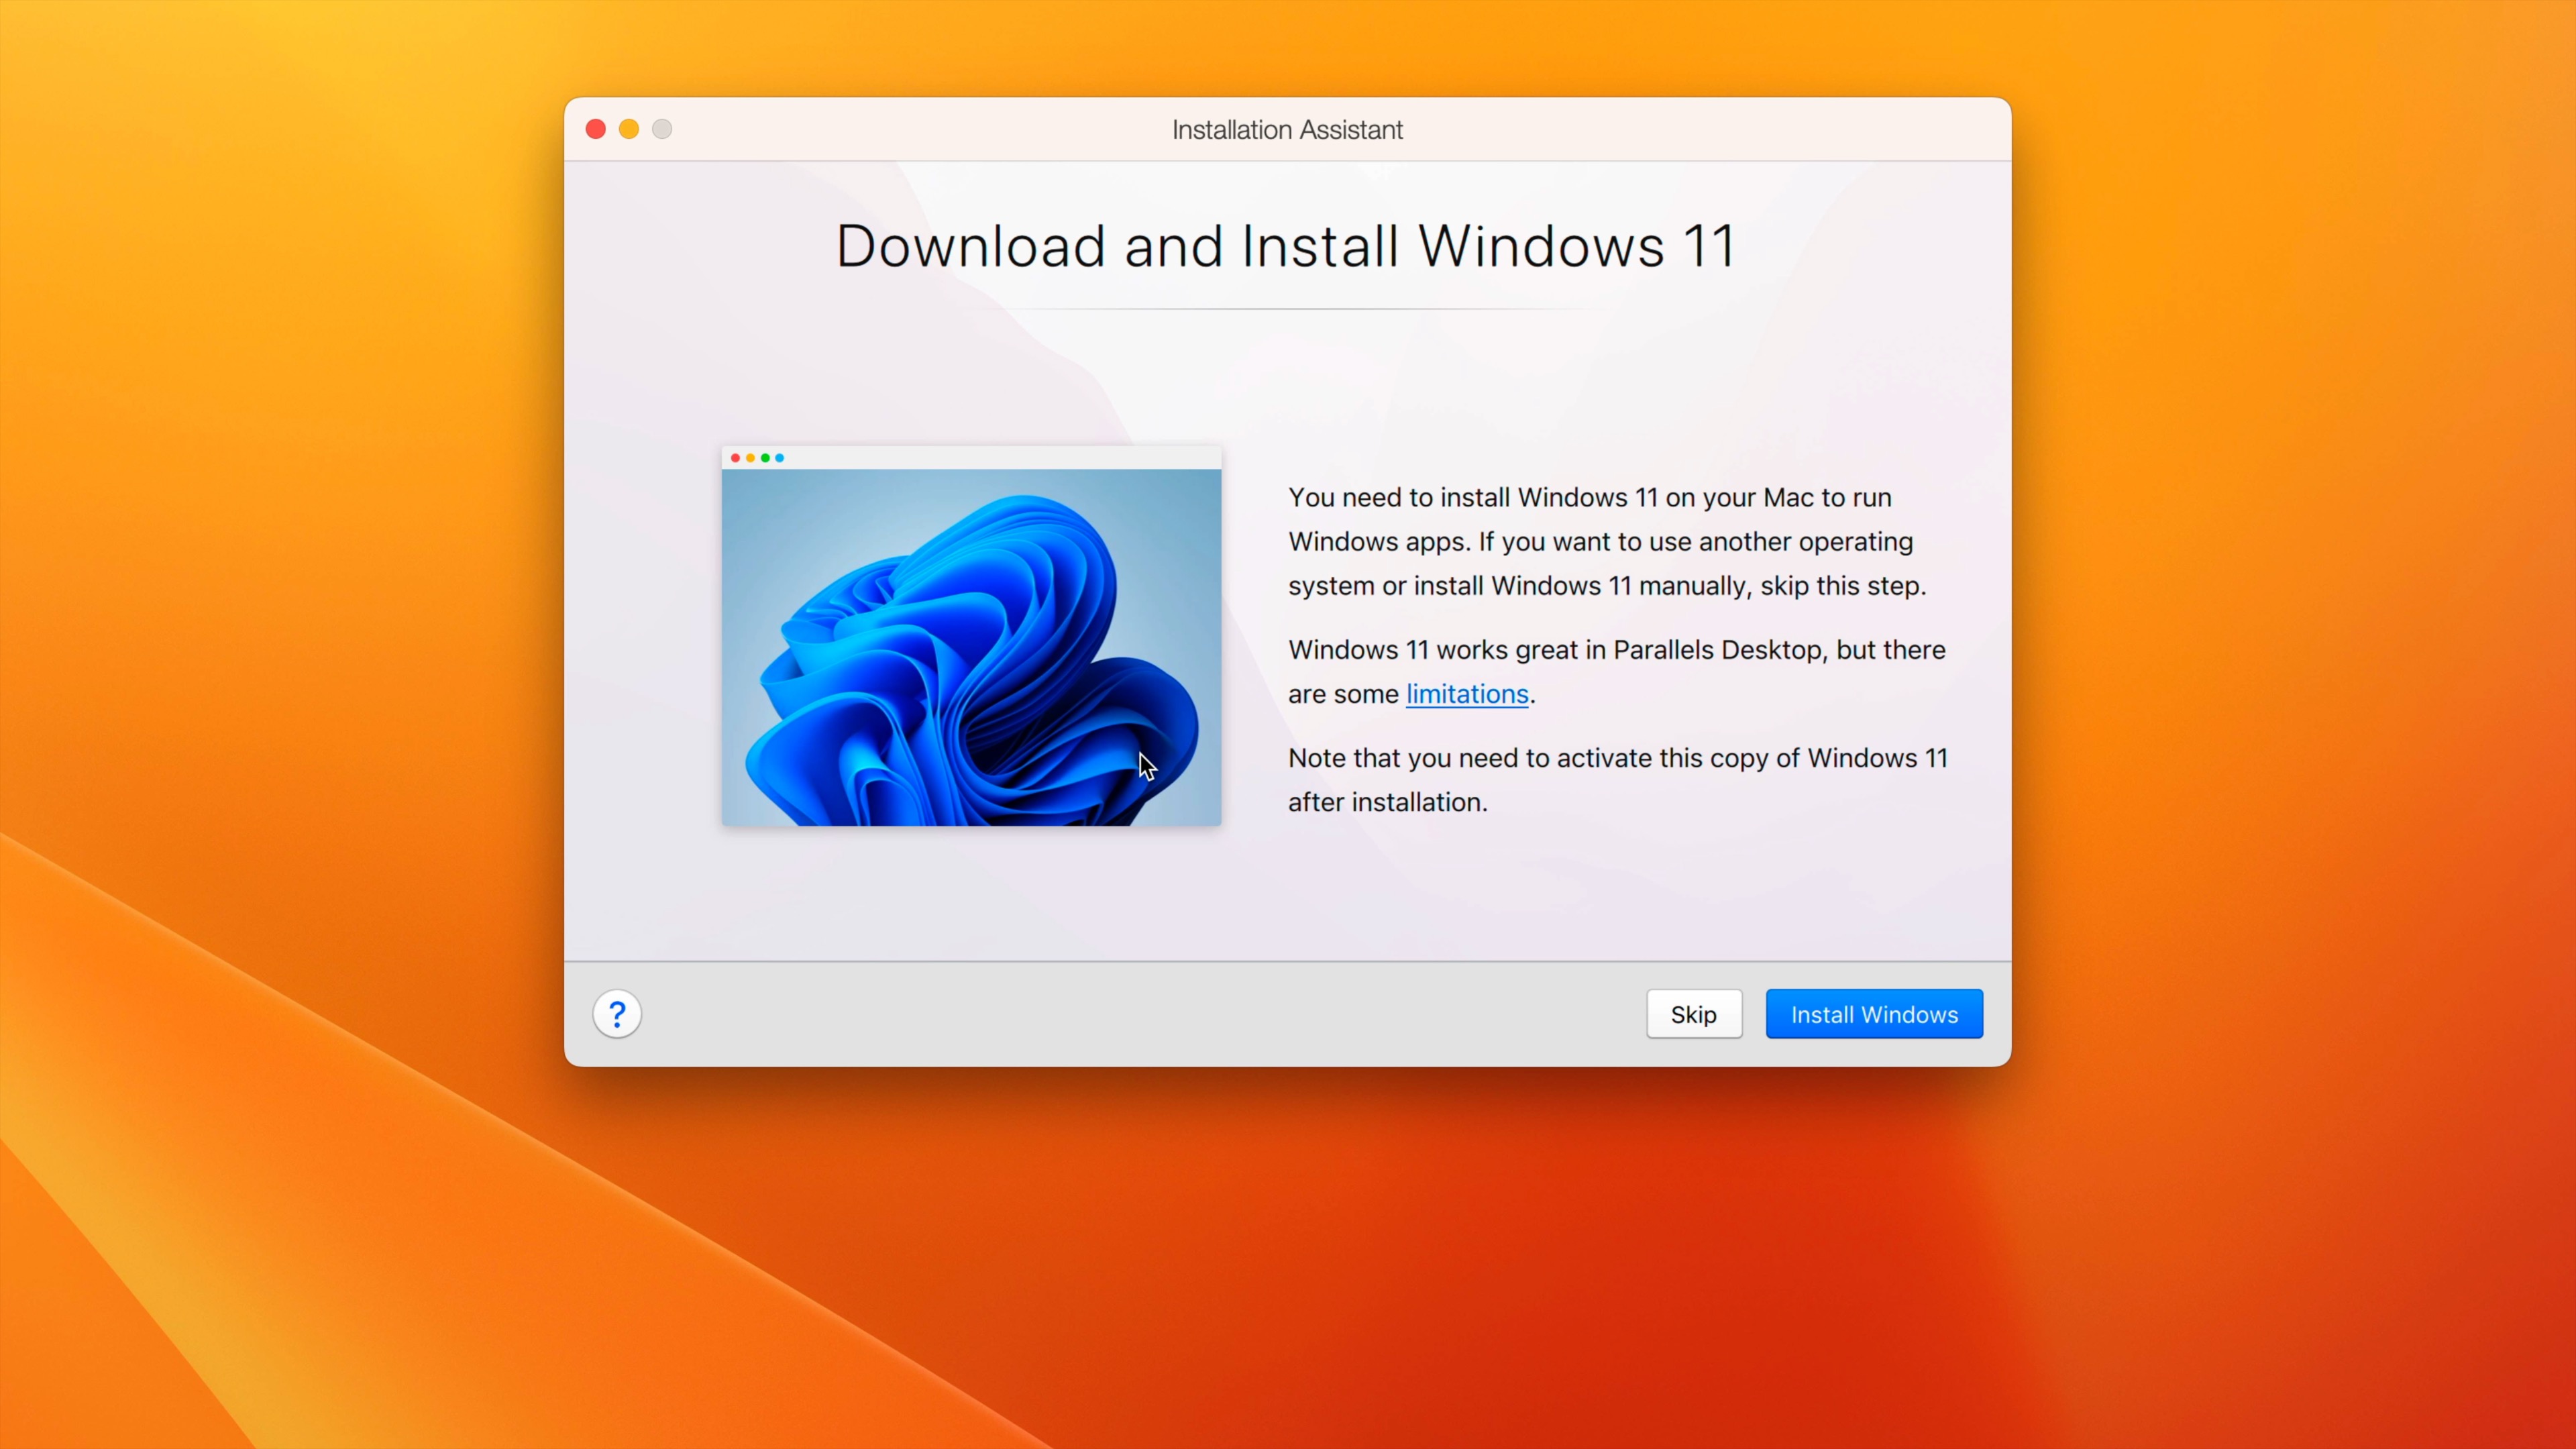
Step 5: After a brief initialization process, Parallels will start and prompt you to download and install Windows 11. Click the blue Install Windows button in the bottom right-hand corner to begin the download of the Windows 11 for ARM64 ISO.
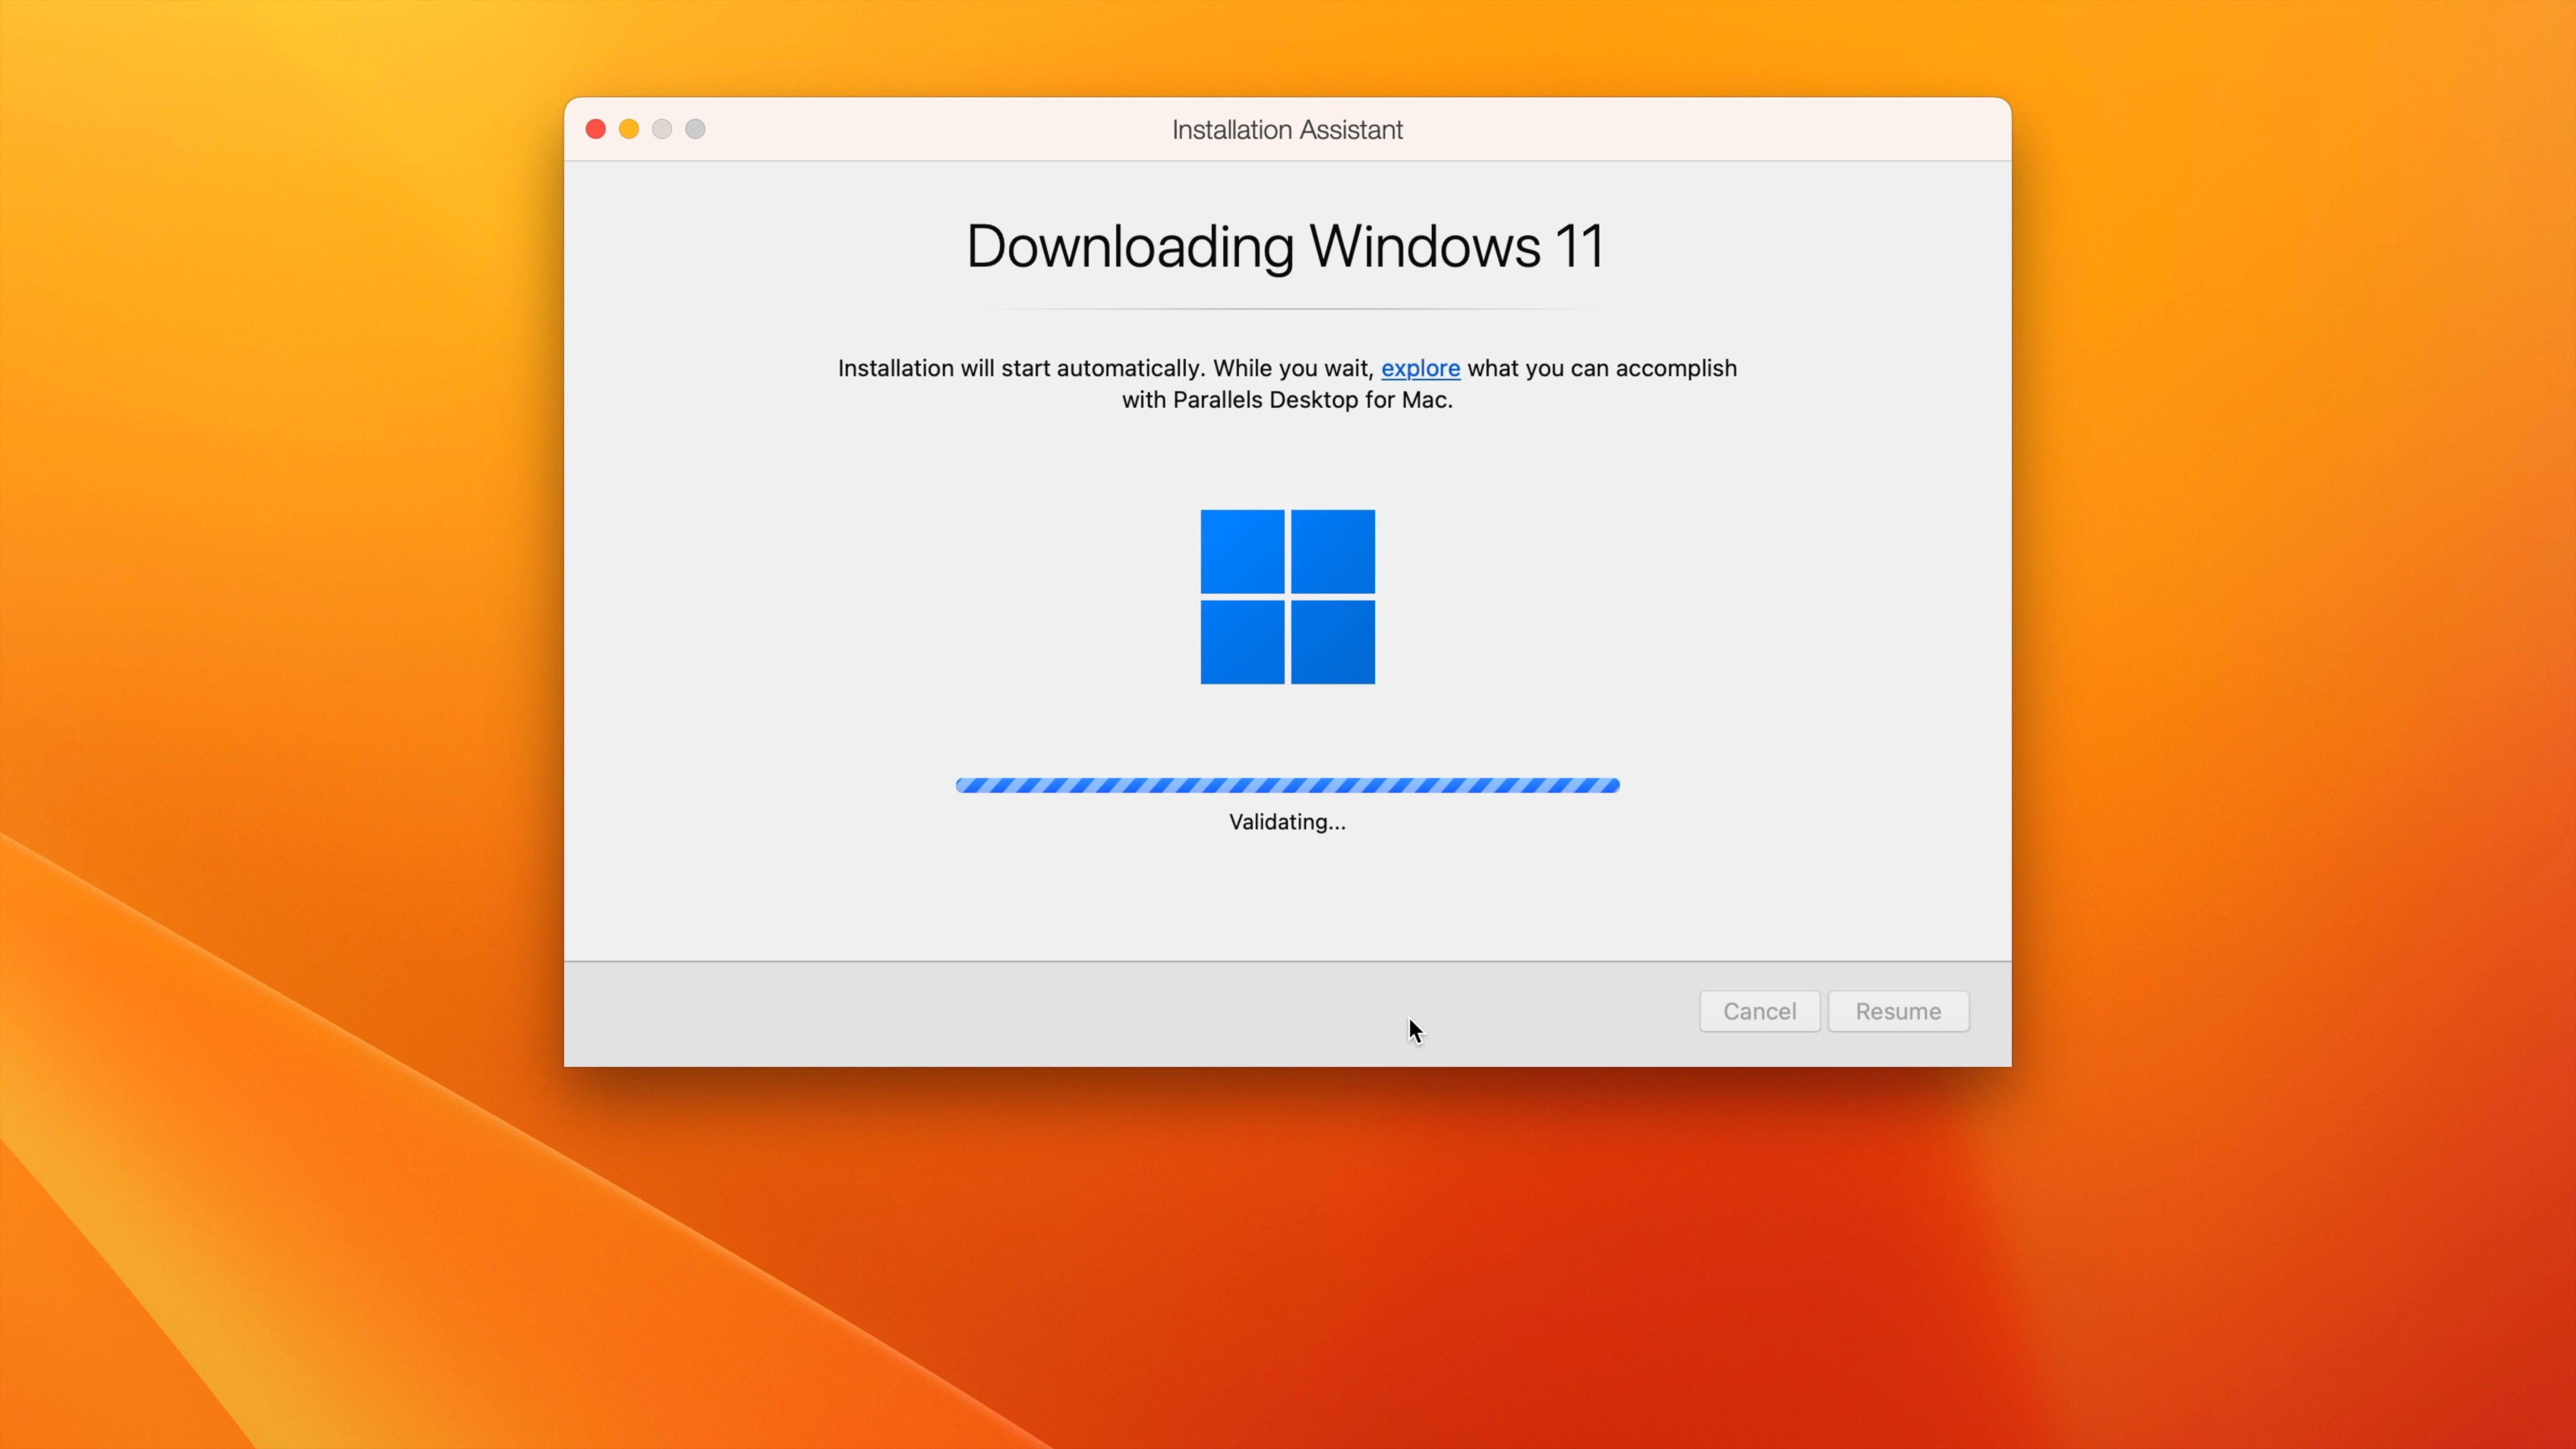
Step 6: Once the Windows 11 for ARM download is completed, the download will validate, and Windows Setup will start automatically to attempt the install. Since we’re only using Parallels to facilitate the Window 11 for ARM64 ISO download, you’ll want to stop the installation.

Step 7: Confirm that the Windows 11 for ARM64 ISO is in the ~/Downloads folder on your Mac. Then Click Windows 11 in the menu bar and select Quit Windows 11 to stop the install and close Parallels.
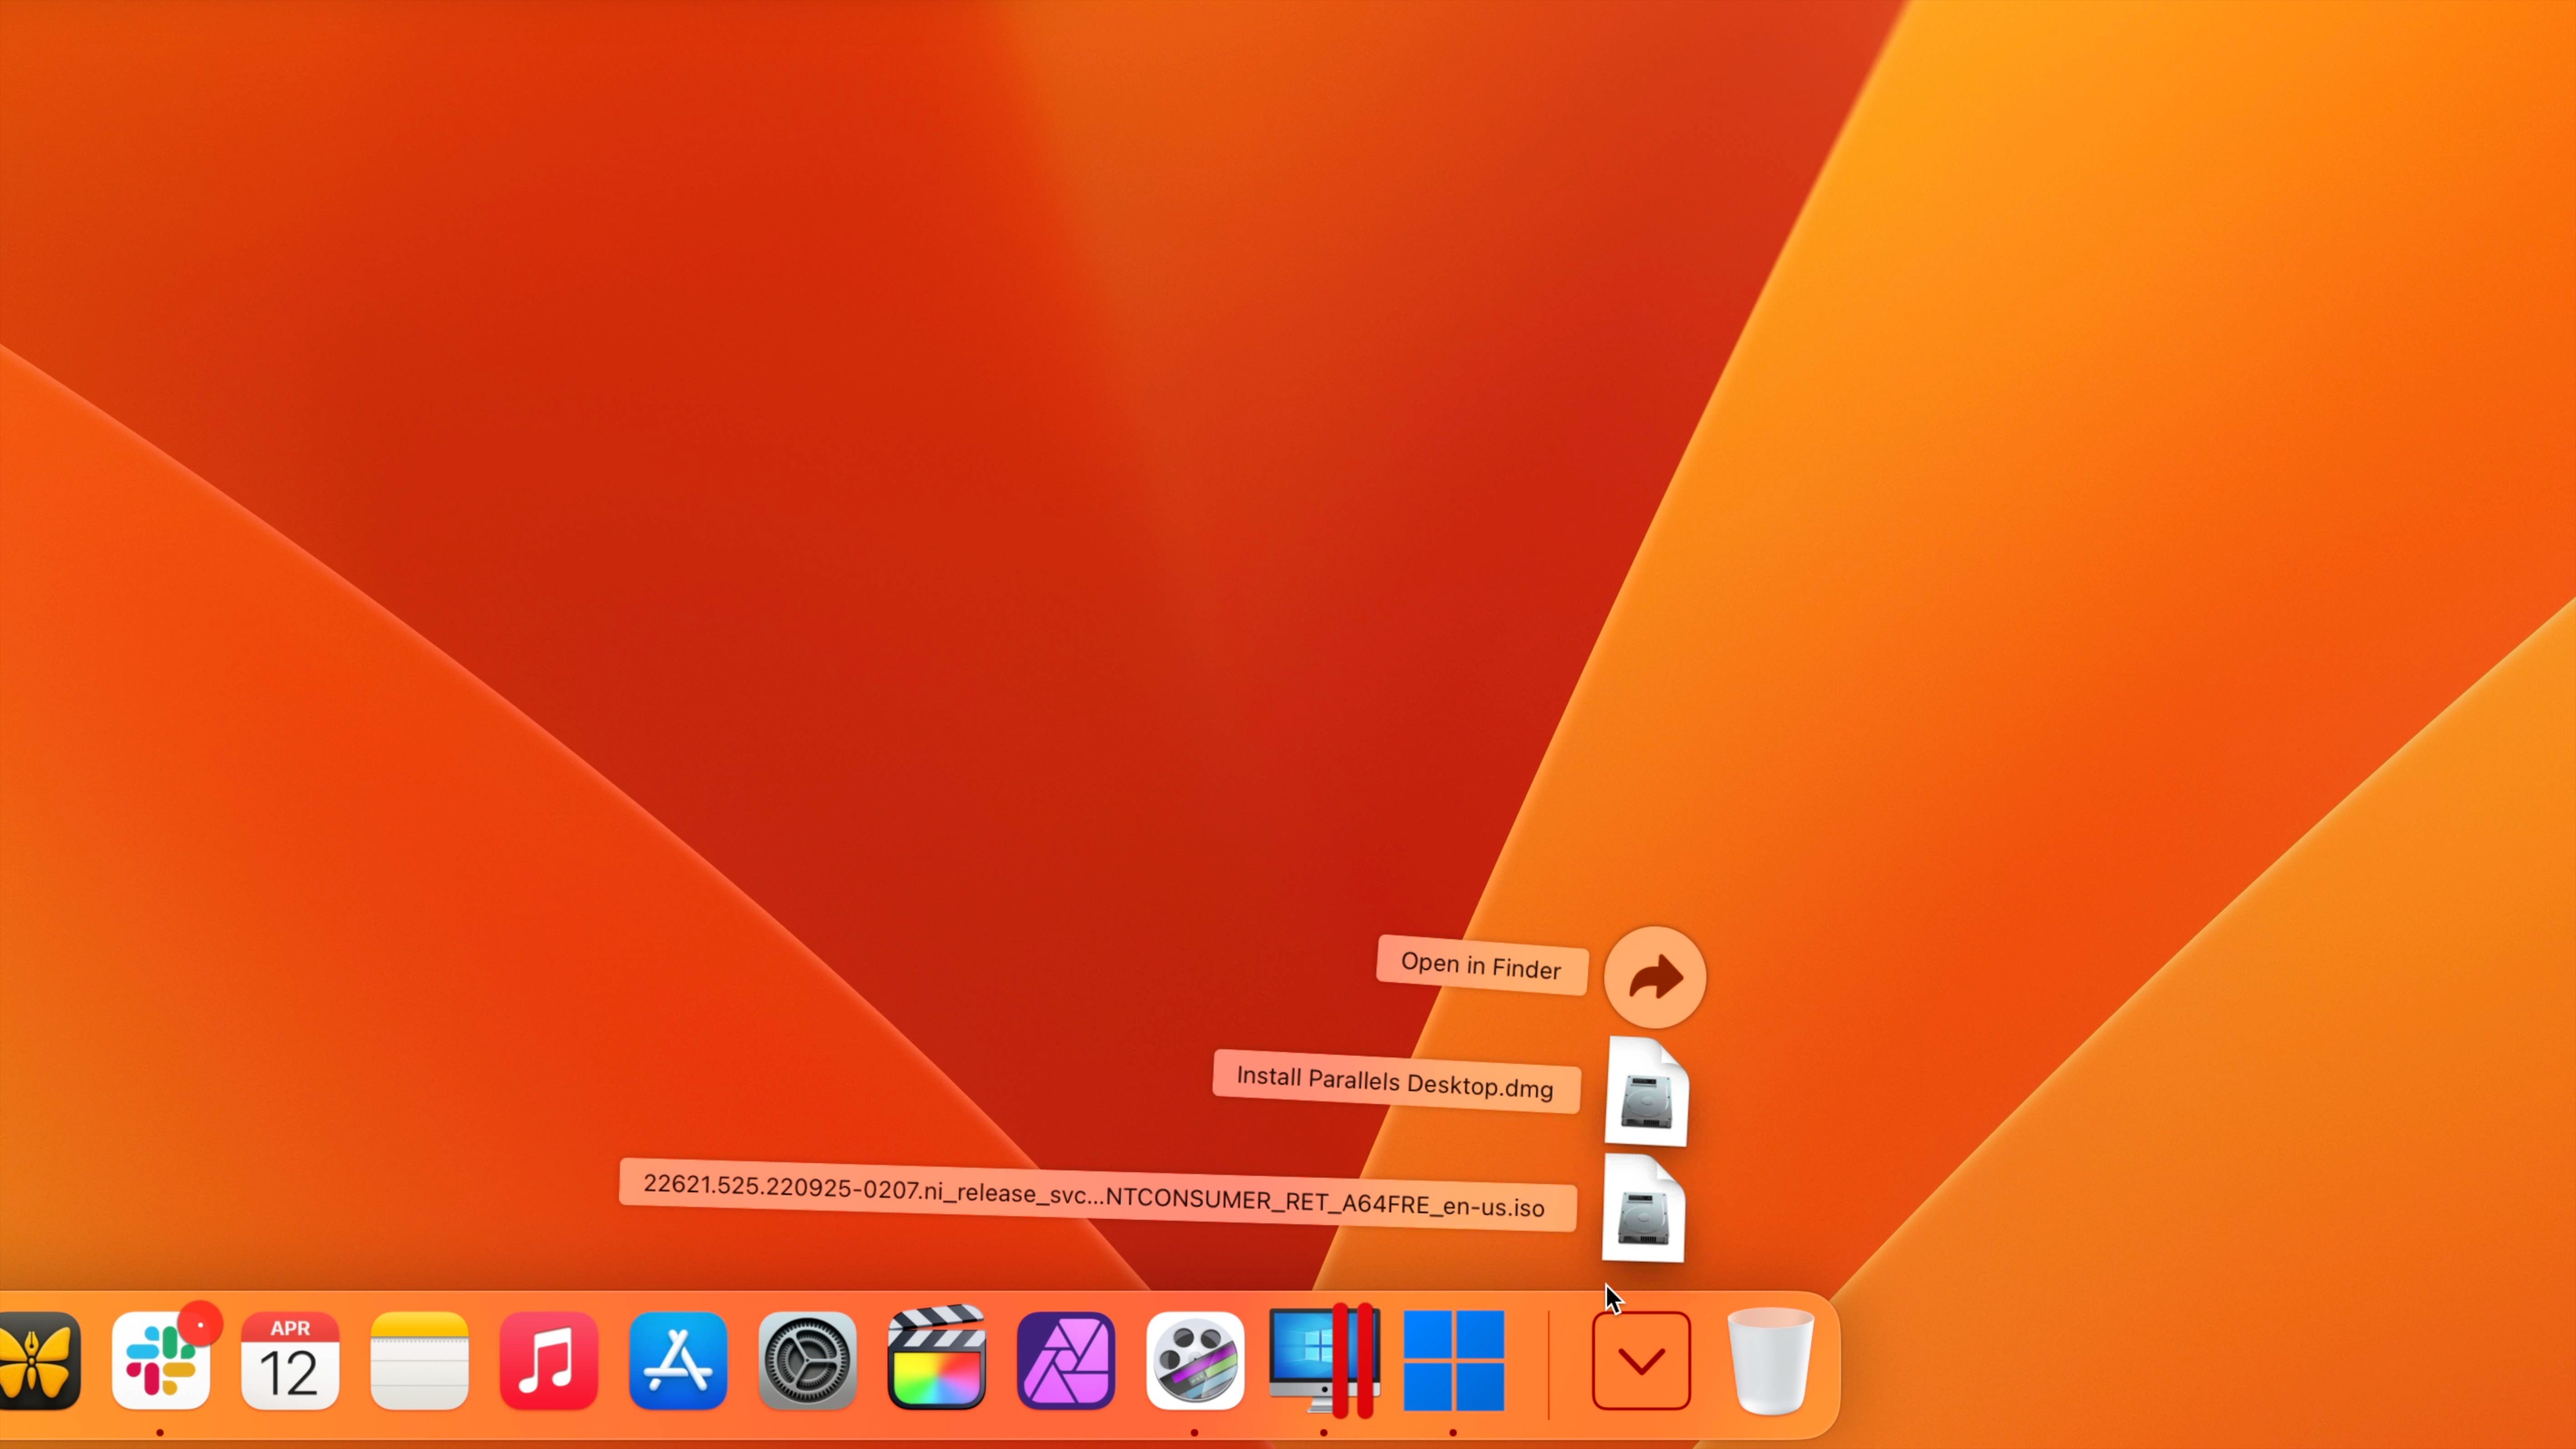
Note: In my example, the Windows 11 for ARM ISO is named:
22621.525.220925-0207.ni_release_svc_refresh_CLIENTCONSUMER_RET_A64FRE_en-us.iso
… but that name of your ISO may be different depending on when you perform the download.

Optional: You can delete the ~/Parallels folder and its contents after the ISO is downloaded if you’d like to save space. You may also completely uninstall Parallels Desktop for Mac if you don’t plan on further using it.
Install Windows 11 for ARM using VMware Fusion Player
Step 1: Visit the VMware Fusion Player 13 page. In order to Download VMware Fusion Player and utilize the personal use license, you’ll need to create and/or login with a VMware account. Once you do, then register for a Personal Use License.
Step 2: Under the License and Downloads tab, click the Manually Download button under the VMware Fusion Player binaries section.
Step 3: Double-click the VMware-Fusion.dmg found in ~/Downloads to mount the image. Once mounted, double-click the VMware Fusion icon to begin the install process.
Step 4: On the are you sure you want to open it prompt, click Open and then enter the administrator password and click OK. A brief initialization will be performed.
Step 5: On the VMware Fusion 13 EULA screen, click Agree in the bottom right-hand corner.
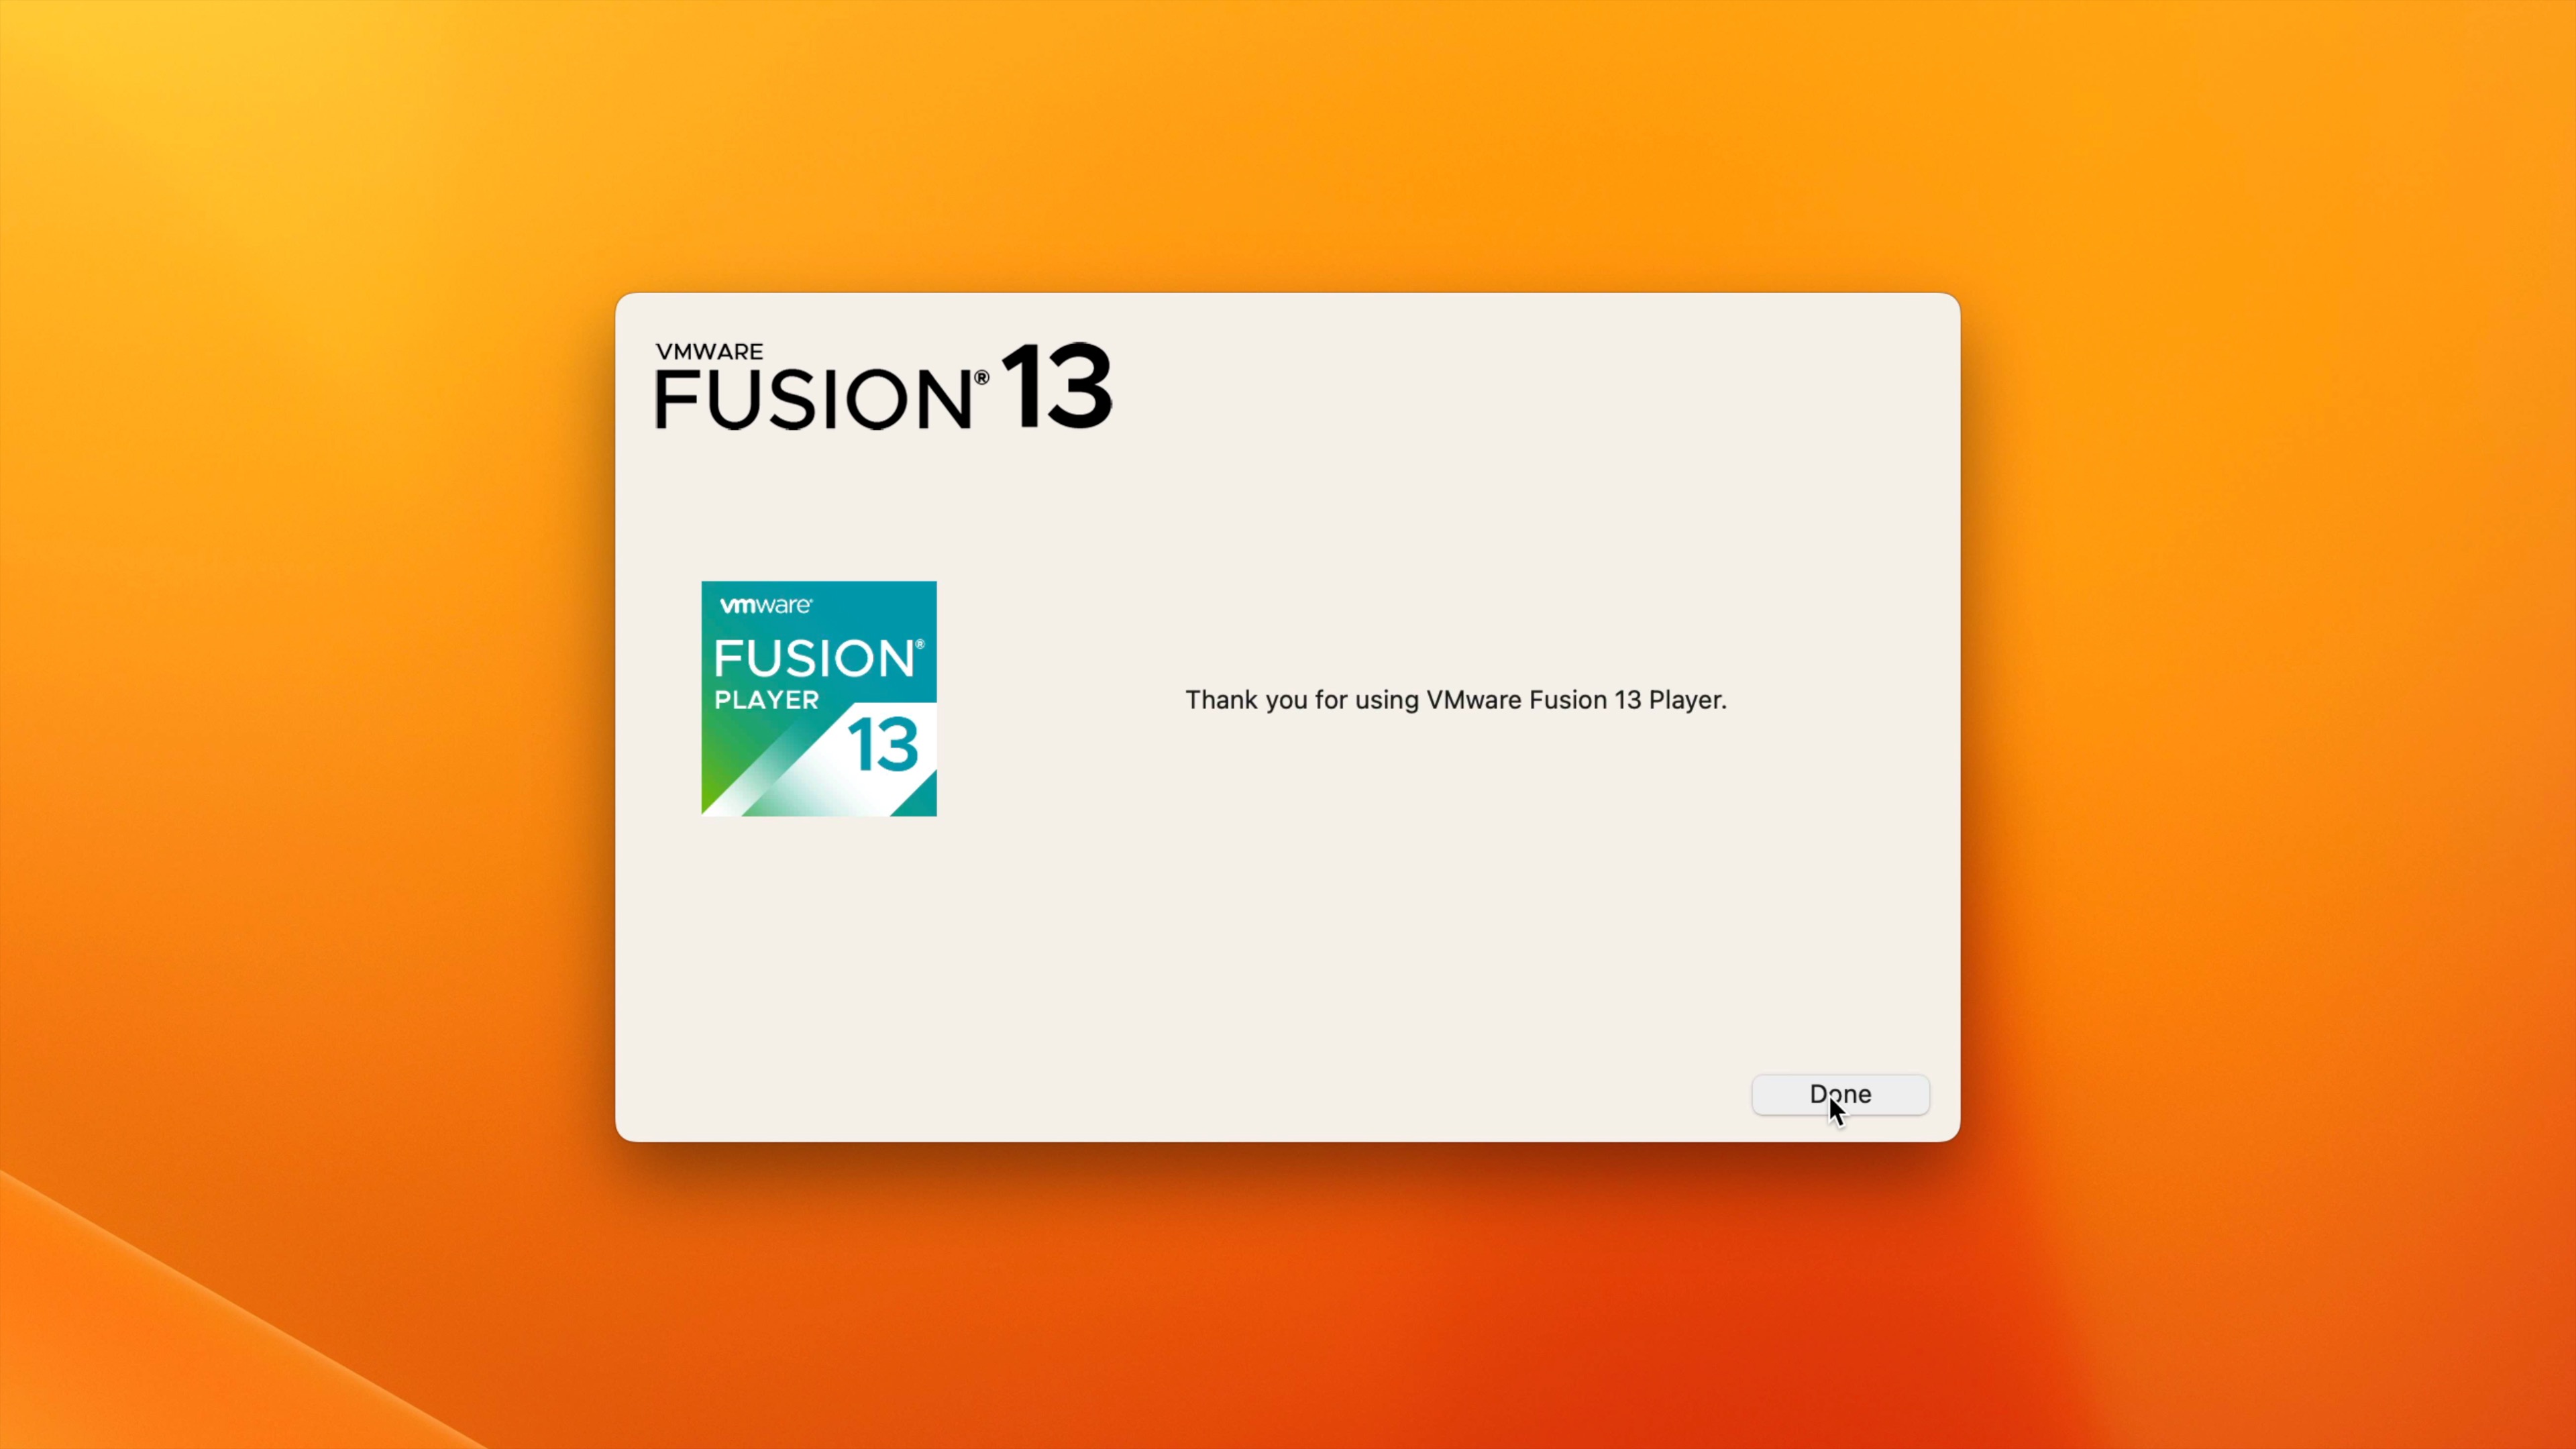
Step 6: Paste the personal license key created in Step 1 in the license key field. This key can be found under the License Information section of the License and Download tab on the VMware Fusion Player website. Click Continue in the bottom right-hand corner and then click Done.
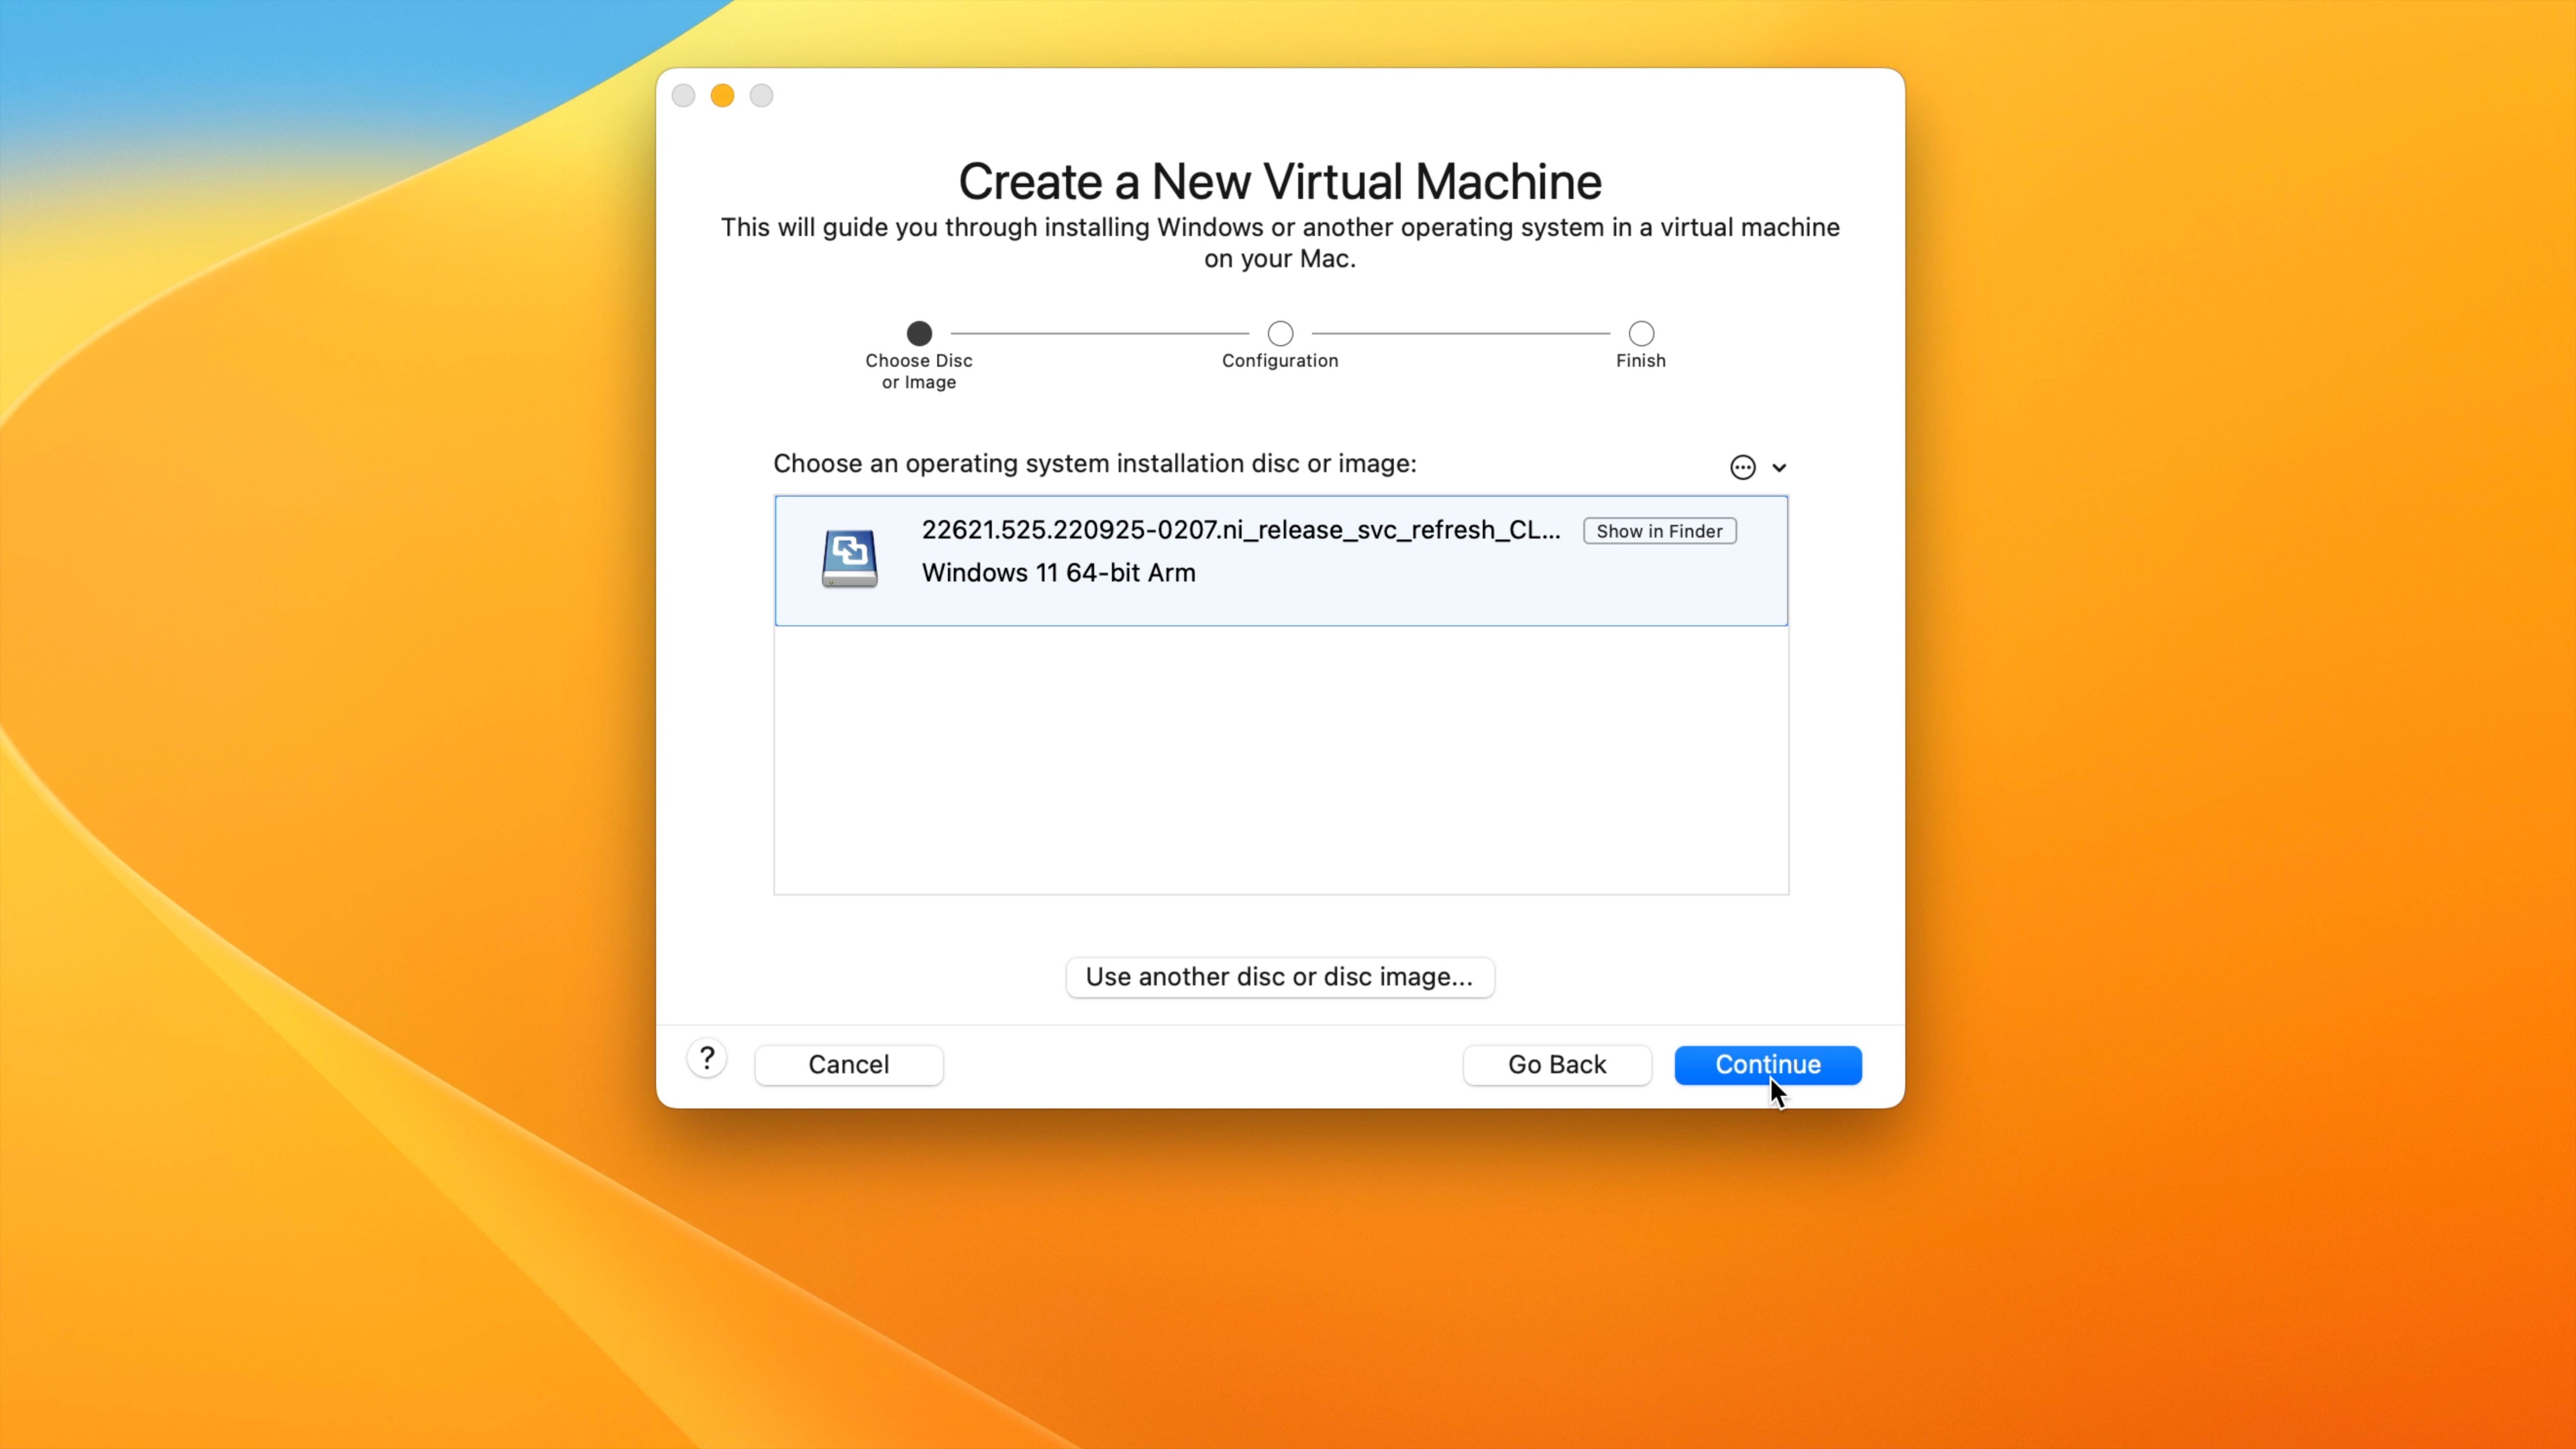
Step 7: The Select the Installation Method screen will now be displayed. Drag the Windows 11 for ARM64 ISO that you downloaded in the previous section to the Install from disc or image portion of the screen and click Continue and Continue again.
Step 8: On the Choose Firmware Type screen, keep the default UEFI selection and click Continue.
Step 9: On the Choose Encryption screen, click Auto Generate Password, and click Continue.
Step 10: On the Finish page, click Customize Settings, type a name for your Virtual Machine, and click Save. Next, configure the Processors and Memory resources as desired, and close the Settings page.
Step 11: On the Virtual Machine window, click the Play button, or click Virtual Machine → Start Up in the menu bar. Press any key when you see the press any key to boot from CD prompt.
Step 12: Windows will boot into its setup utility. Configure language options if needed, and click Next and then click Install now.
Step 13: Windows 11 will start setup. On the initial Windows Setup screen click I don’t have a product key (unless you actually do have one).
Step 14: Select between Windows 11 Home, or Windows 11 Pro. If you plan on purchasing a license, Windows 11 Home is the cheaper option, and most of the Pro features tread closer to the small business/enterprise side of things. Click Next once you’ve made your selection, and click Next again after clicking the checkbox to accept Microsoft’s Software License Terms.
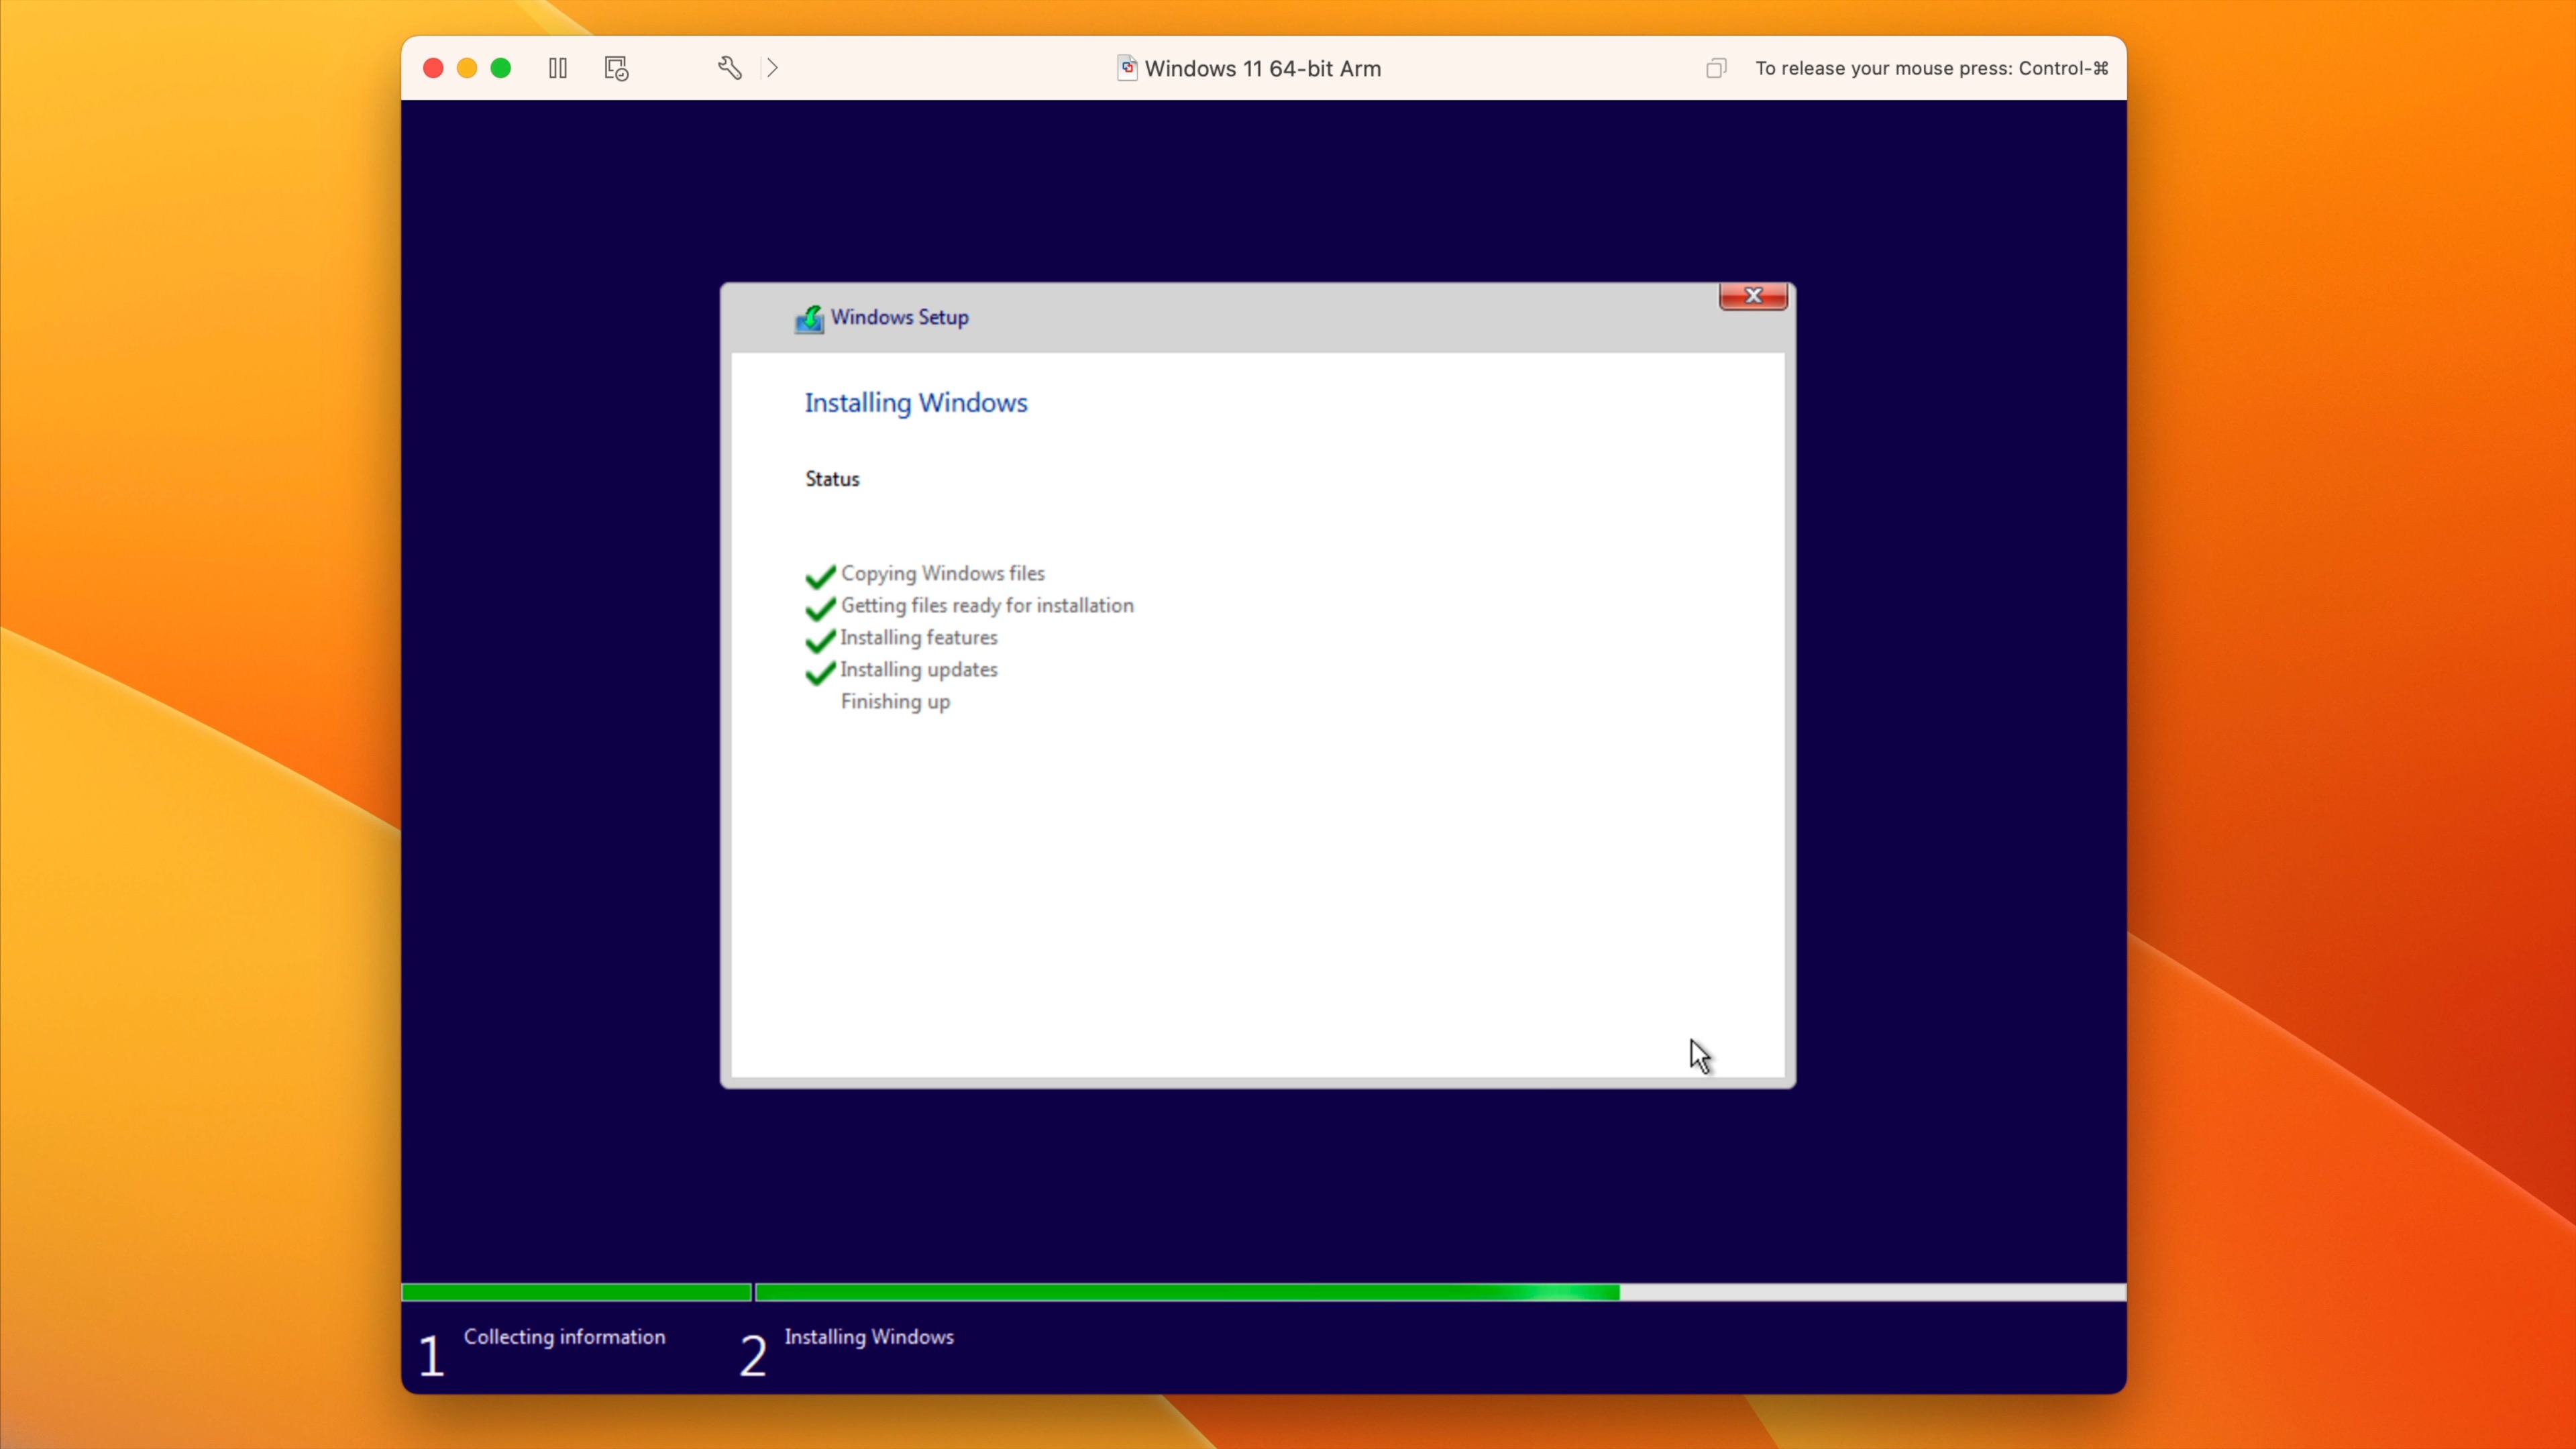
Step 15: Select Custom Install Windows only (advanced) and on the Where do you want to install Windows page, click Next. Windows Setup will proceed to copy files, and install Windows 11. Once the installation is completed you’ll be prompted to reboot.
Configure Windows 11, install network and display drivers
Windows for ARM doesn’t include the needed VMXNet3 virtual network driver, so you’ll need to bypass network enrollment to get through the Windows setup successfully. Once Windows is at the Home Screen, we’ll use PowerShell to make it possible to install VMware tools, which will then install the needed network and display drivers.
Step 1: While on the Is this the right country or region? page, press Shift+F10. If your keyboard is set up as default, and you’re using a Magic Keyboard or MacBook, you’ll need to press Fn+Shift+F10 instead. Doing so will open the Windows Command Prompt.
Step 2: At the command prompt, type the following and press Return:
OOBE\BYPASSNRO
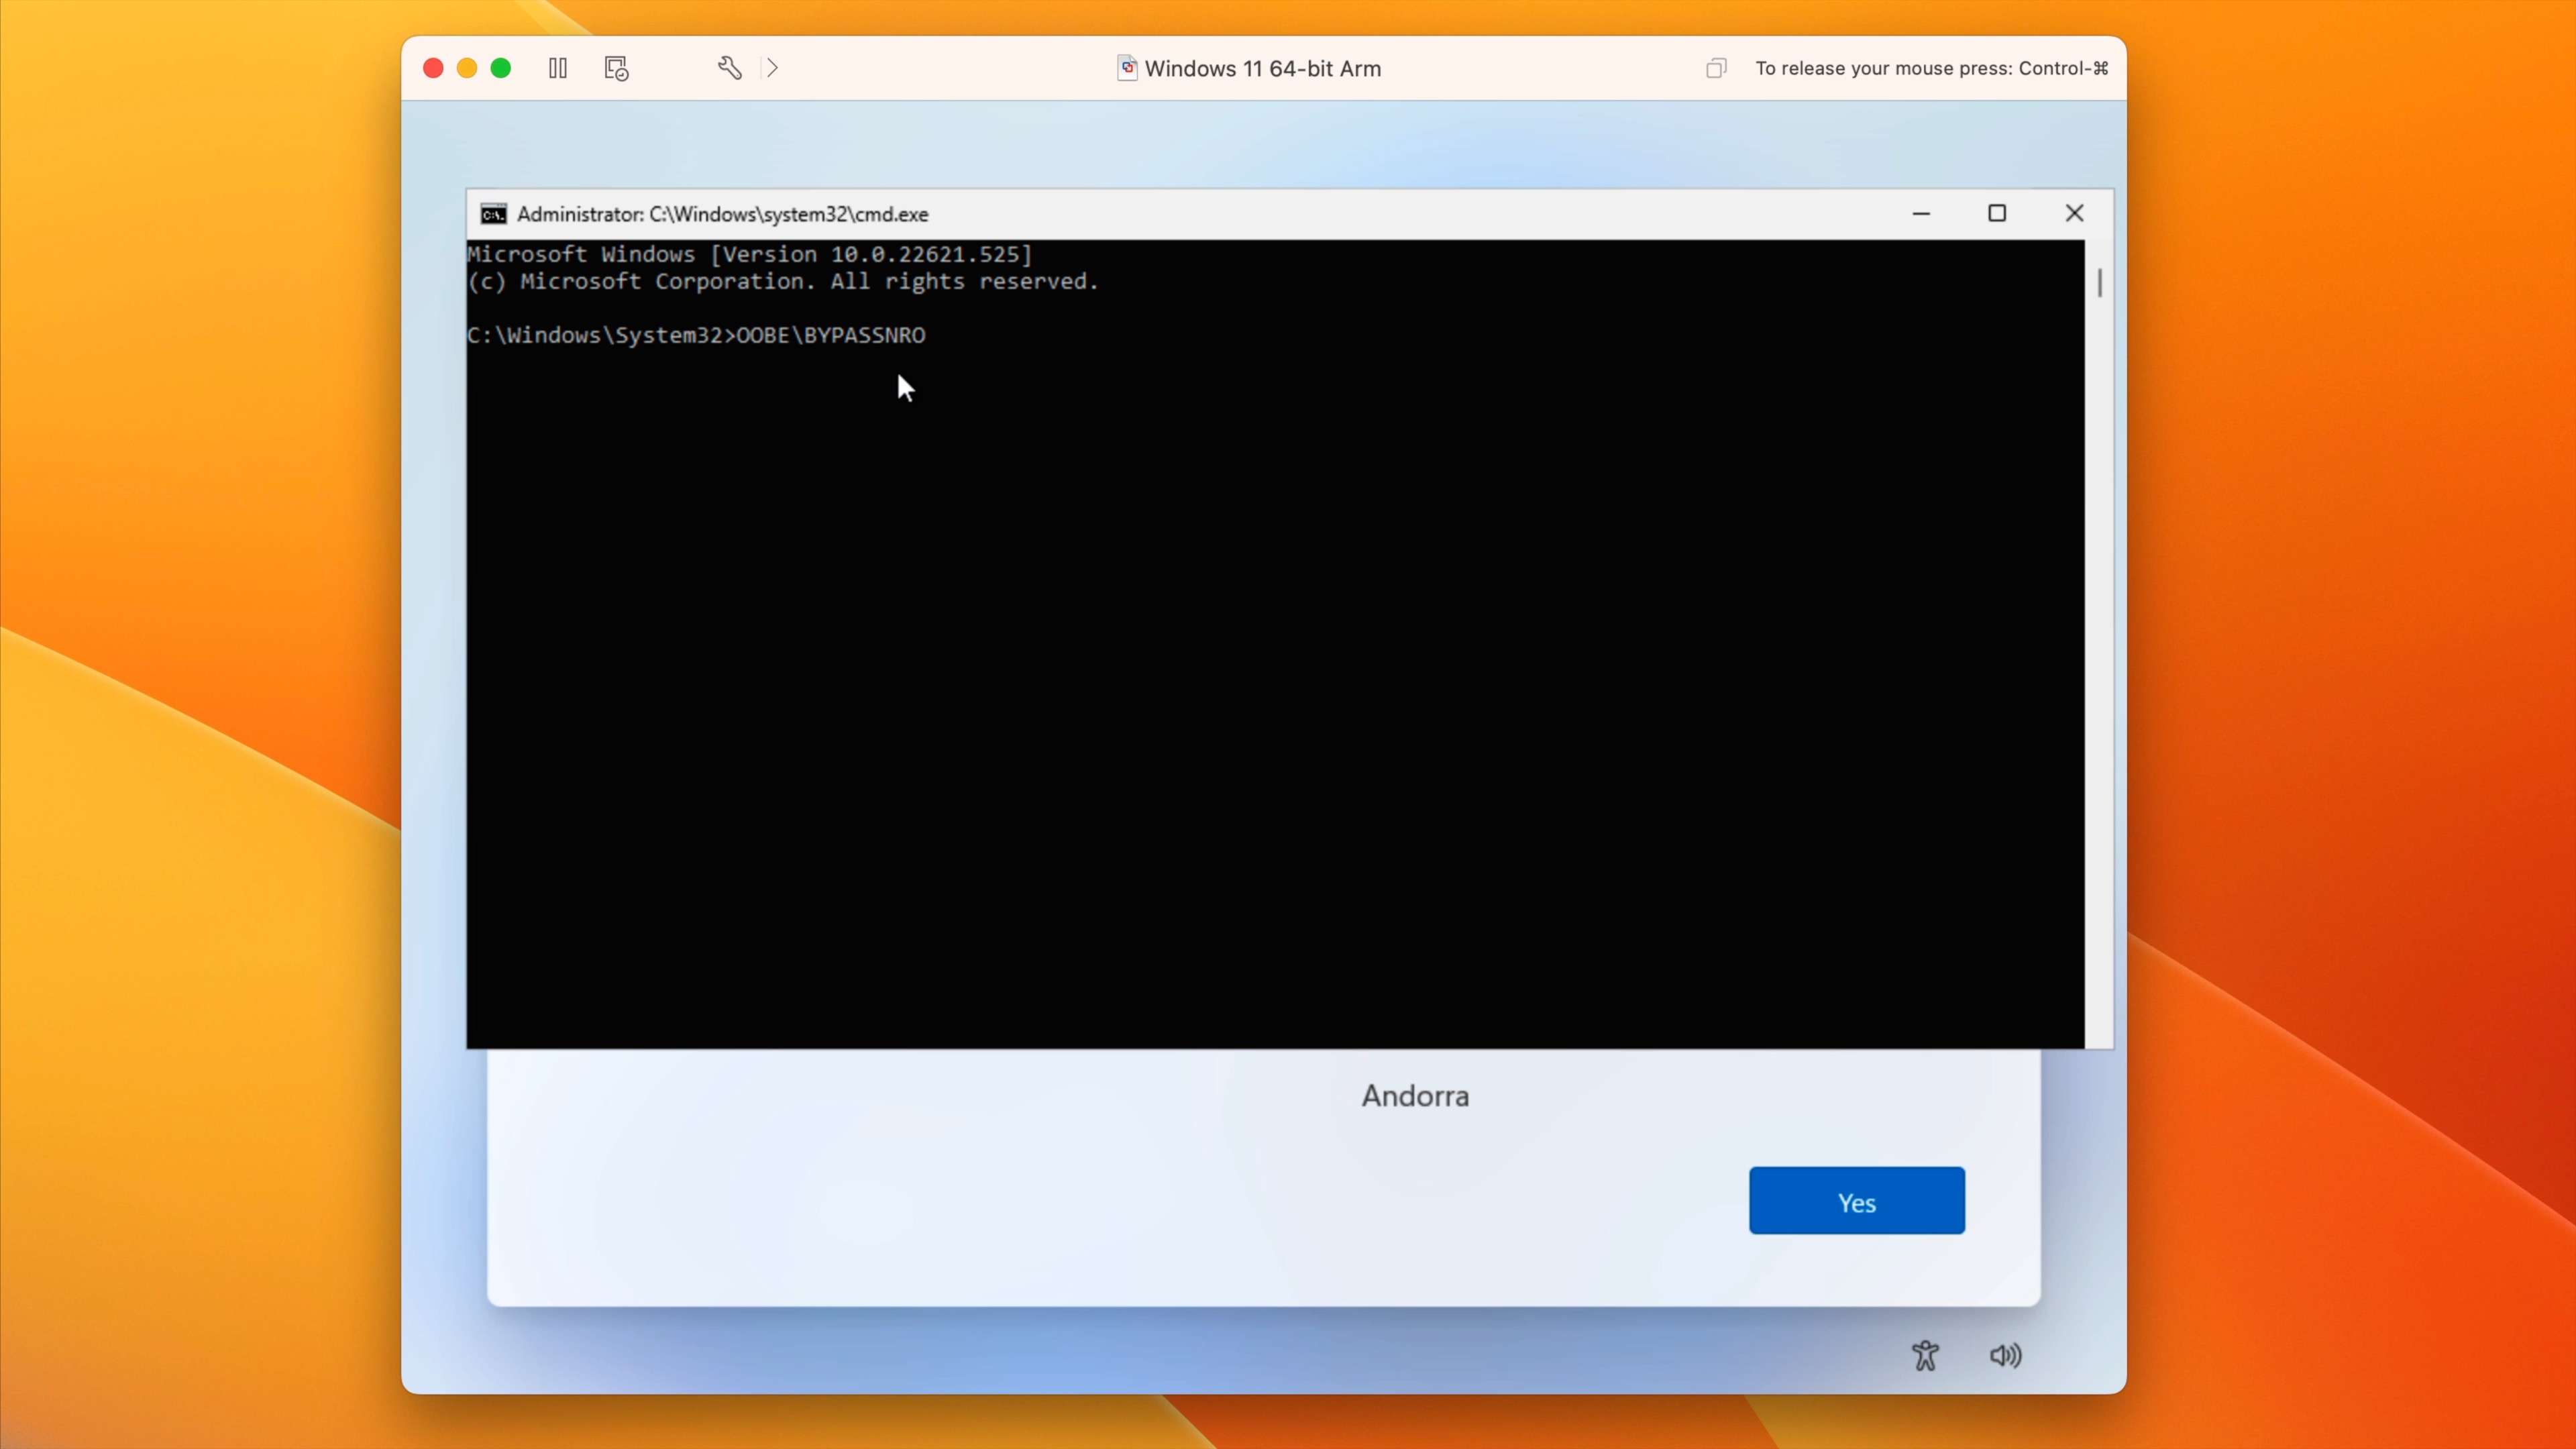
Step 3: Windows will reboot and restart Windows Setup. Select your Country and keyboard layout and click Yes. On the second keyboard layout page click Skip.
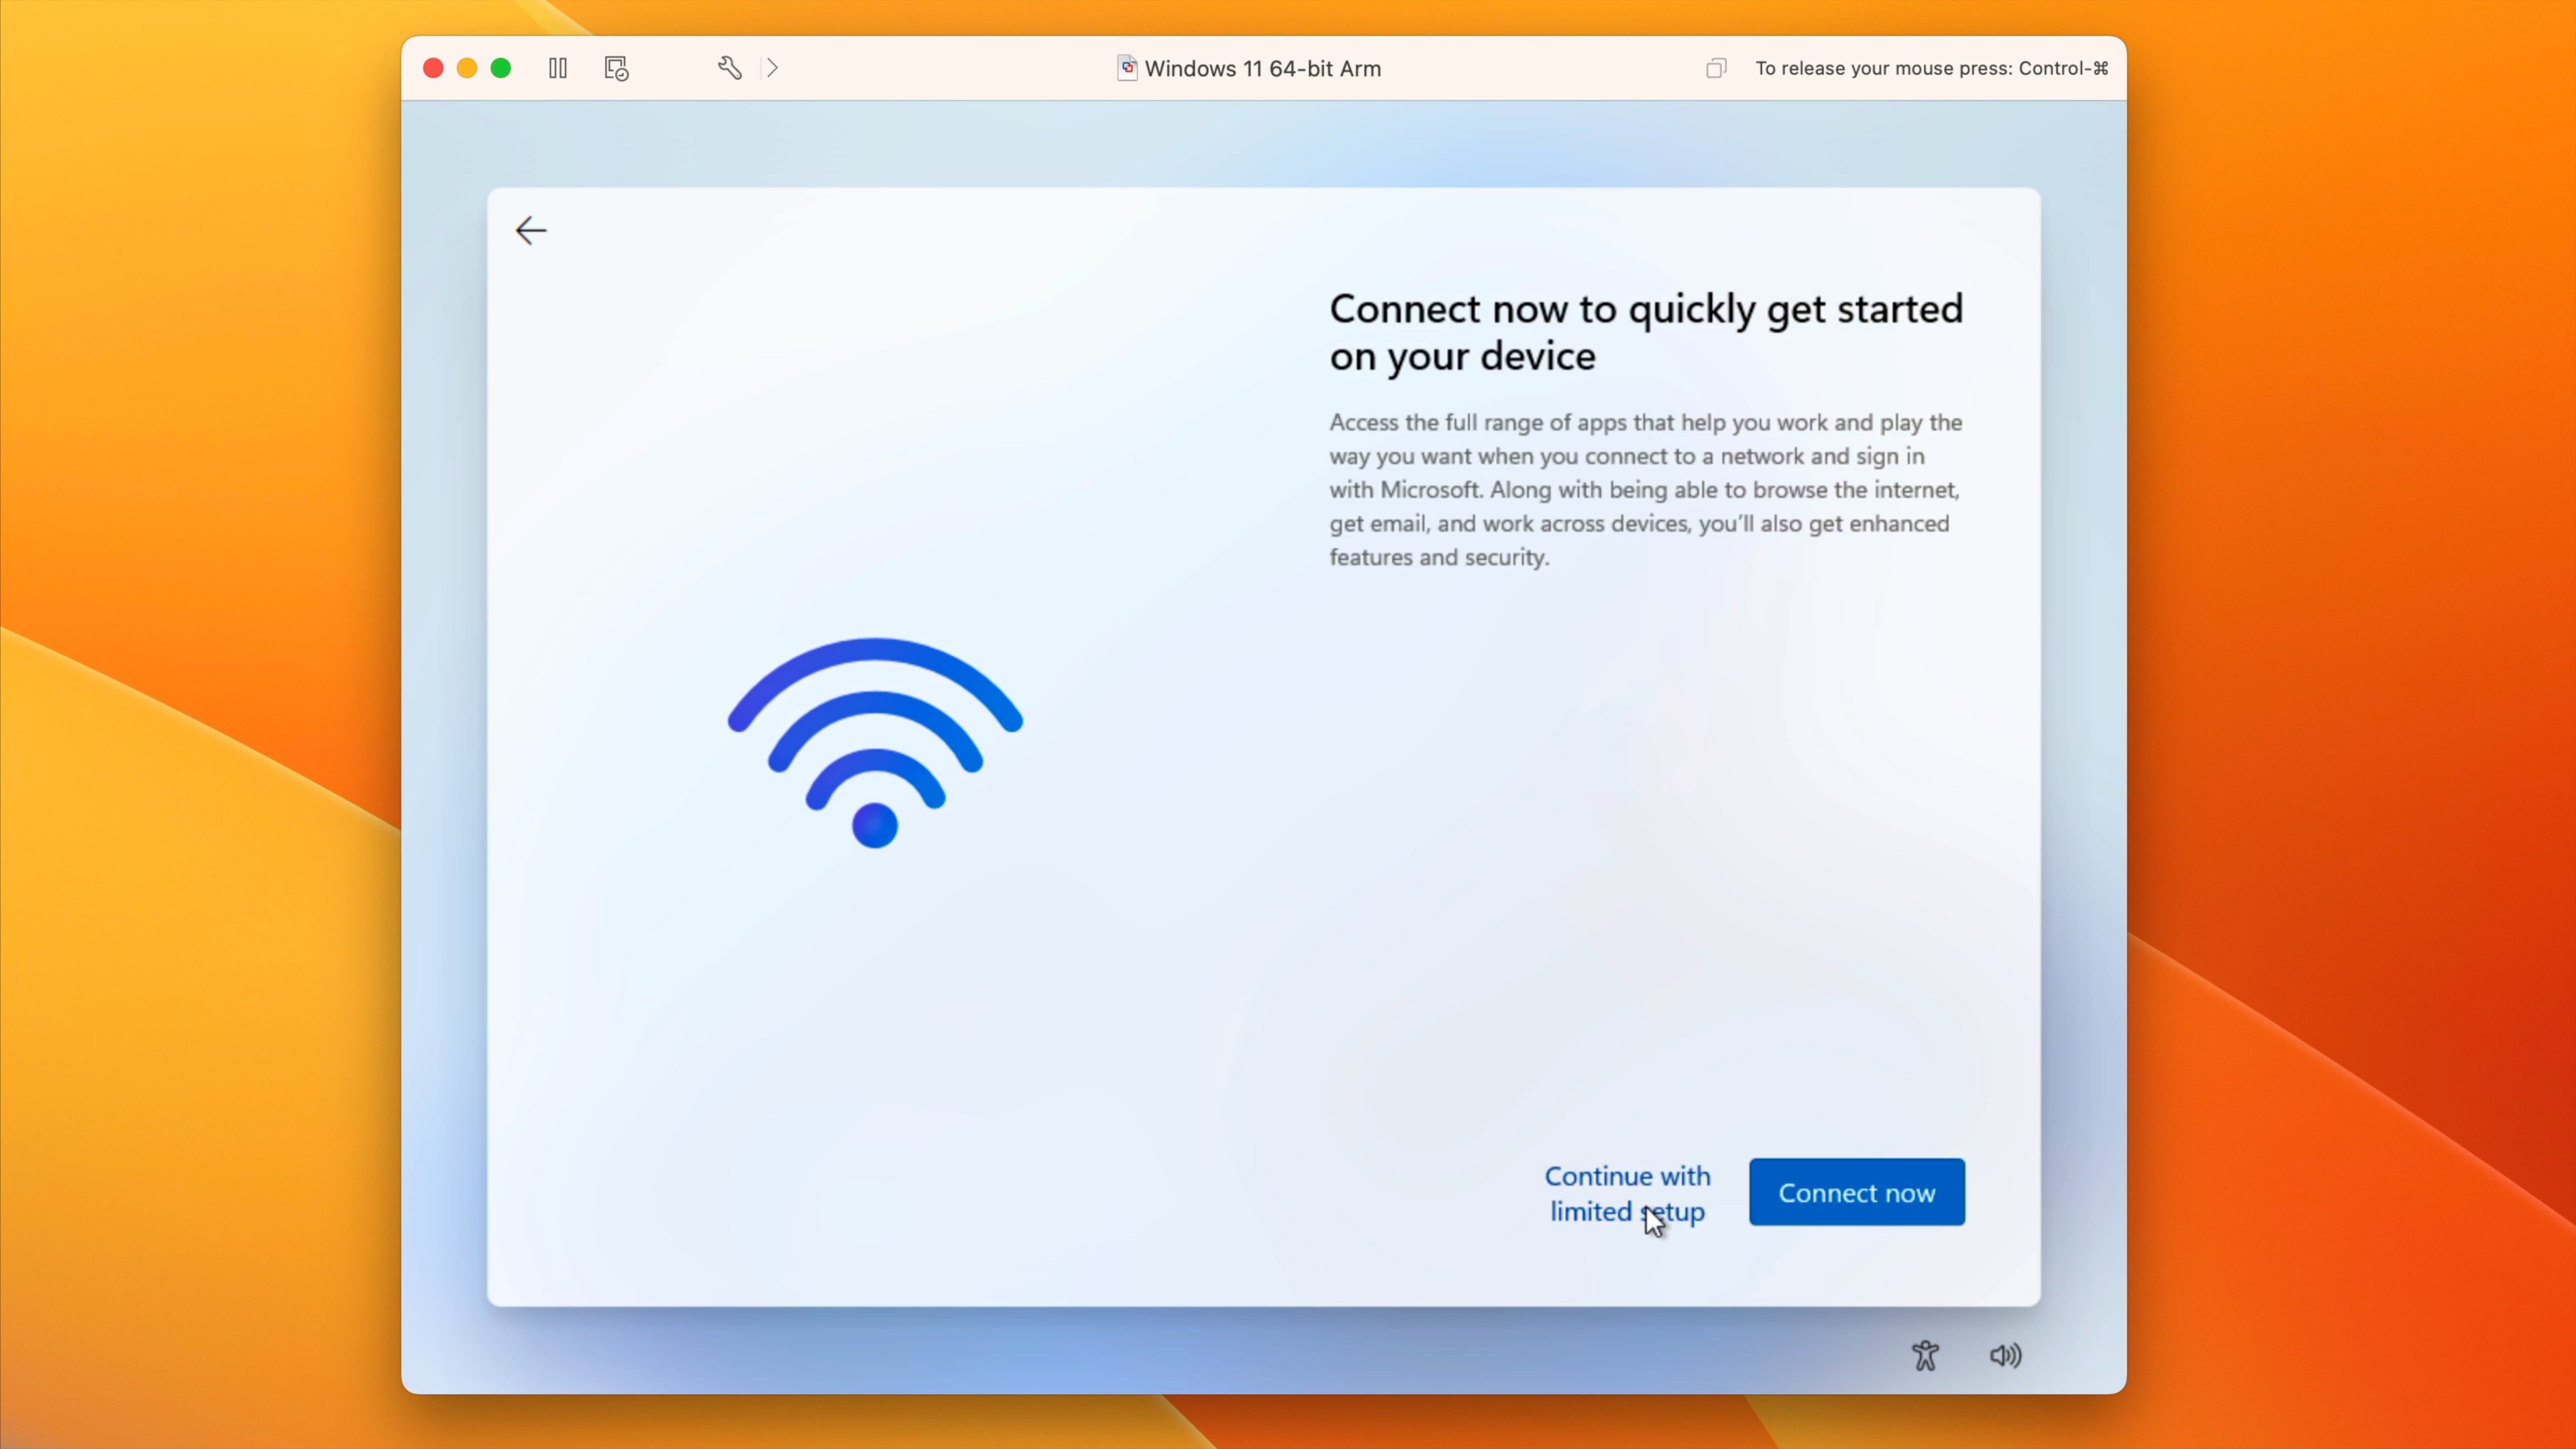
Step 4: On the Let’s connect you to a network page, click I don’t have internet at the bottom of the page and click Continue with limited setup on the next page.
Step 5: Enter your name and click Next. You may assign a password now, or leave the password field blank and click Next.
Step 6: Disable all of the privacy settings and click Accept. Windows will now continue to get things ready in the background. This may take a while, just be patient, and eventually you’ll be brought to the Windows desktop.
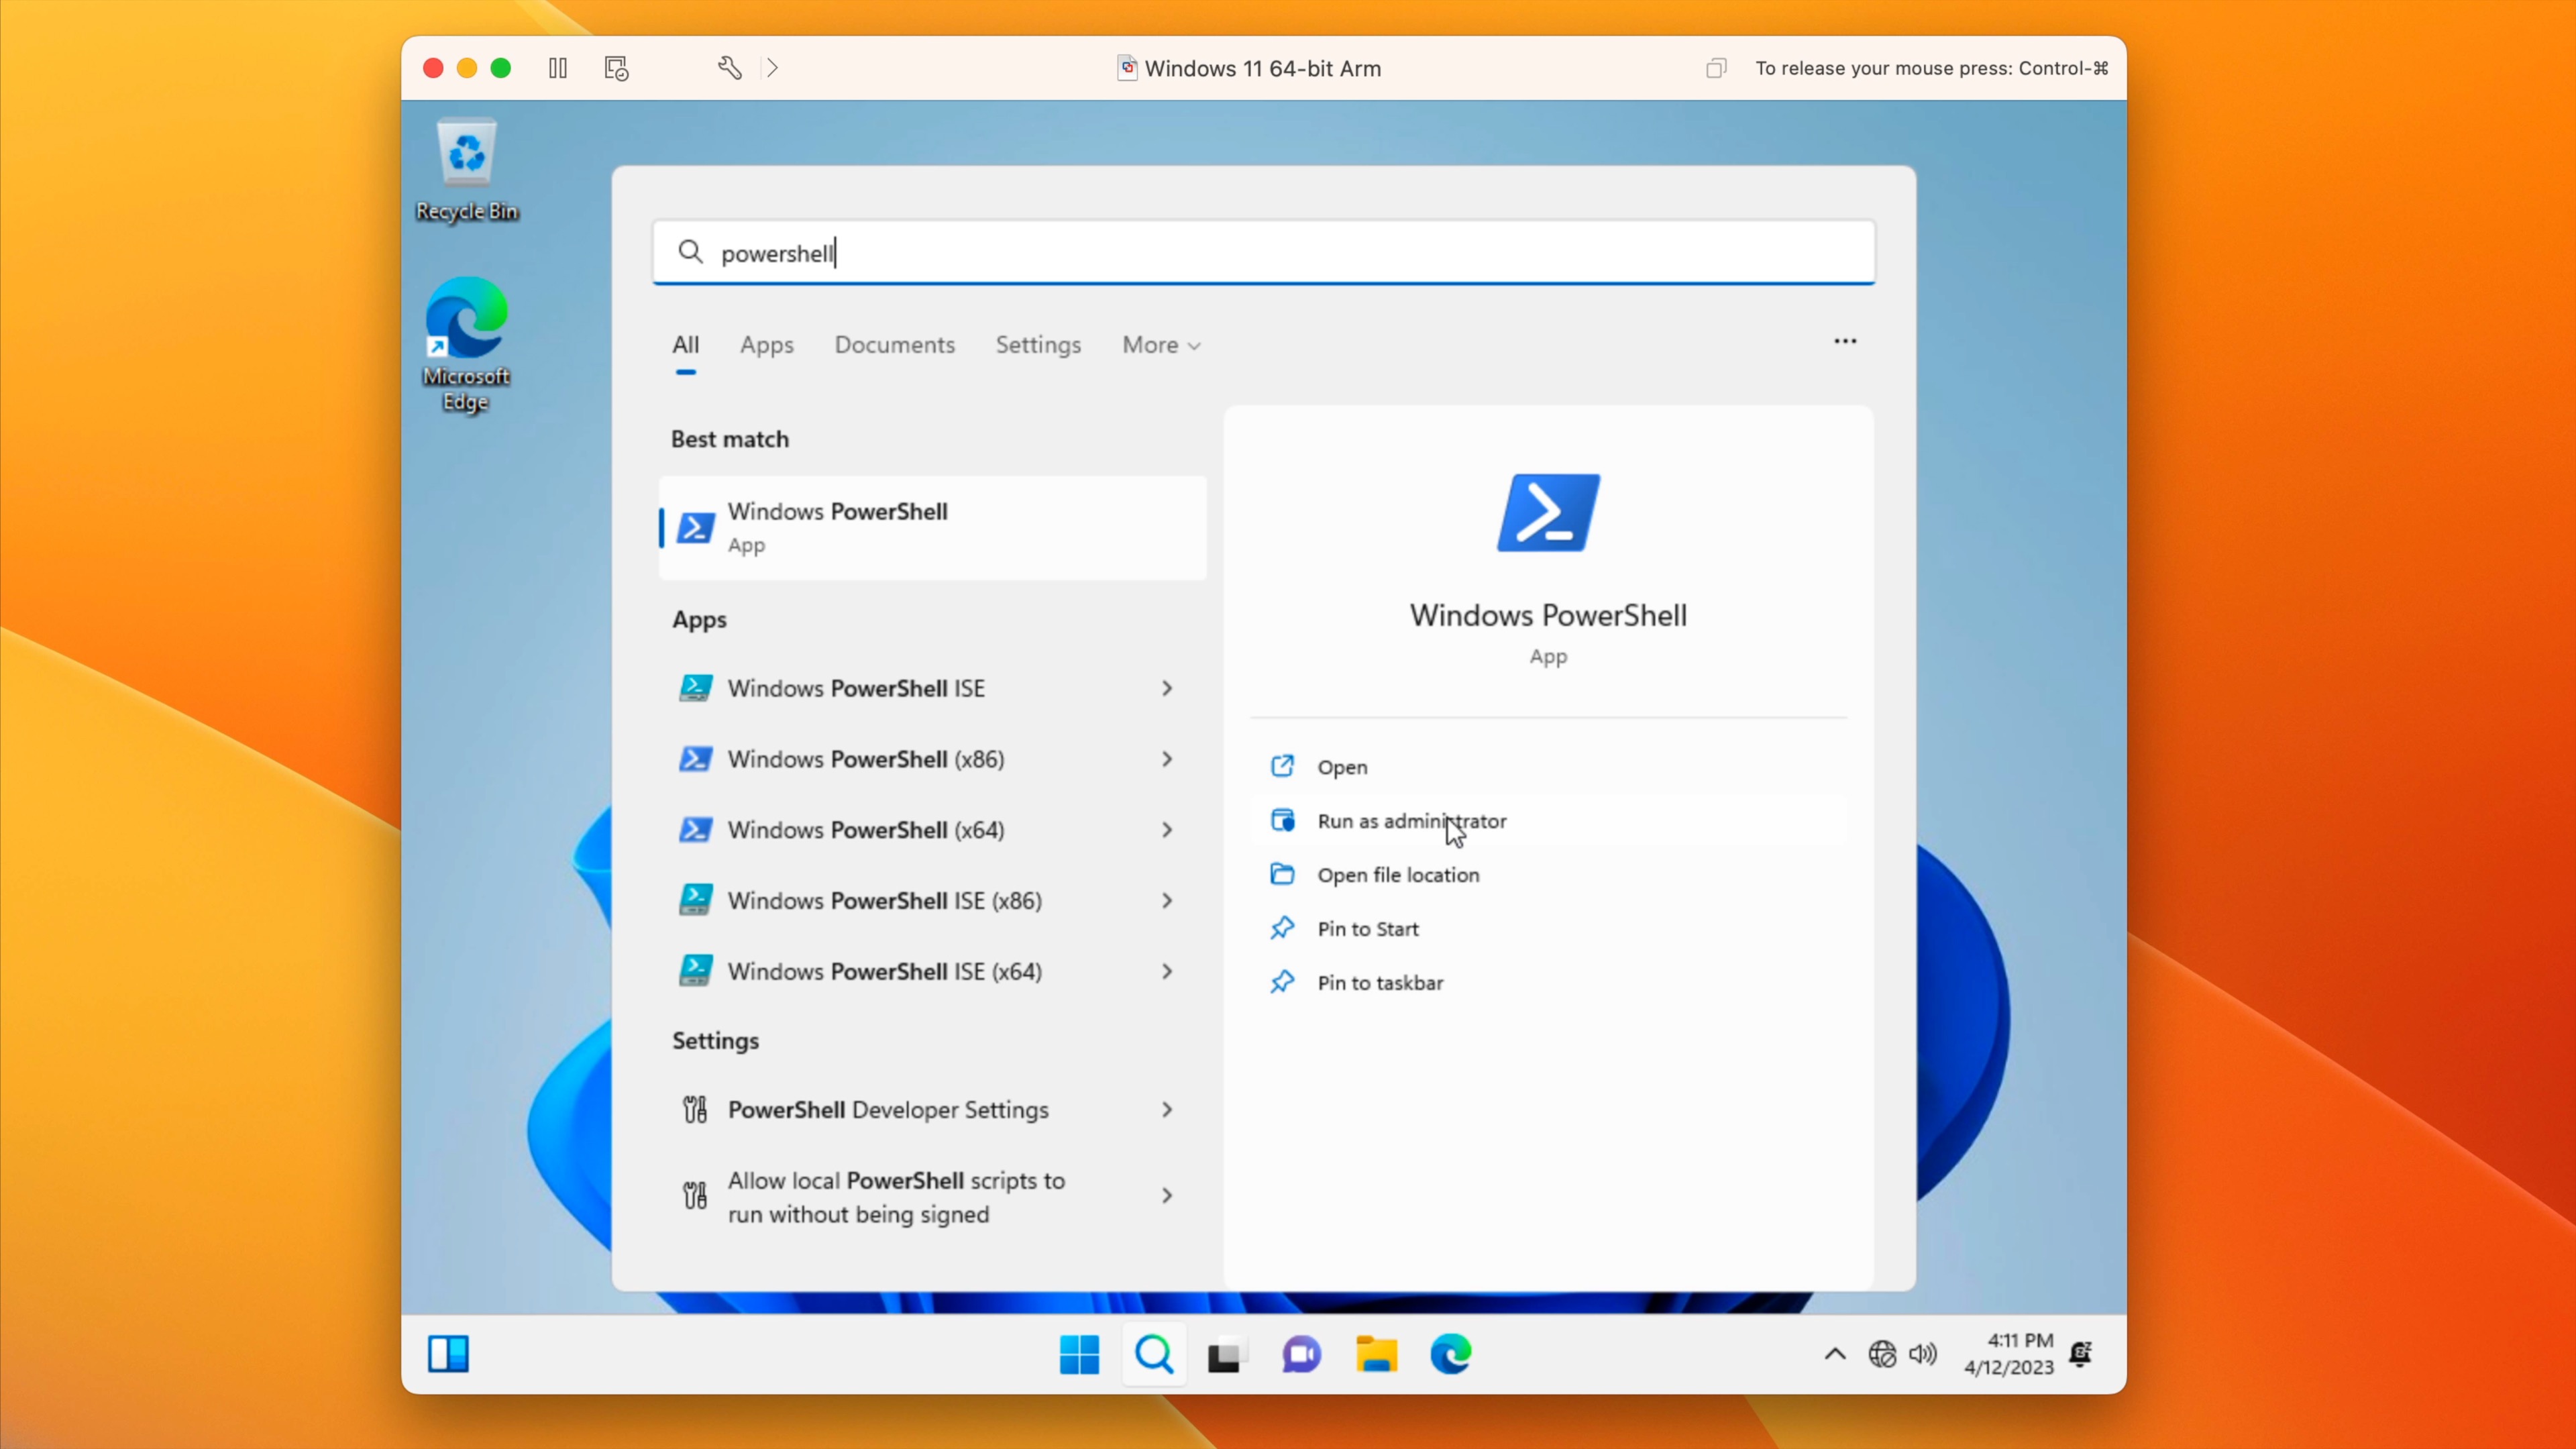
Step 7: Open the Start Menu, type “PowerShell” in the search box, and click Run as administrator for PowerShell. Click Yes on the User Account Control pop up, and PowerShell will open.
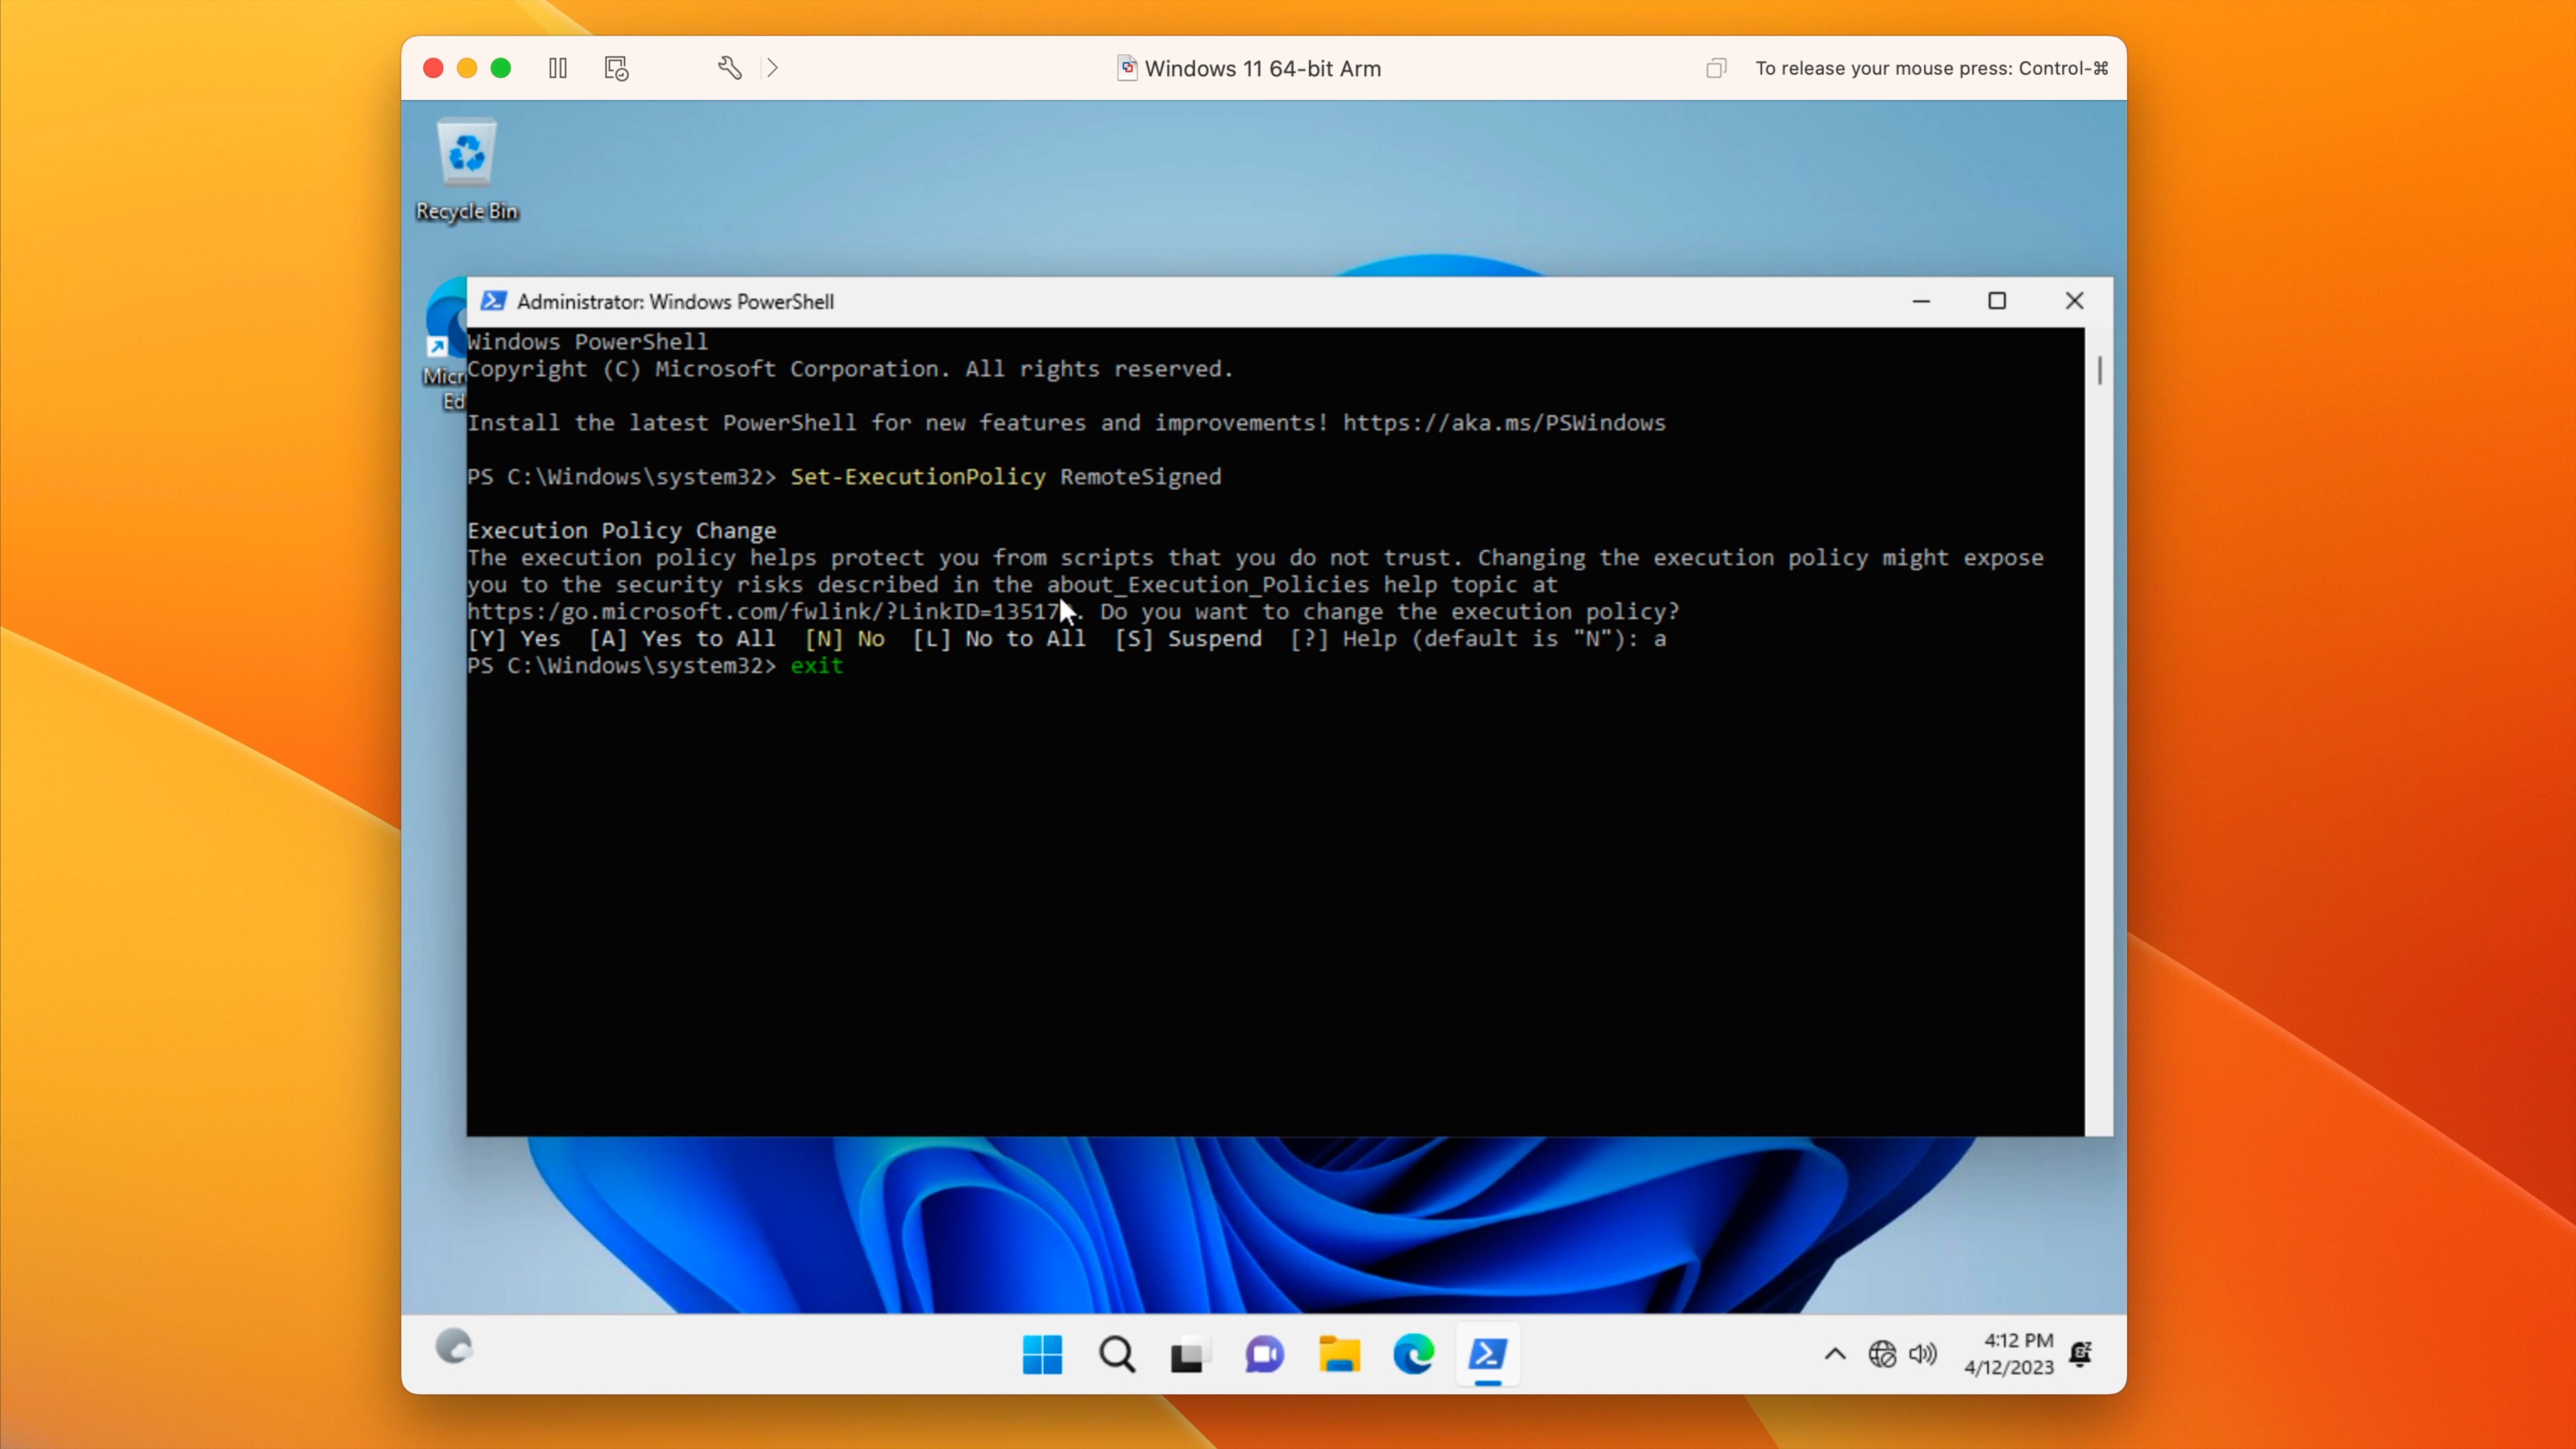
Step 8: At the PowerShell command prompt, type the following and press Return on your keyboard:
Set-ExecutionPolicy RemoteSigned
You’ll next be asked if you want to change the execution policy. Type “A” to indicate Yes to All, and press Return on your keyboard and then close the PowerShell window.
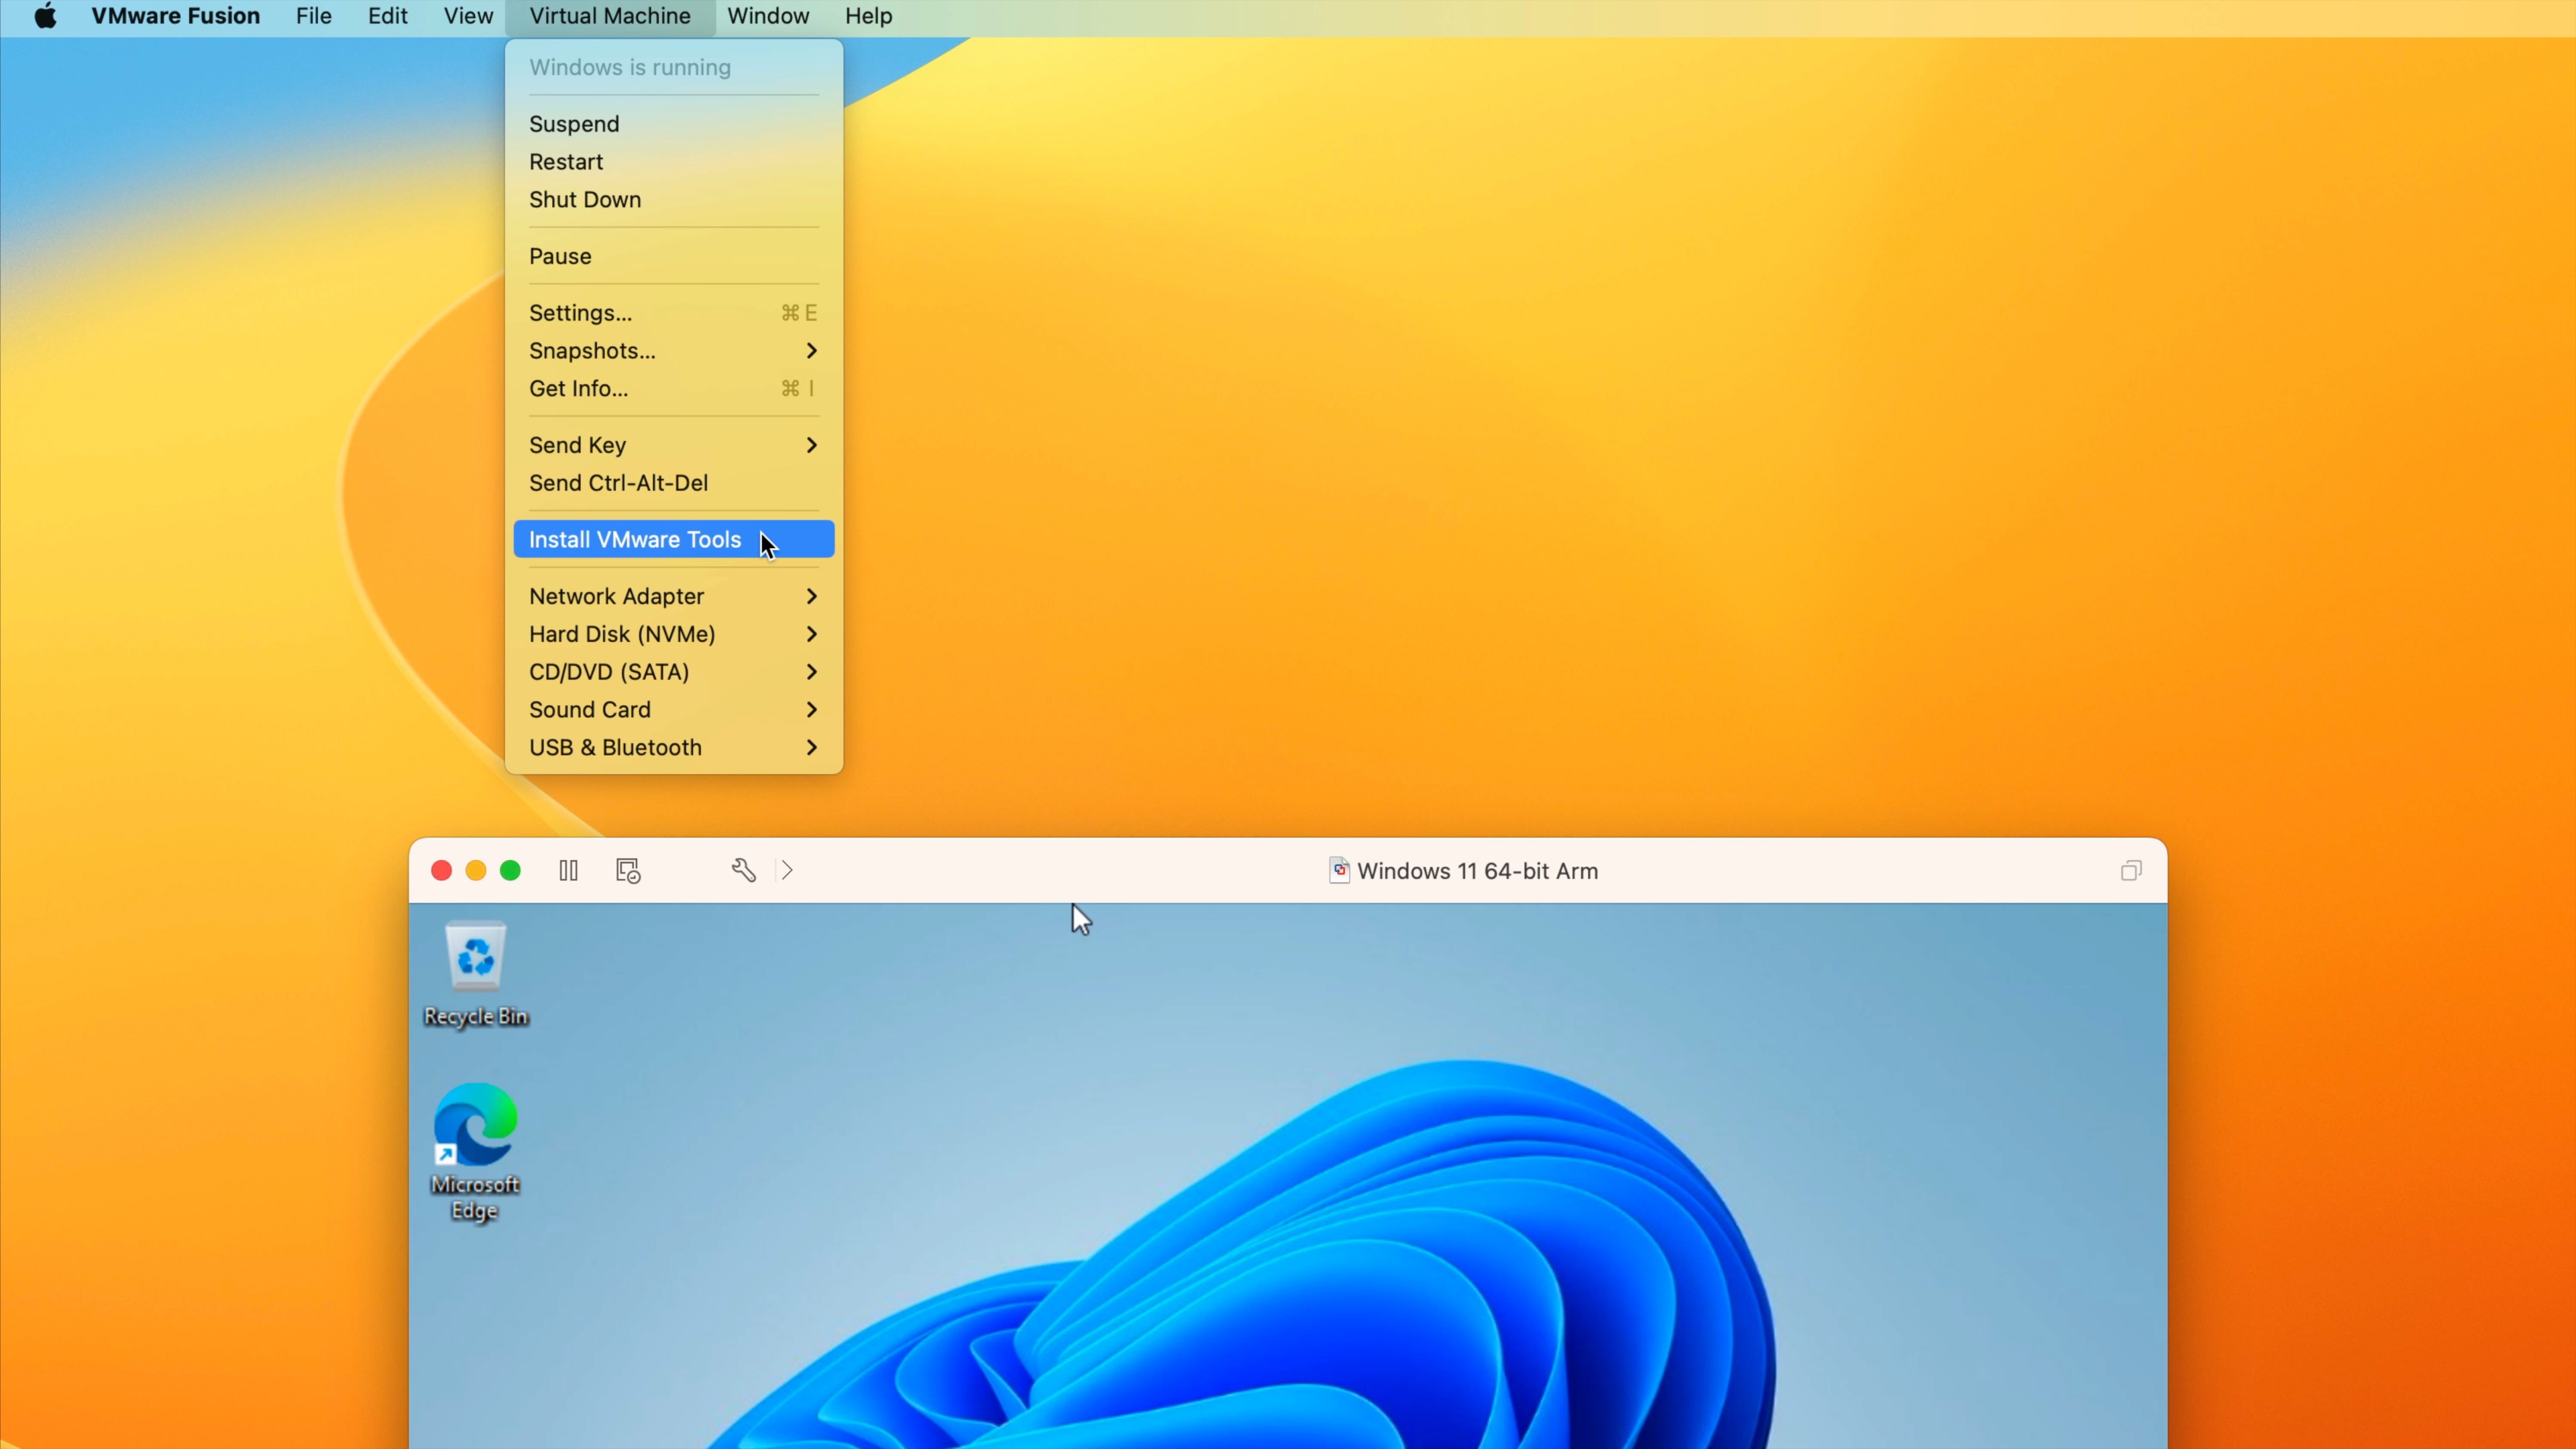
Step 9: In the Mac menu bar click Virtual Machine → Install VMware Tools. Click the Install button on the pop-up that appears to mount the virtual DVD-ROM drive.
Step 10: Open Widows Explorer and select the DVD drive. Scroll down until you see the “setup” PowerShell script. Right click on setup, select Run with PowerShell, then click Yes on the User Account Control pop-up.
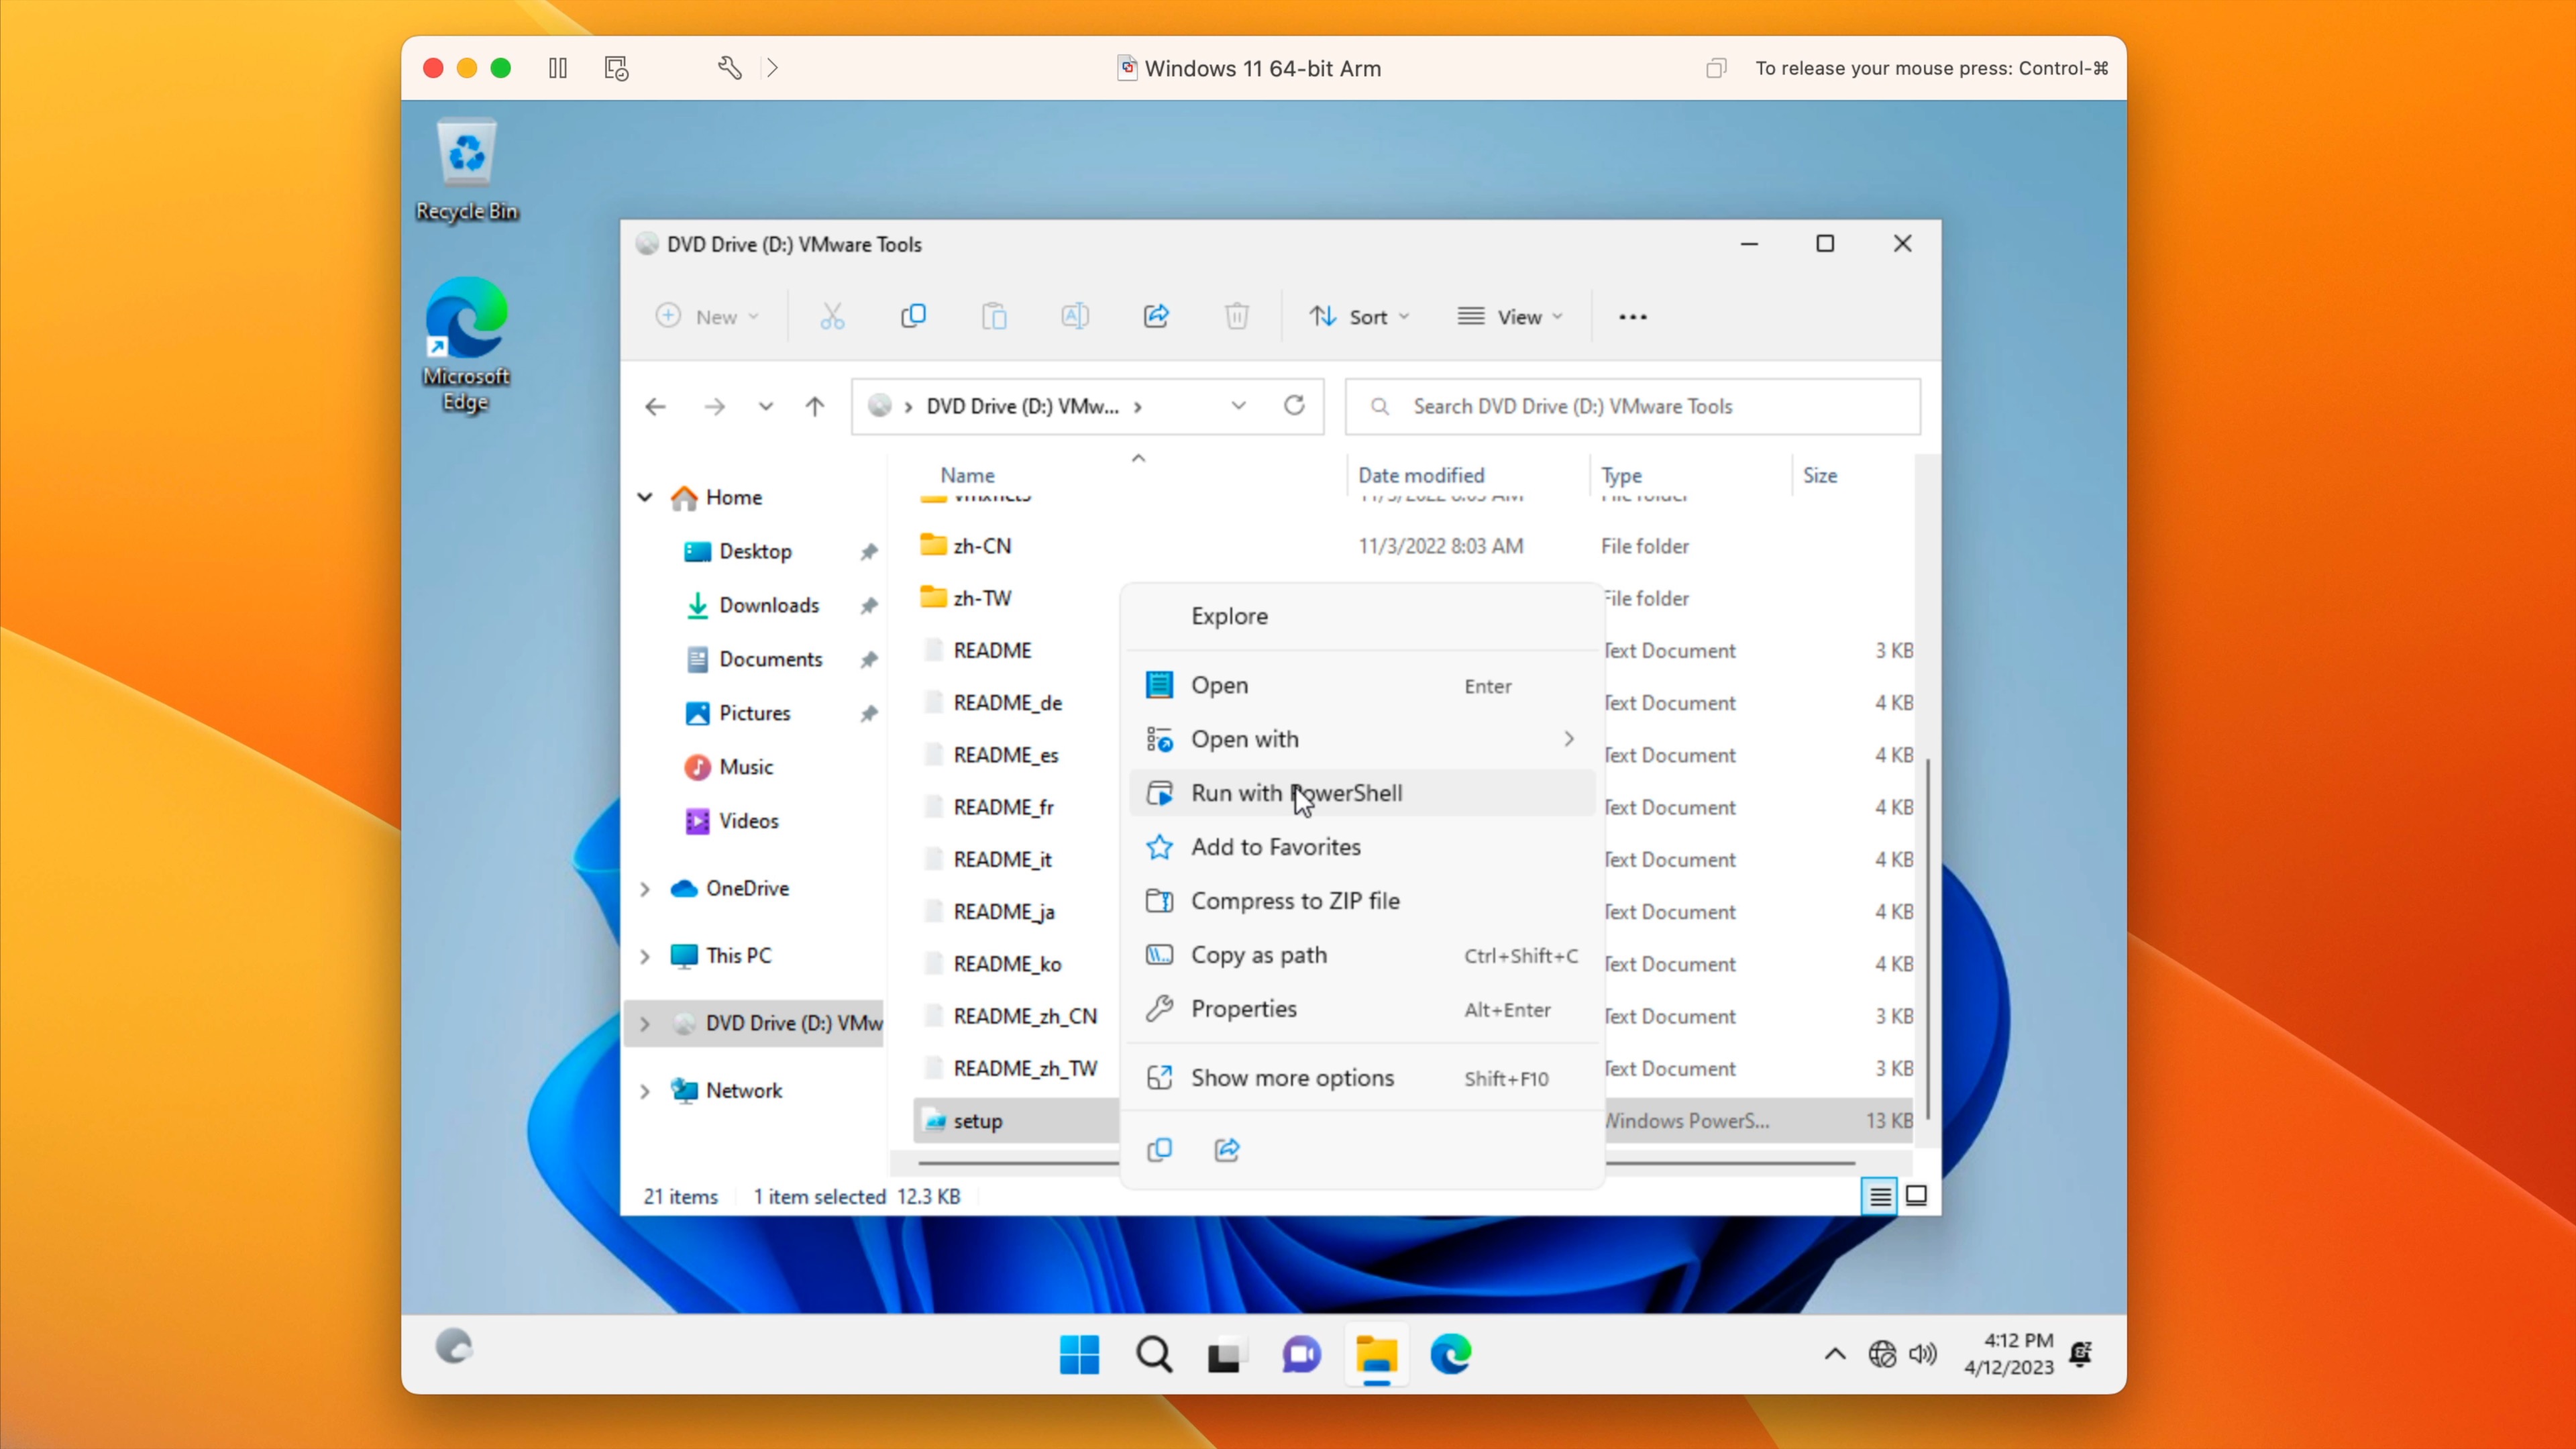
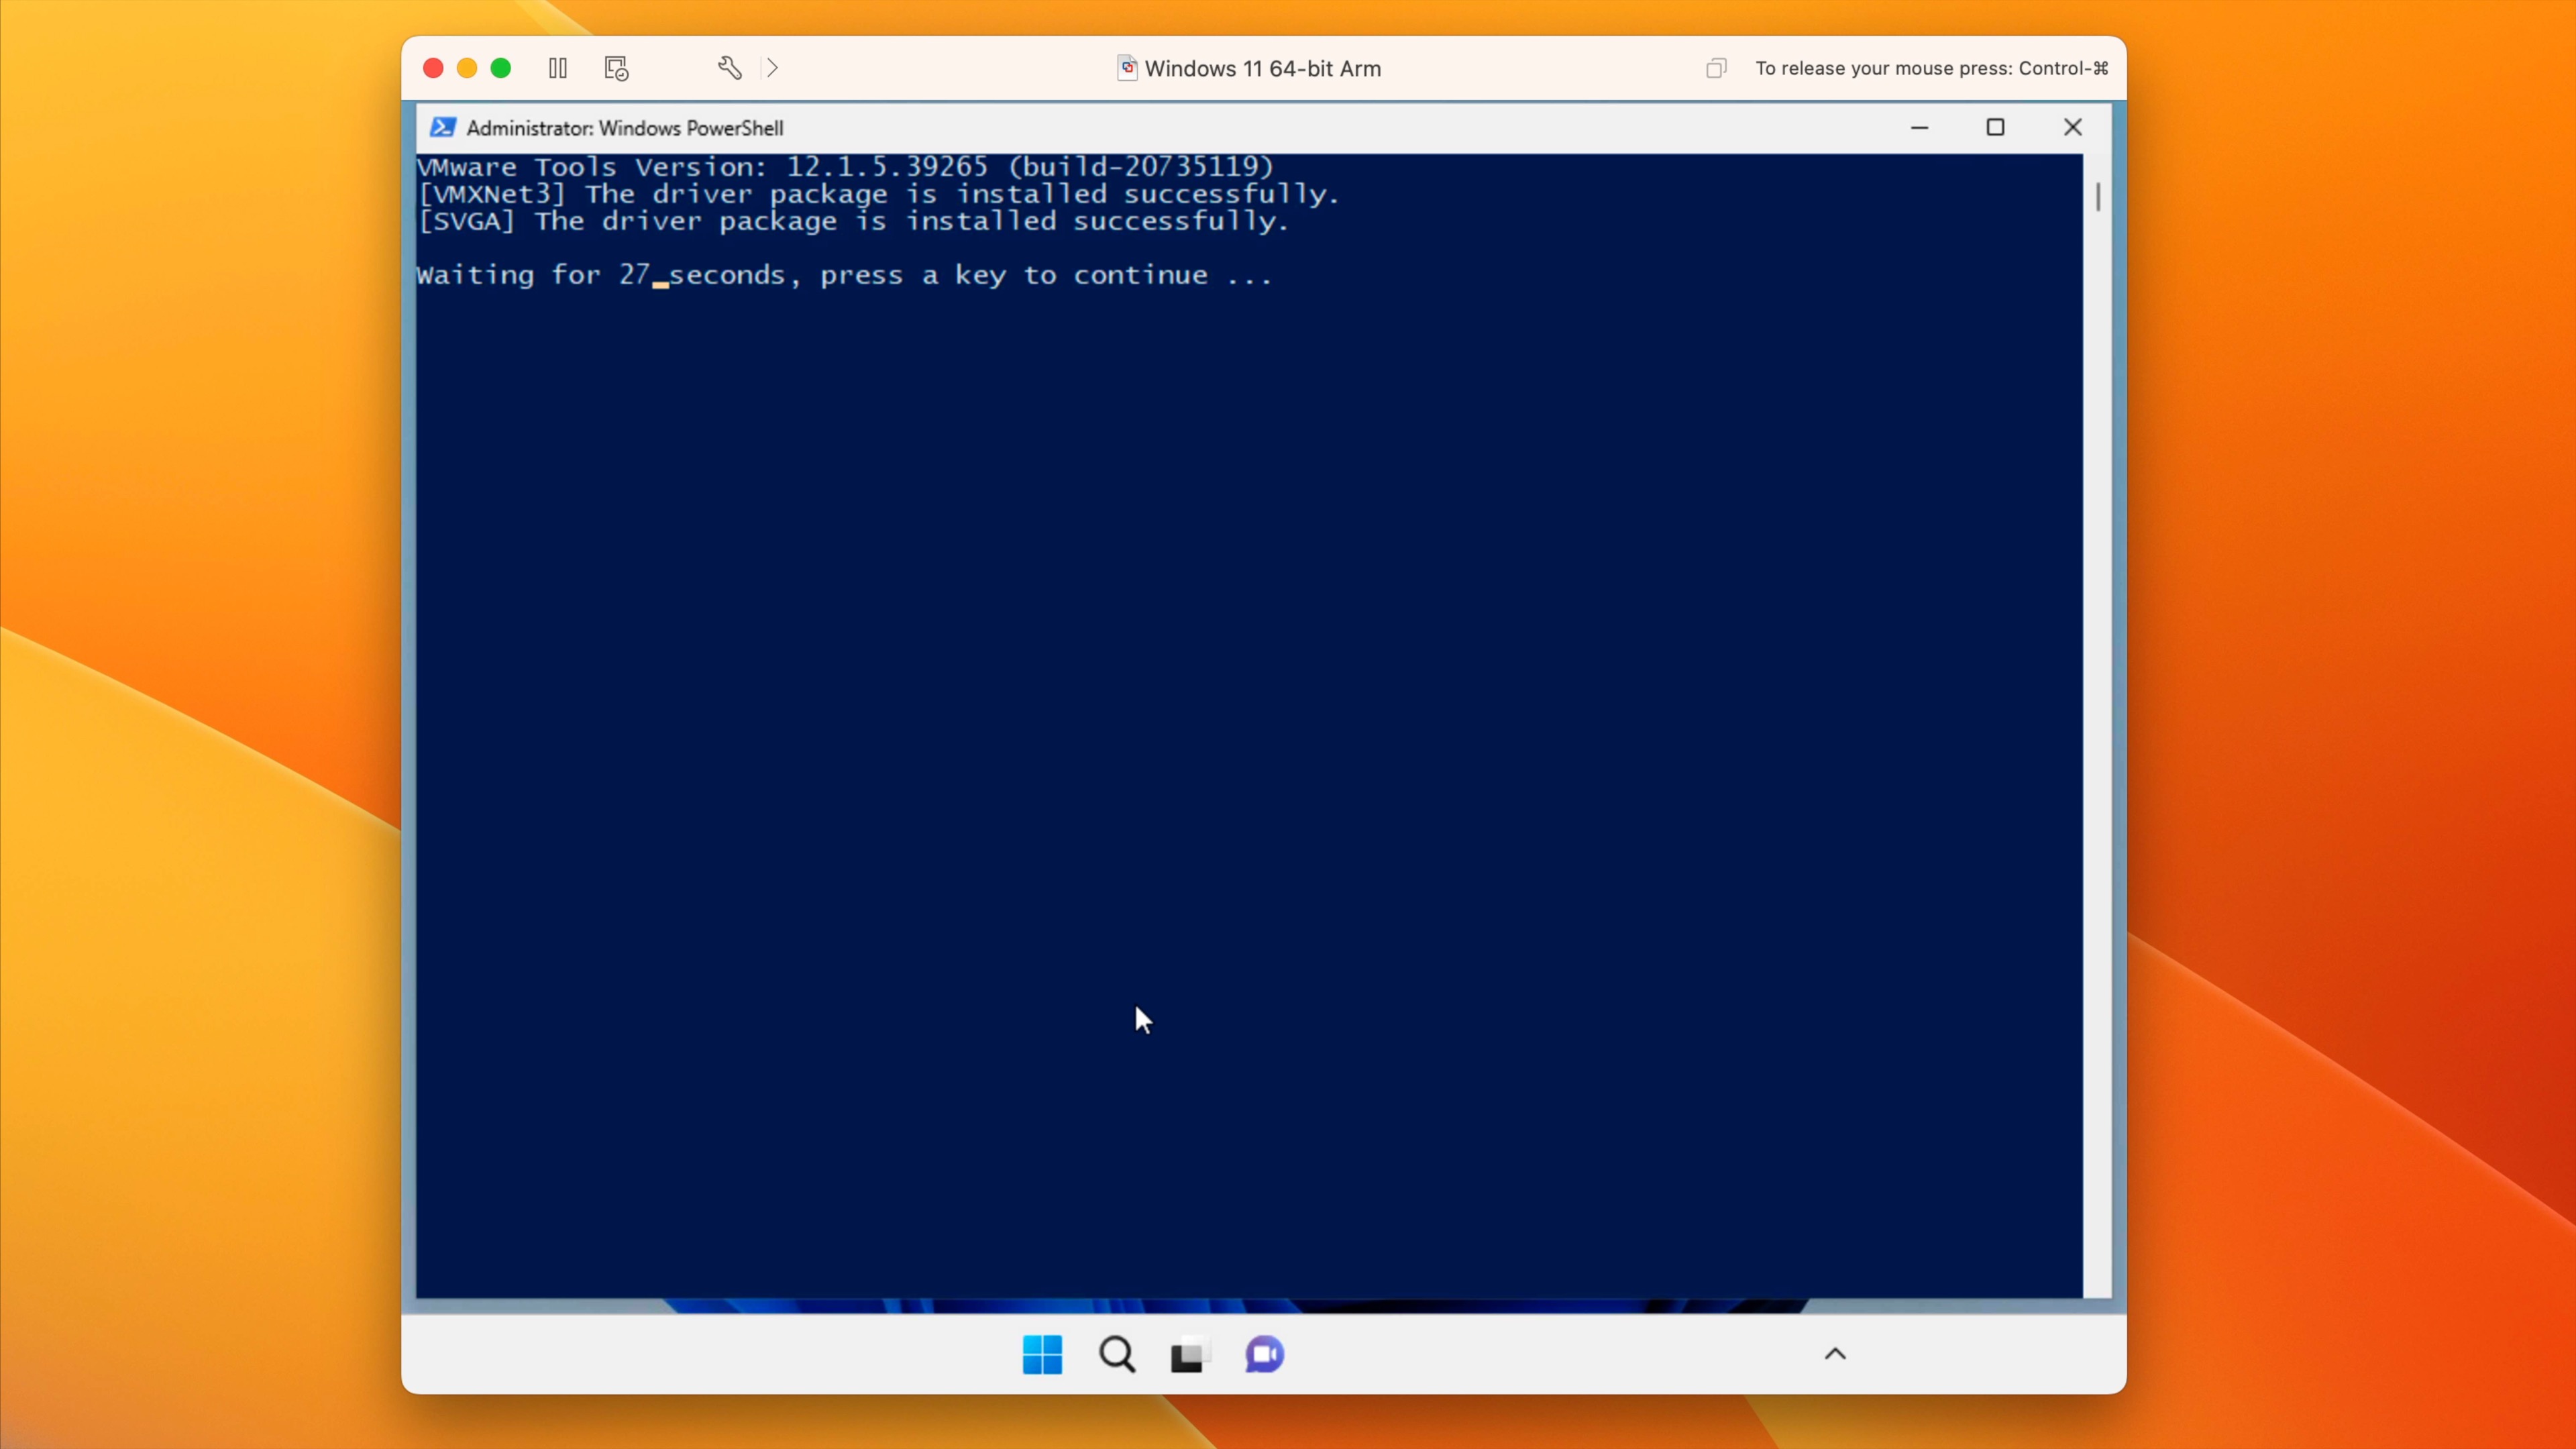
Step 11: Powershell will open and VMware Tools will install the VMXNet3 driver package and SVCGA driver package. Once installed, the PowerShell window will automatically dismiss after a period of time, or you can press any key when prompted to dismiss the Window manually.
You should now have full network access, along with the needed display drivers.
Step 12: Go to Start → Settings → Windows Update → Check for updates to download the latest drivers and software updates from Microsoft.
Conclusion
Top comment by Stephane Vermette
The ISO I got from Parallels works in Parallels, but under VMware Fusion, it keeps wanting to boot from PXE. I've checked the boot order, and it just doesn't seem to think there's anything on the iso. I'm still poking around with other OSs to see if it's just my iso that might need a direct source from MS instead.
If you’re a gamer, then Parallels Desktop is my recommended solution for running Windows 11 on a Mac feature Apple Silicon. Parallels has access to DirectX 11, which means 3D gaming is far more viable when running Windows via Parallels as opposed to VMware Fusion Player. But remember that, in most use cases, Parallels requires a subscription fee on top of whatever you end up paying for a valid Windows 11 license, should you choose to license Windows. If you do not, you’ll get the watermark of shame in the bottom right-hand corner until you purchase the necessary license.
Related: Run Windows 11 on Apple Silicon w/ Parallels Desktop 18
Subscribe to 9to5mac on YouTube for more videos
VMware Fusion Player, on the other hand, is a much more budget-friendly solution, with a free personal license, and no subscription fees. It’s also relatively easy to get setup, but isn’t dead simple like Parallels is with its tighter Microsoft integration. VMware Fusion Player is a solid option if you’re not worried about gaming, and would like to run lightweight one-off Windows applications that aren’t available on macOS.
What do you think? Are you considering or currently running Windows on your Mac with Apple Silicon? Sound off down below in the comments with any thoughts, suggestions, observations, or questions.
FTC: We use income earning auto affiliate links. More.


Comments