Today, March 31 is World Backup Day – a good reminder to check in on your device backups. Even with Apple’s high-quality products, it’s important to backup regularly. No device works flawlessly all the time and there are many scenarios outside of device failure when a backup is crucial. Let’s look at 8 tips and tricks to backup iPhone, iPad, and Mac with built-in and third-party options, shared Time Machine backups, NAS, and more.
At the bare minimum, it’s key to have at least one backup of your important information, but two or more copies are ideal. And to be fully protected, you want to have at least one backup of your data off-site (with a cloud service, in a bank security box, at a friend’s house, etc.).
Below we’ll look at 8+ ways to back up all of your Apple devices including free built-in options like iCloud and your Mac, as well as more advanced solutions. Do you know them all?
Table of contents
Tips and tricks to backup iPhone, iPad, and Mac
Backup iPhone and iPad
iCloud
The simplest way to backup an iOS/iPadOS device is through iCloud. In the event something happens to your device or you upgrade, it’s seamless to restore everything with your iCloud backup.
Here’s how to check your iCloud backup settings:
- On iPhone, iPad, and iPod touch, head to the Settings app
- Tap your name at the top then choose iCloud
- Now tap iCloud Backup
- Tap the toggle to turn on iCloud backups if they’re not already
- You can see the last successful iCloud backup under the “Back Up Now” button
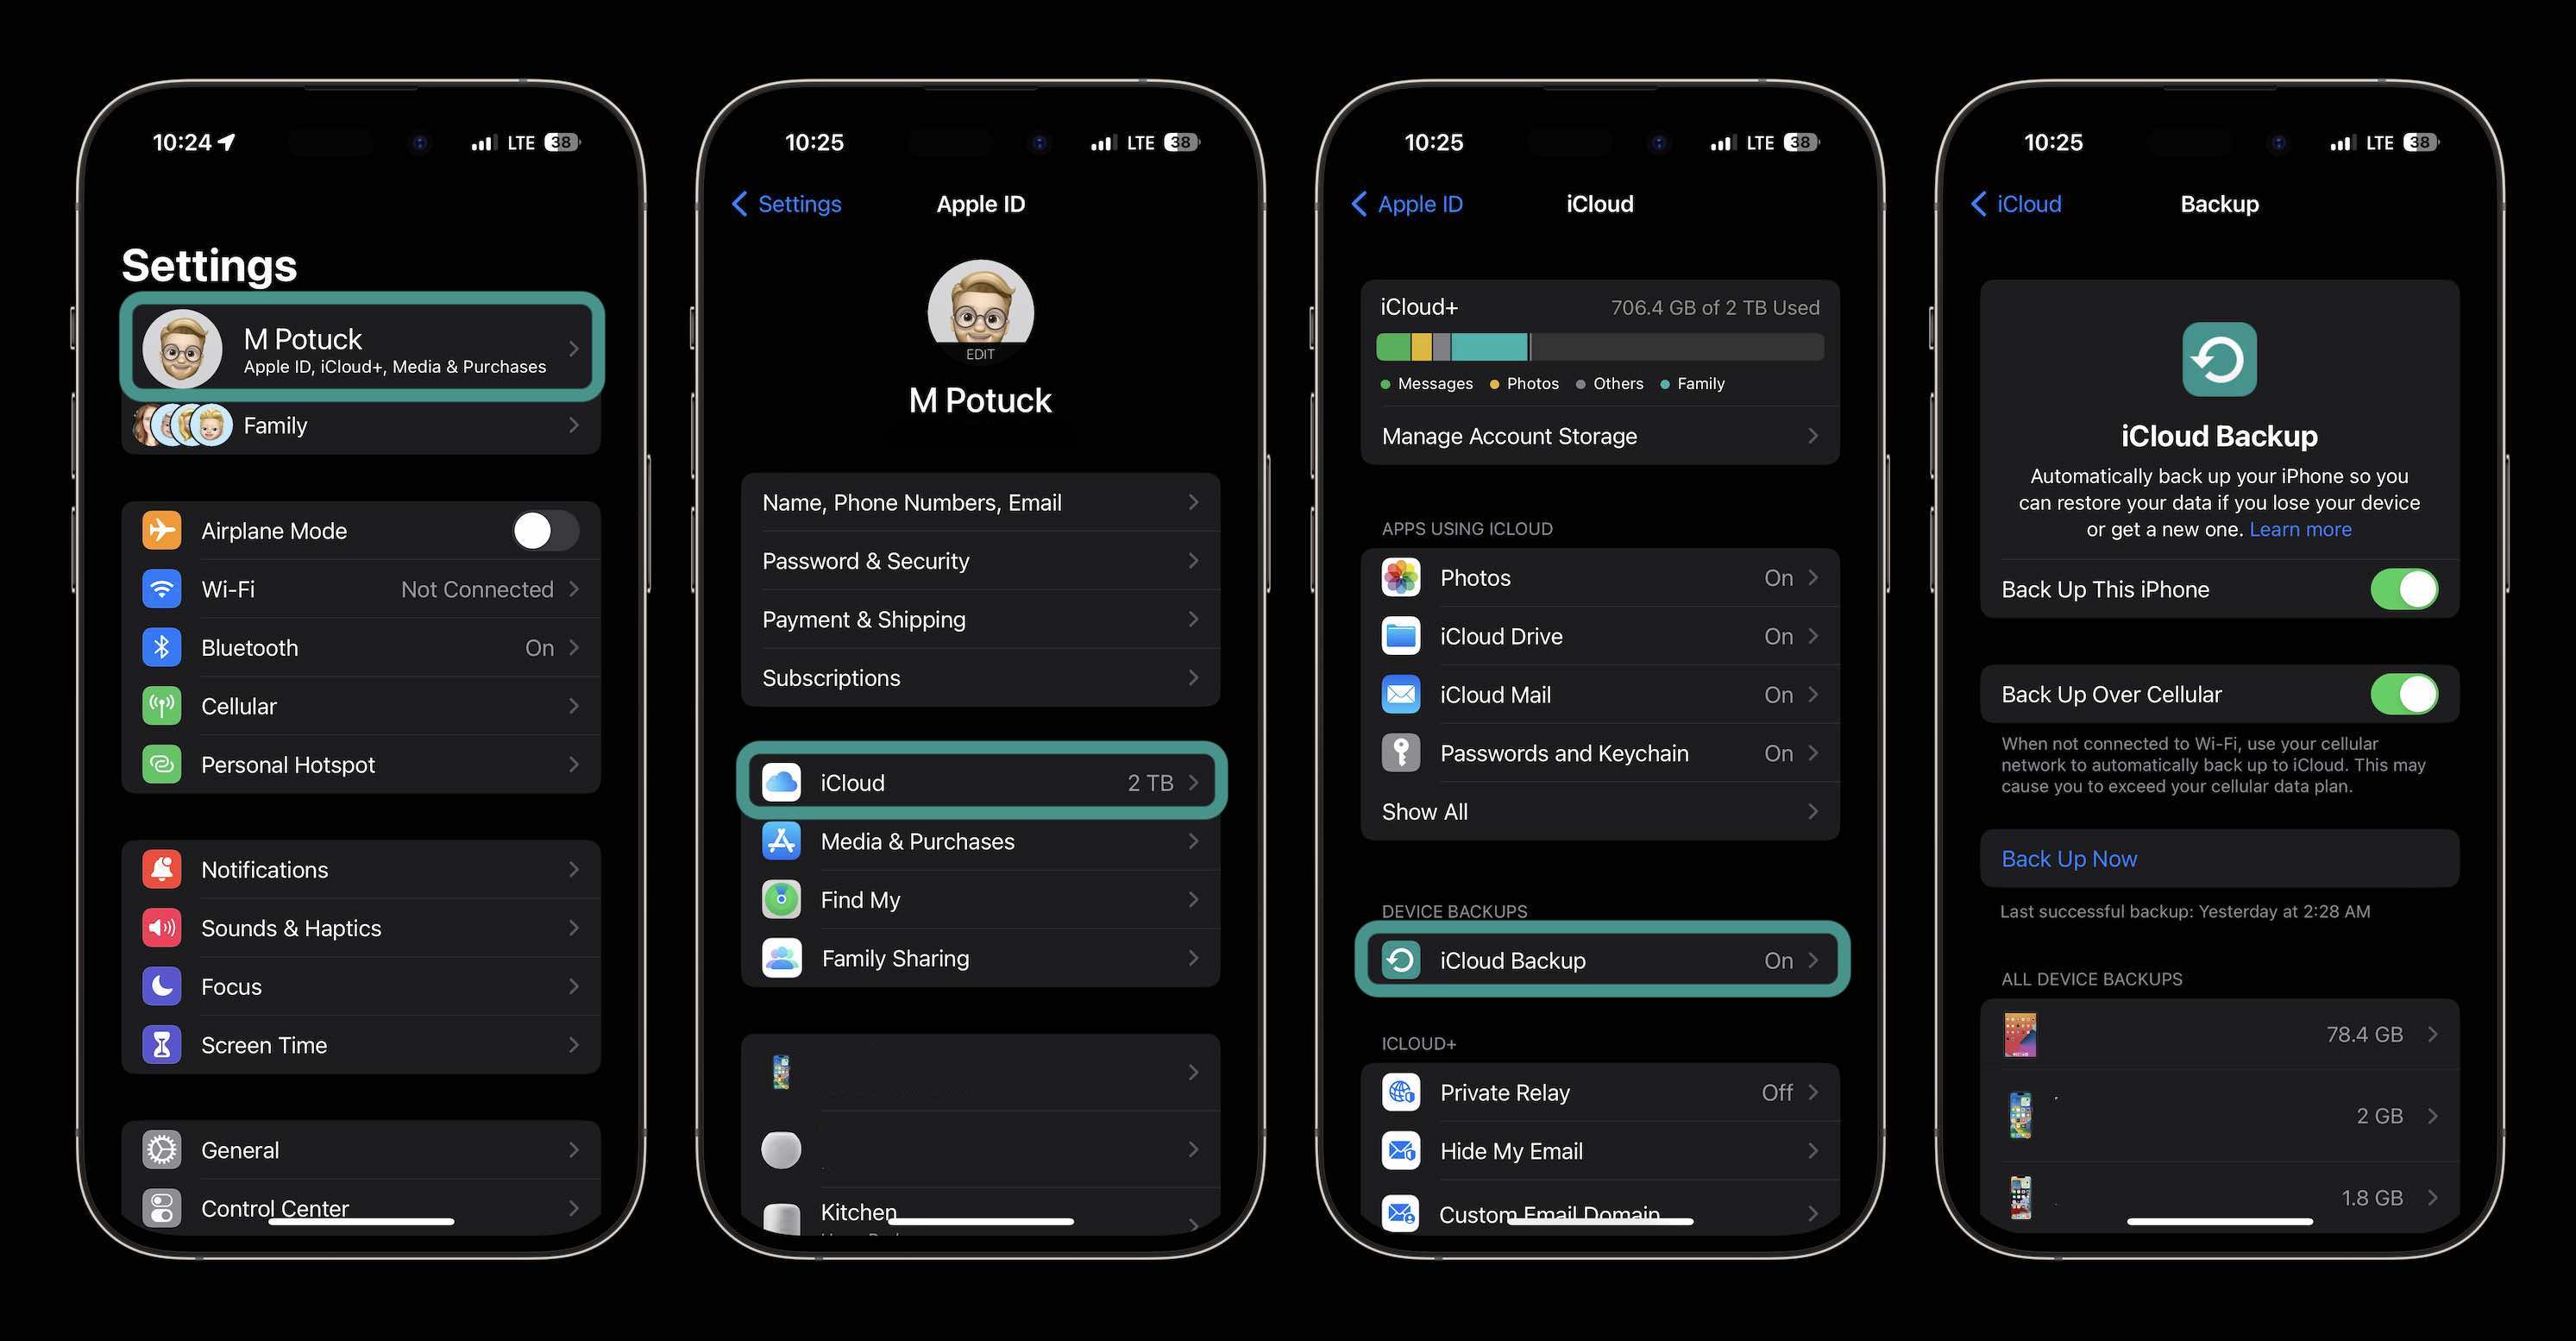
Once iCloud Backup is turned on, your iPhone, iPad, or iPod touch will automatically backup when it is charging and connected to Wi-Fi with the screen locked. It’s also a good idea to review what you have iCloud backing up with the toggles shown above.
One thing to watch out for is running out of iCloud Storage. Apple includes 5 GB for free, but that doesn’t go far. Apple offers 50GB for $0.99/month and up to 2TB for $9.99/month. It may also be worth checking out if an Apple One bundle could save you some money.
Under Settings > iCloud, tap Manage Storage. Now you should see “Change Storage Plan,” choose that and you’ll see the current plan that you’re on and the upgrade options.
Apple Watch Backups
Apple Watch backups happen automatically with iCloud iPhone backups. It’s also backed up when you unpair Apple Watch from an iPhone. For now, there’s no way to manually make an Apple Watch backup like there is with iPhone.
Backup iOS devices with Mac
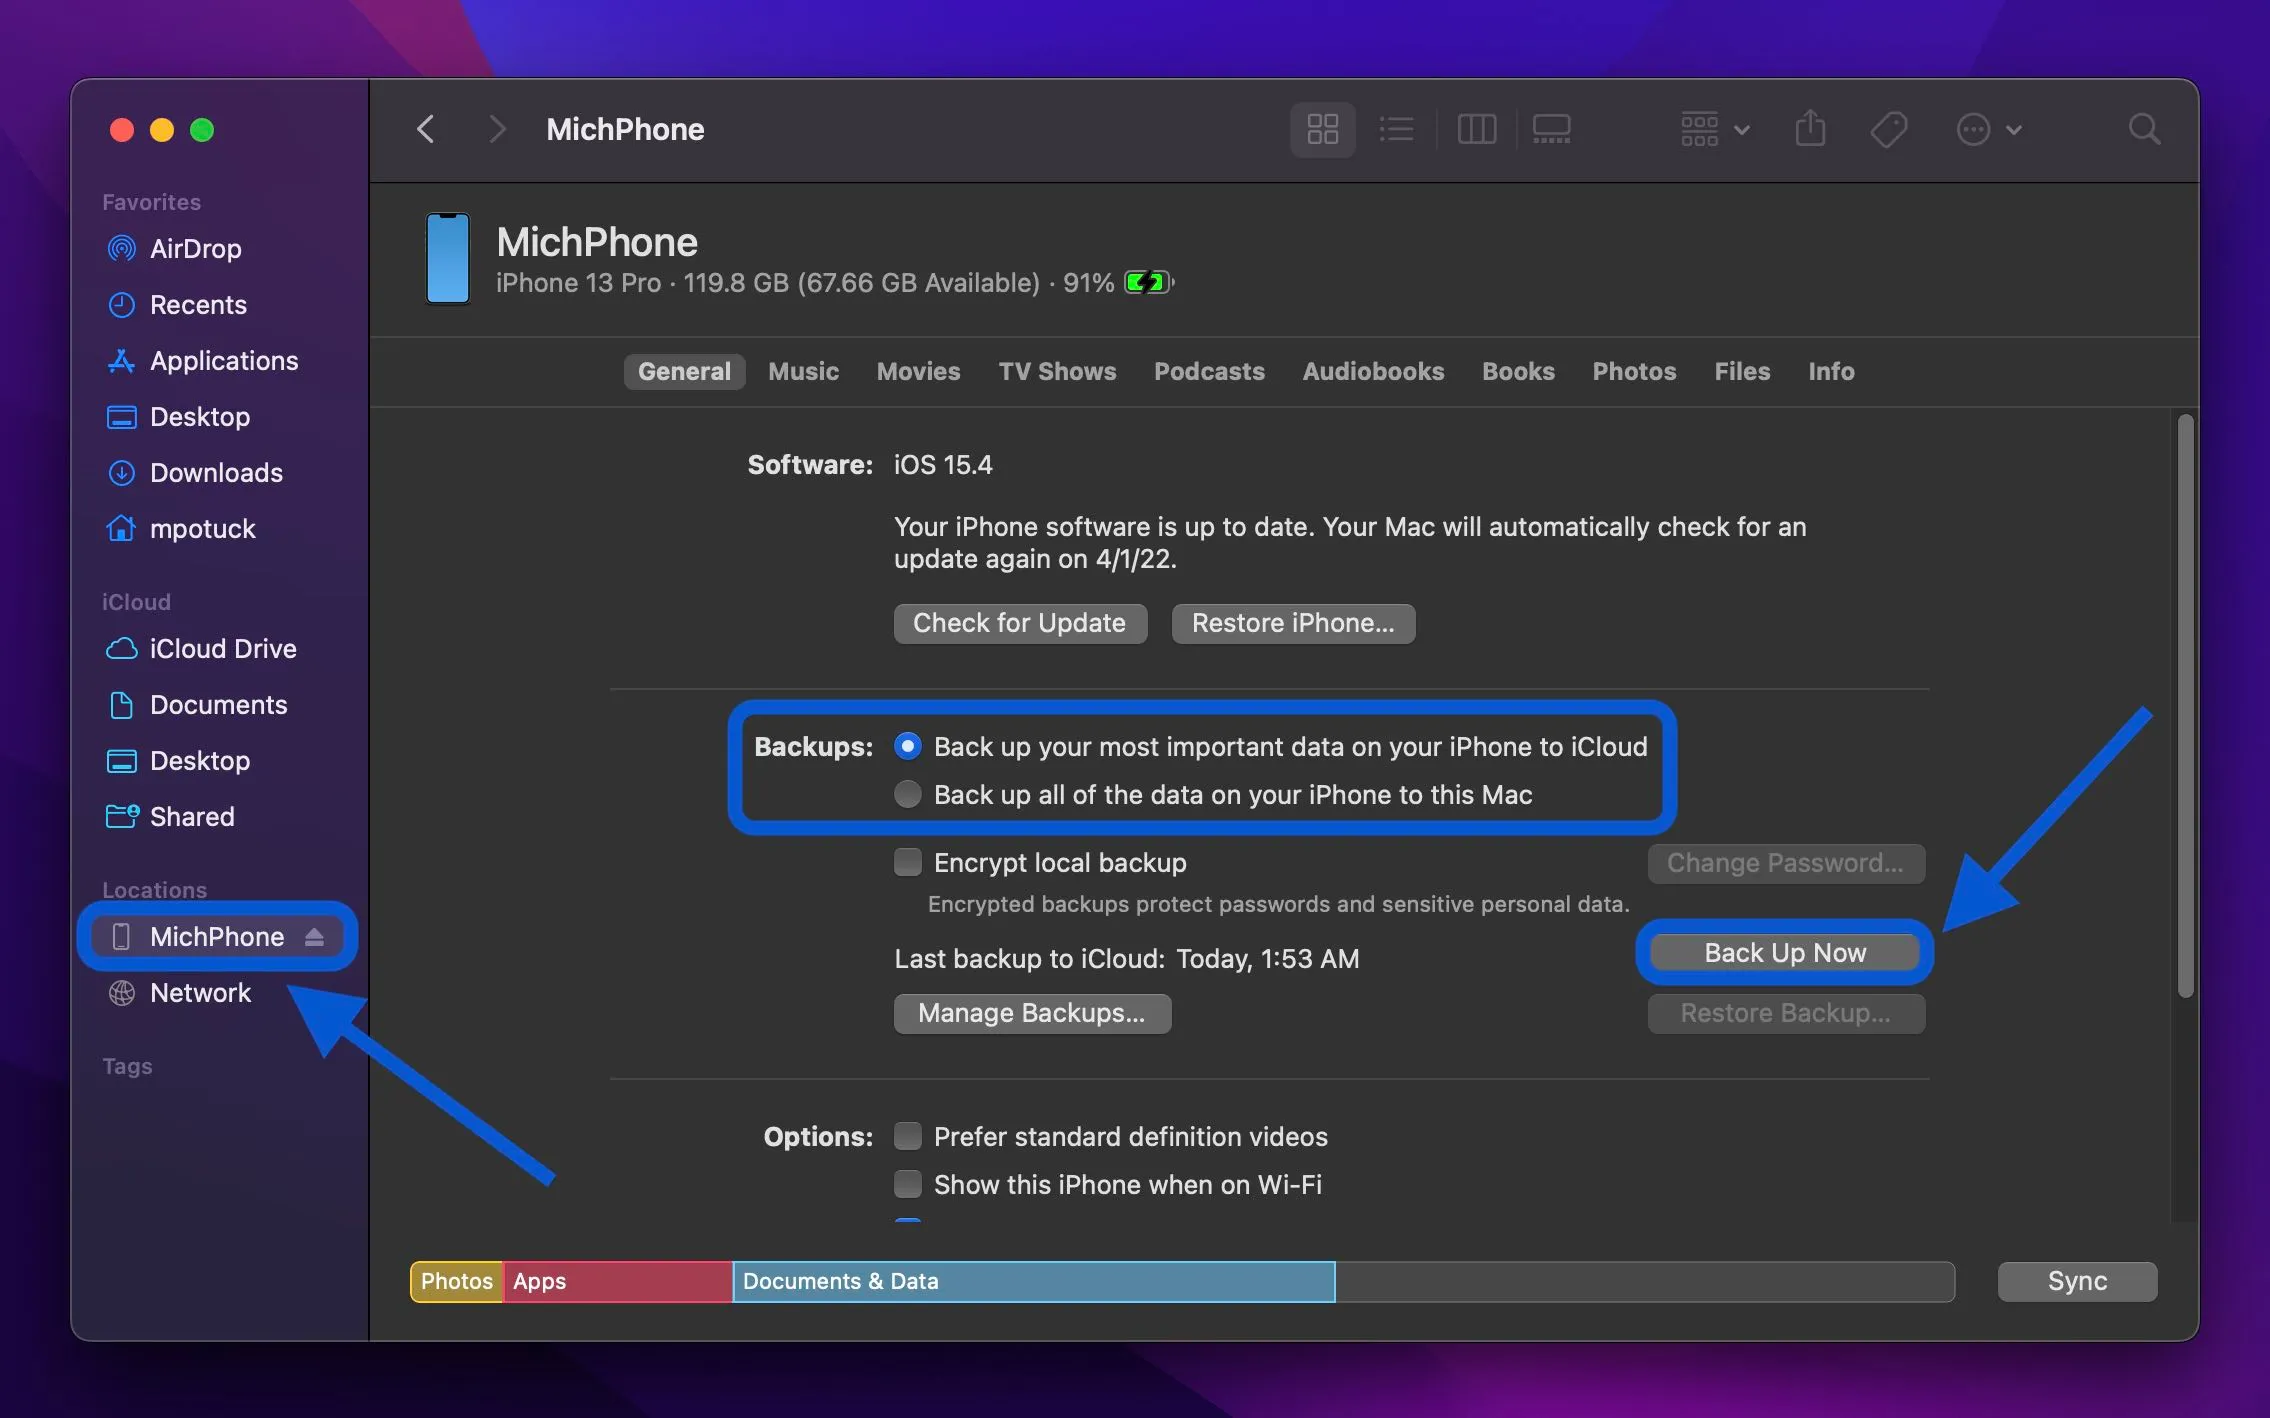
Backing up your iPhone, iPad, or iPod with your Mac is simple to do but means you’ll need to remember to plug it in. One benefit here is your iOS backups will then also be saved with your Mac (Time Machine etc.) backups as well.
- Plug your device into your computer with the Lightning to USB cable.
- If prompted, choose “Trust This Computer.”
- In macOS Catalina and later, open a Finder window
- On macOS Mojave and earlier, open iTunes (same for PCs)
- Look for your iPhone on the left sidebar and click it (top left near playback controls in iTunes)
- In the middle of the screen, click Back Up Now
- You can check the status of your backup in the sidebar
- Click the eject button next to your iPhone before unplugging it
- You can also change the default backup settings in the middle of the screen (shown below) to always back up all of your iPhone/iPad/iPod data to your Mac when plugging in
Backup iPhone and iPad with third-party options
A popular alternative to backing up your iOS device with Finder/iTunes is iMazing for Mac/PC. You get advanced controls like the ability to save and export Messages, ringtone management, and more detailed backup settings. iMazing offers a free trial and is available from $60 for a lifetime license for three devices and also can be used with an unlimited devices option for $65/year.
External drives for iOS devices
Another handy option to backup iPhone, iPad, and iPod touch is with Lightning/USB-C flash drives like the SanDisk iXpand devices.

The iXpand devices use an iOS app that allows them to automatically backup your photos, contacts, and more every time you plug them in. You can also manually manage your data with these devices. And if you have an iPad Air or Pro with a USB-C port, you can use them as external storage with the Files app.
More
Other options include apps from your cellular carrier and other third parties like Dropbox, Box, Google, and more. However, third-party apps usually don’t feature backups that are as complete as using iCloud, a Mac/PC, or the other options above.
Backup Mac
Time Machine
This is one of the easiest ways to make sure your Mac is backed up. Time Machine is built-in to macOS and with a drive connected, creates hourly backups for the last 24 hours, daily backups for the last month, and weekly backups for the last year.
You can find 1TB external drives from Seagate and Western Digital for around $50. Faster SSDs often go for ~$100+, and the fastest external storage – Thunderbolt 3/4 drives are the most expensive.
If you have an issue with your Mac and need to bring back your data, you can either restore everything by using a Time Machine backup or enter the Time Machine app on your Mac to restore individual files.
- The first time you plug in an external drive, macOS should ask if you’d like to use it with Time Machine
- To manually adjust your Time Machine settings, head to System Settings > General > Time Machine (or click the icon in the menu bar > Open Time Machine Settings)
- Make sure the box is checked next to “Back Up Automatically” and also turning on the menu bar Time Machine icon is handy for quick access if it’s not already
- Click “Select Disk” to add a new backup drive (you can use multiple)
- If you already have more than one connected, click “Add or Remove Backup Disk…”
- With the menu bar Time Machine tool, you can manually start a backup, see your latest one, and more

Shared network Time Machine backups
One neat way to make Time Machine backups easier for families or small businesses is to create a shared network Time Machine backup folder.
This feature is built-in and free with macOS and lets you use a Mac to host the shared folder where other Macs can save their backups.
Check out our full guide for step-by-step details on how to set this up:
Time Machine backups with NAS
Another way to automatically backup with Time Machine is with a Network Attached Storage (NAS) device. Some of the main advantages here include more advanced options and greater flexibility.
Third-party automatic Mac backups
Carbon Copy Cloner
If you’re looking for an alternative to using Time Machine for backups that offers more control and advanced options, Carbon Copy Cloner is a good choice. You can create a range of backup tasks to run on a schedule automatically or manually. And you can choose to backup your Mac to external drives as well as other Macs.
Carbon Copy Cloner is a one-time purchase for $49.99 for all the Macs in your house. You can also test it out for free with a 30-day trial.
Backblaze
Backblaze is probably the most popular automatic cloud backup service for Mac (and other platforms too). Plans start from $7/month or $70/year per device for unlimited data. This is an easy way to make sure you’ve got your Mac backed up off-site.
Backblaze has a strong track record and also offers a 15-day trial if you want to give it a shot before paying for a plan.
Manual backups
Of course, you can always manually backup any of your important data by dragging and dropping to external drives or with cloud services like iCloud Drive, Dropbox, Google Drive, etc. But this isn’t usually a great option to use as your primary backup strategy since you have to remember to do it regularly and it likely won’t include all of your data.
Read more 9to5Mac tutorials:
- Best USB-C and Thunderbolt displays for Mac
- How to check if iPhone has 5G Standalone turned on and is working
- Do’s and don’ts for cleaning your dirty iPhone (and why you should make it a habit)
- 5G home internet comparison: How T-Mobile and Verizon stack up with price, speed, incentives
FTC: We use income earning auto affiliate links. More.


Comments