Thefts of Apple products made up 18 percent of all grand larcenies in New York City last year, reports the WSJ, citing NYPD figures. Of the 47,000 grand larcenies occuring in the city last year, 8,465 involved Apple products.
Many of the thefts happen on public transportation, where most people are buried in their devices and aren’t paying attention to their surroundings, said Joseph Giacalone, a retired New York Police Department detective. “It’s easy pickings,” he said … Expand Expanding Close
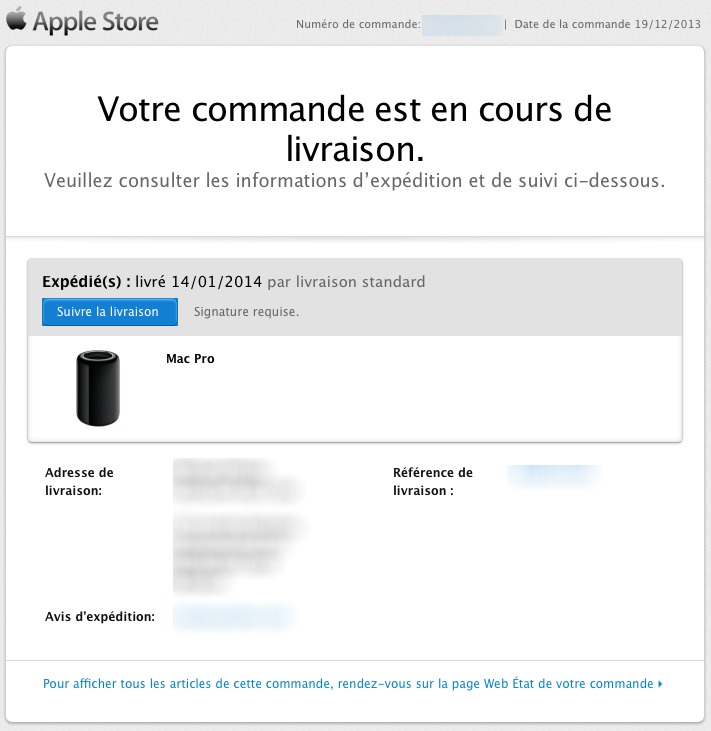
Since March, the old Mac Pro has not been available to buy in Europe as changes in regulations meant that the old Mac Pro no longer complied with EU law. In particular, the large exposed fans of the Mac Pro were the main reason behind the ban — the amendment required fan guards and minor changes to electrical ports.
With the design of the new Mac Pro, Apple once again complies with regulatory requirements. Via MacGeneration, customers in Europe are now receiving shipment notifications with delivery as early as January 14. According to Apple’s online store, customers ordering today should receive their Mac Pro in February.
Preventing unwanted messages from showing up in your inbox can be integral to enjoying email. In this article we will walk you through the process of creating mail rules that will direct messages to other folders or the trash based on conditions you specify. We will also discuss how to update rules to include additional senders or other criteria, and provide some common-sense guidance about effectively using mail rules in general.
Mail rules allow you to direct messages out of your inbox into another folder or trash automatically, based on their sender or other conditions. Rules can be set up on iCloud.com if the email address is the one you use for iCloud (it can end in either @icloud.com, @me.com, or @mac.com).
For your other email addresses, rules can be set up in the Mail app on a Mac. If you set up rules using iCloud.com they are very effective, immediately directing messages to the specified folders on all your devices. If you set up rules using the Mail app, they are effective only after you start up your Mac and open the Mail app. At the end of this article, I will make some practical suggestions about how to address that, and other aspects of using mail rules.
Keyboard shortcuts that allow for quick entry of longer strings of text were introduced with iOS 5. The feature allows users to enter a short bit of text and have it automatically converted to a longer message. Now with iOS 7 and Mavericks, keyboard shortcuts will sync between iOS devices and the Mac through the “Documents and Data” setting in iCloud.
In this how-to you’ll learn how to create and sync sync keyboard shortcuts in iOS 7 and Mavericks.
Over the years, building ‘Hackintosh’ computers has become both a lot easier and more popular. For those unfamiliar, a Hackintosh is essentially a machine running OS X on non-Apple approved and manufactured hardware. There are many reasons to build a Hackintosh instead of buying a Mac directly from Apple. They can be more expandable, faster, have more features and configurations, run quieter and can be a great learning experience. One of the biggest reasons to go down the road of building your own, however, is price. It’s no secret that Apple charges a premium for its products, especially if you don’t need some of the hardware (Thunderbolt for example). And thanks to the ongoing growth of the Hackintosh community, the process has become very easy over the past few years.
Back in 2011, Seth took a stab at building a Hackintosh. He originally intended on it being an affordable, baseline model without many bells and whistles. He ended up building a $750 ‘beast’ that competed with the best iMacs of the day, though. Now, it’s my turn to make an attempt at building a Hackintosh, but with an added twist. I am building one capable of performing on par with the highest-end Macs and capable of powering a 4k monitor. And, I want it took look ultra-sleek on the outside and be absolutely silent. I don’t want to be able to hear the hard drive, fans, or anything else –essentially nonexistent in my office. Most of all, I want to do it on a budget of about $1500, not including a 4k display.
Let me preface this with something, though: I have never built a computer, Windows or OS X. In fact, up until this project, I was pretty clueless as to what went into building a computer. So if I am able to successfully build this machine, pretty much anyone can. My best friend for this project was easily tonymacx86.com, which we have praised in the past for its clear breakdown of compatible parts and software guides.
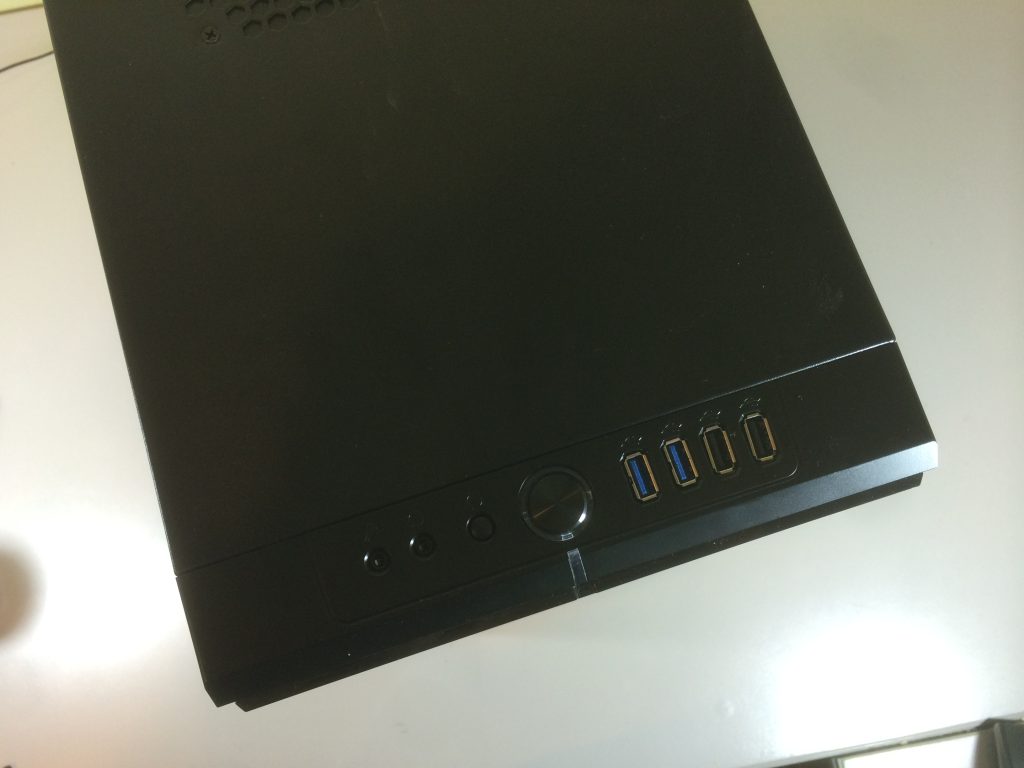
Let’s start by discussing the parts that I decided to use for this build.
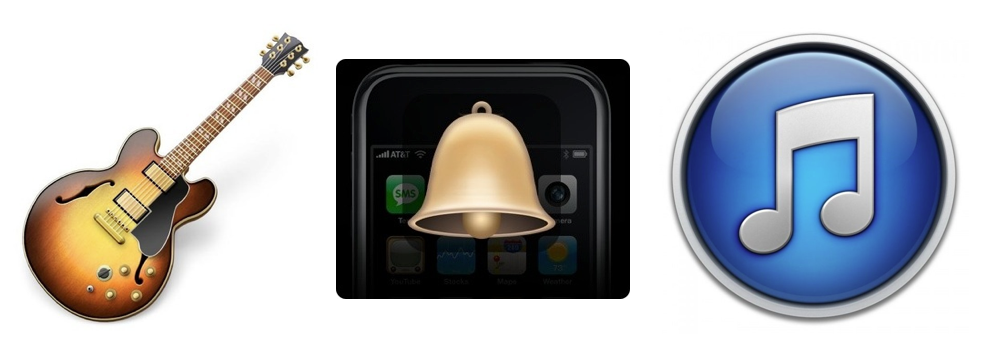
Using GarageBand, you can create a custom ringtone out of any portion of any track you have in iTunes. This article will walk you through the process of making a custom ringtone and syncing it to your iOS devices, as well as assigning it to a certain contact or as your default ringtone.
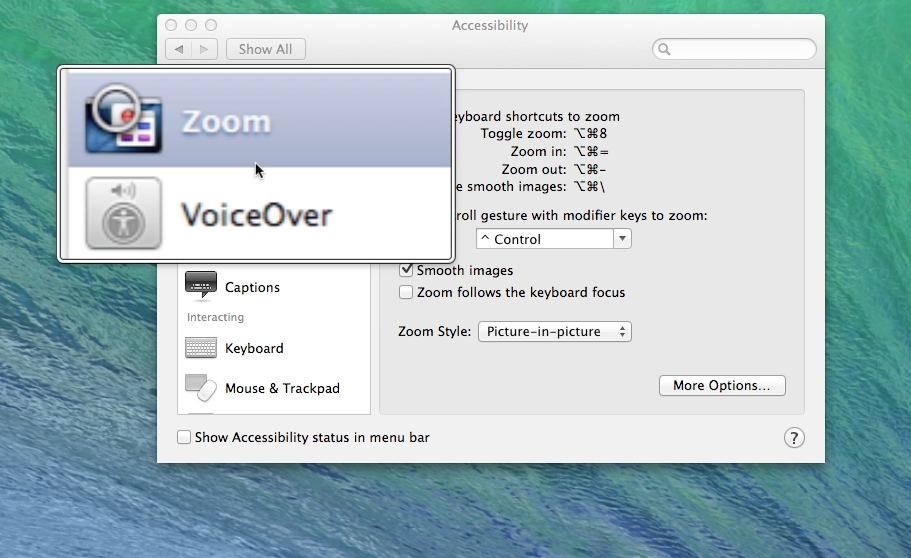
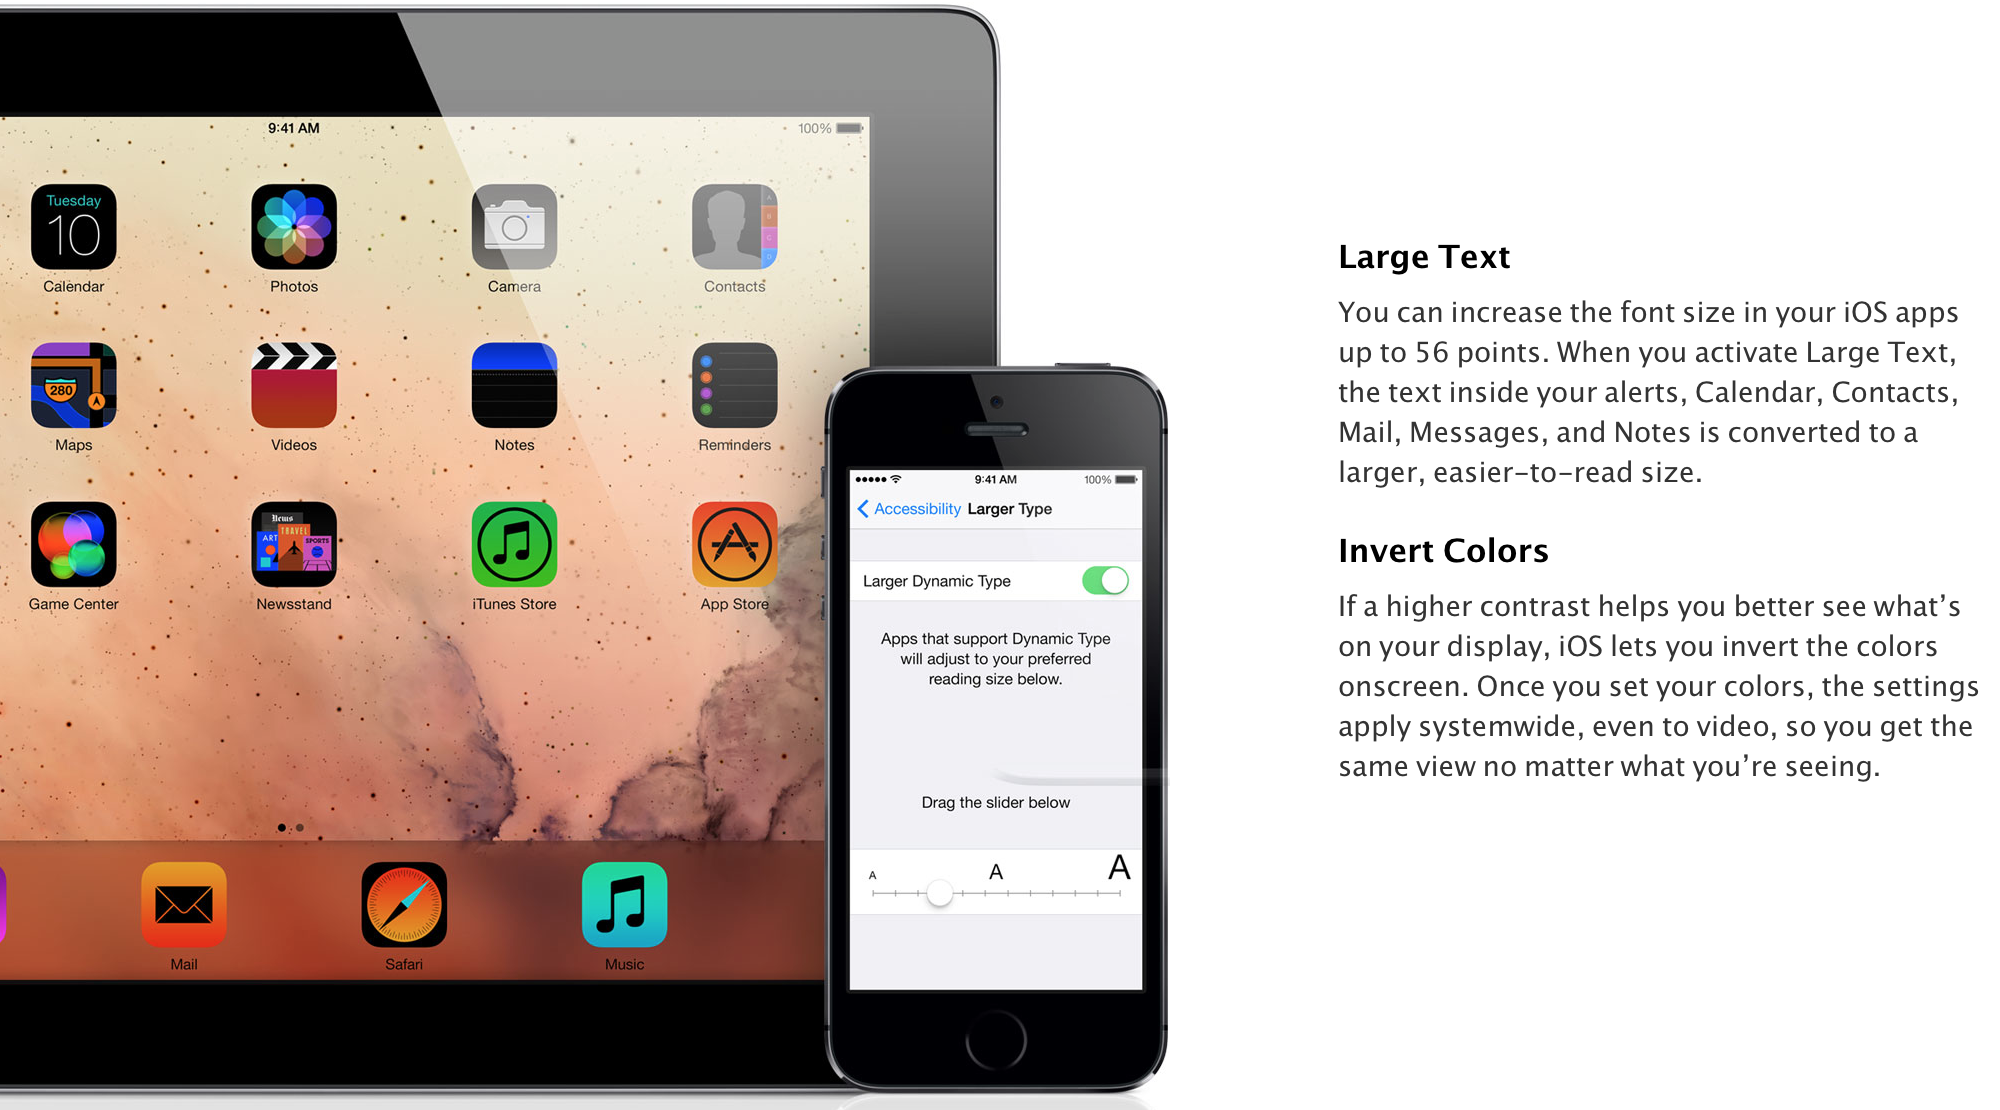
OS X Mavericks has numerous features and settings that make text and images more visible. In this article, I will discuss many options and methods to take advantage of those features in different ways. In pointing out many different ways, I hope to help you find a method that will be a good fit for you.
Use System Preferences, Displays Settings: Access System Preferences from the dock or the Apple on the menu bar, and click on Displays. Then click on the Display tab. Choose Scaled, and the different resolution settings available are displayed. The options available vary, depending upon what resolution your model of the computer is capable of displaying. Adjust the settings by choosing different options—the lower the numbers are in the setting, the larger objects will be displayed. Below are examples of the display setting options you will see on a white MacBook, an older iMac, and a MacBook Pro with Retina display … Expand Expanding Close
Using customized labels can help make your holiday cards look more modern and festive. In this article, you will learn how to make a group in your address book for holiday cards and print address labels based on that group in the color and style of your choice, including a photo. Expand Expanding Close
Apple has finally implemented a maps app in the OS X platform, and it seems to have been worth the wait. After being noticeably missing from the system, Maps (and iBooks) are helping achieve a greater consistency between the iOS and OS X platforms. After running the free Mavericks update, the Maps app icon will automatically be added to your dock.
In this guide, we’ll show you how to use the new app for everything from searching for locations to getting turn-by-turn directions set directly to your iPhone.
iBooks was introduced in 2010 for the iPad. With Mavericks, 3.5 years after iBooks came out for iOS, Mac OS X finally gets in on the action. Unlike iOS devices that have to download iBooks from the App Store, the Mac comes pre-loaded with it. This how-to will discuss how to organize and read your books, and how to shop for new books in the iBooks Store.
iCloud Keychain is a brand-new cloud service in OS X Mavericks and iOS 7.0.3 and launched with the new operating systems on October 22nd. iCloud Keychain stores your usernames, passwords, Wi-Fi networks, and credit card information so that you can easily fill in forms or logins whenever you need. This will sync across Safari and with third party apps that support iCloud Keychain. Your information is securely protected using 256-bit AES encryption, preventing unauthorized use of your information. iCloud Keychain also includes a powerful password generator, which will create unique passwords for your online accounts so that you no longer have to come up with secure or hard-to-guess passwords.
This article will teach you how to setup and use iCloud Keychain for iOS and OS X.
Apple’s latest desktop operating system, OS X Mavericks, is available today. In this post, we’ll take you through the steps required to protect your data by backing it up, upgrading the OS, and getting started with the latest version of OS X.
Before you get started, you’ll want to make sure you have everything you need. To backup your data, you’ll need an external hard drive with at least the same amount of storage as your hard drive (or a Time Capsule). You’ll also need to make sure your Mac is capable of running Mavericks (we’ll show you how below), and you’ll want to make sure you have an iTunes account to purchase the update.
Preview is a built-in Mac application that has many features that doesn’t get a lot of press. One of them is the ability to place a caption inside the body of the image. Another is to mark up images to remove confidential information. If you double click on an image outside of a photo editor like iPhoto or Aperture, it opens in Preview and can be edited.
Notification Center in iOS is a panel that keeps track of all of your incoming notifications so you can easily access them. It has been around since iOS 5, but it has been completely redesigned in iOS 7. In this article, you’ll discover how to increase enjoyment of your iOS device by customizing Notification Center. First, you’ll learn how to change the way certain apps show notifications. Then you will learn how to set Notification Center to show only the notifications you want in a customized view.
First, there are a few important settings you’ll want to pay attention to. On your iOS device go to Settings, Notification Center and scroll down to the bottom. Confirm that under Government Alerts, both AMBER and Emergency Alerts are ON. Both of these settings are optional, but they are potentially life saving…
Evernote, Adobe, even Apple … just a few of the companies who have found their user data compromised by hackers in recent times. The possibility of a hacker being able to access one of your web accounts is worrying enough – but if you use the same email address and password for almost all the websites you use, the risk becomes huge.
The first thing a hacker does when they get hold of a list of usernames and passwords is to use automated software to fire them at a whole bunch of popular websites. That means your online security is only as good as the most vulnerable of the websites you visit. Not good.
The answer, of course, is to use a unique – and strong – password for each website you access. But that creates its own hassles. Strong passwords aren’t easily memorised. Sure, we can ask our browsers to store logins for us, but when you might use several different computers, an iPhone and an iPad, you’d have to login once from each device as soon as you chose the password so it gets stored before you forget it. Not very convenient.
Which is where password managers come in. When you see the instructions, it’ll look like a long process, but it in fact takes only 10-20 mins if you have two or three devices … Expand Expanding Close
Evernote is one of the most popular and talked about apps in the App Store. In this article, you’ll learn how to install and configure the app, gather and organize notes, and review workflows that include sharing and advanced features. You’ll also learn about Evernote’s accessories and “baby apps” that are fully integrated into it’s functionality. This article will enable you to use Evernote and its integrated apps as effective organizational tools.
AirPort Utility is a built-in Mac app that is used to configure and control Wi-Fi networks using Apple’s AirPort Extreme, AirPort Express, and Time Capsule. The AirPort Extreme is a base station router like you would use when setting up your Wi-Fi network. An AirPort Express is used to extend a Wi-Fi network to a larger area, or can be used to stream audio using AirPlay. A Time Capsule is a combination of an AirPort Extreme and an external hard drive, and comes in 2 TB or 3 TB. It automatically backs up all Macs on your network.
AirPort Utility has the ability to set limits on what time of day the network (and therefore the internet) can be accessed from specific wireless devices. This can be helpful in situations where parents want to keep kids off of the internet after a certain time. Time limits can be set for different times on different days of the week.
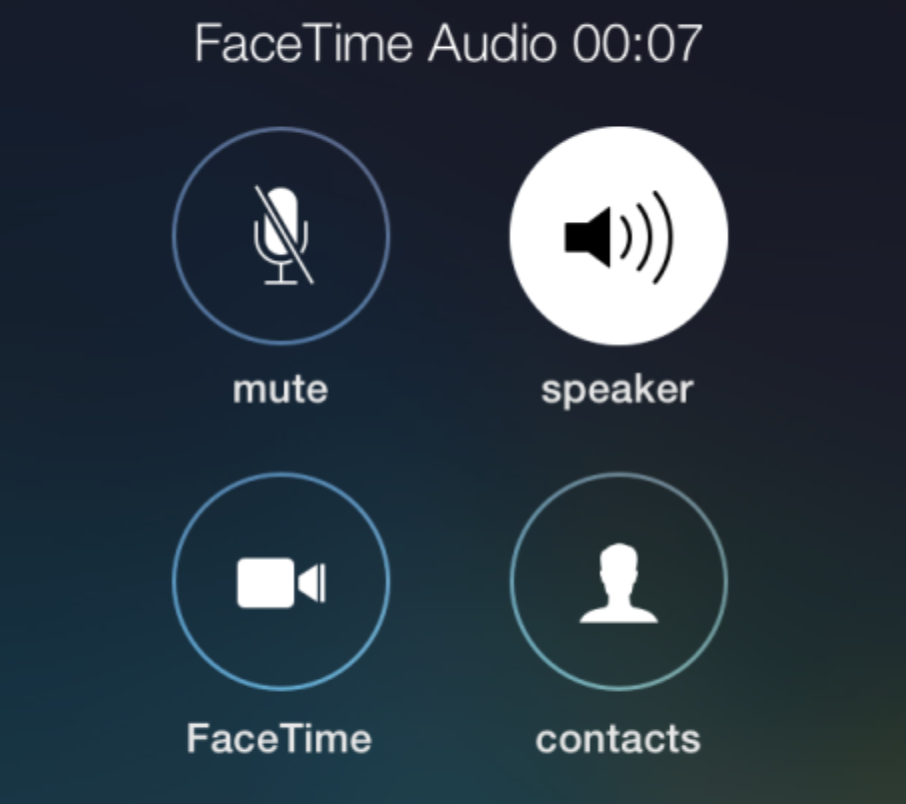
New in iOS 7 is the ability to make FaceTime Audio calls. FaceTime Audio works internationally and works on a Wi-fi network, or on a cellular connection. Using Facetime Audio sounds nicer than actually using the iPhone to make calls. FaceTime Audio sounds deep, and closer to the actual sound of the voice. Another benefit of using FaceTime Audio is that it is associated with your Apple ID and phone number and is built right into the core operating system. For example, while you are texting someone, and you want to make a FaceTime Audio call, you can press the Contact button in blue in the upper right hand corner:
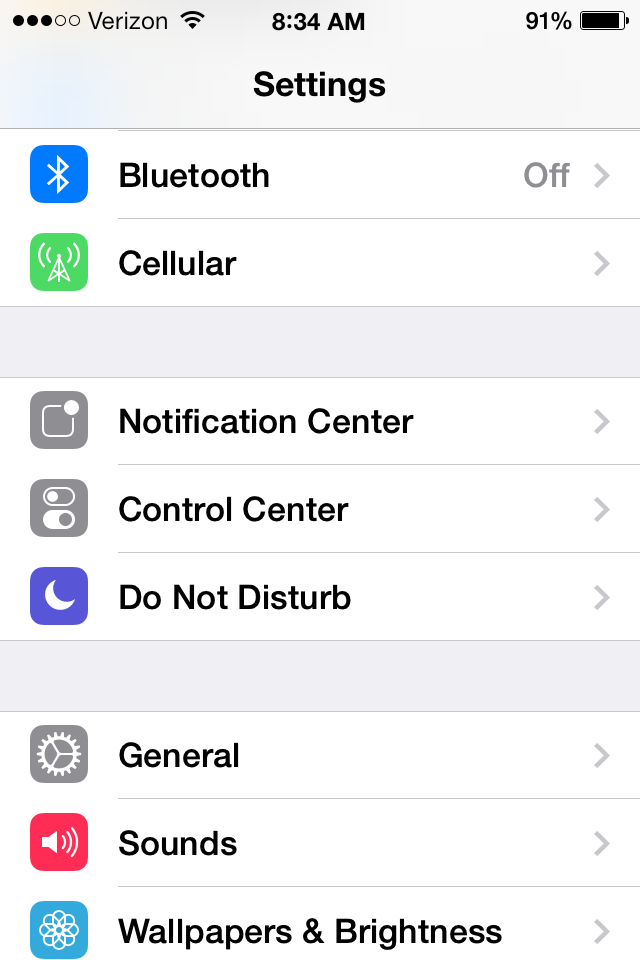
Have you ever wondered how much data you should get with your carrier? Do you barely use your data plan but pay for a huge one anyways? Or do you go over data each month with your data plan and have no idea why? New in the iOS 7 Settings application is the ability to track cellular data usage per each app you have installed on your device.
In iOS 6, it shows you how much data you use, but it did not define or described what made up that number. To monitor and track your cellular data usage in iOS 7, first go into Settings.
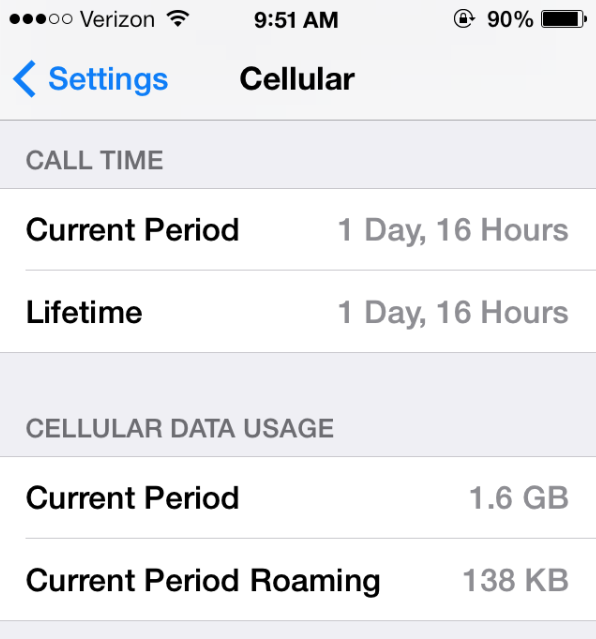
Then tap on Cellular. If you scroll down a little bit at first you will see your total history. It will show your Call Time and total Cellular Data Usage, just like it did in iOS 6.
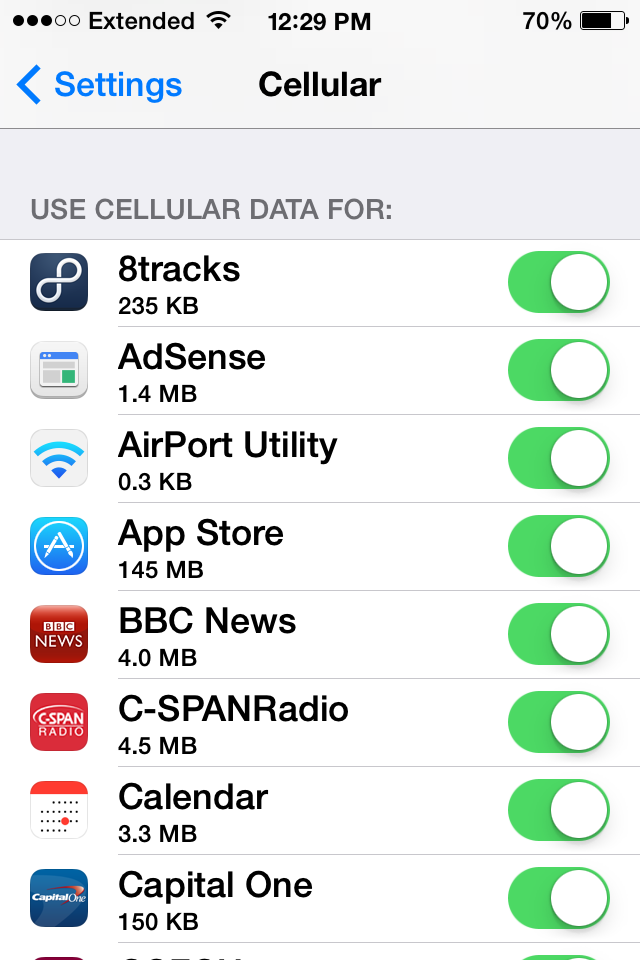
If you scroll down further, you will get an alphabetical list of all the apps have use cellular data.
If you scroll all the way down at the bottom, you will see a button called System Services. If you tap on that, it will show you how much cellular data you are using for things like Messaging Services, Push Notifications, Documents & Sync, iTunes Accounts, Siri, Voicemail, Software Updates, Find My iPhone, Diagnostics and Apple ID Services.
The devices gather your statistics until you manually reset them on the device by tapping on the blue Reset Statistics button. If you want to monitor and track your cellular data usage, I would recommend setting up a reoccurring calendar event, or a reminder every thirty days to coincide with your cellular bill so that way you would remember to reset the cellular statistics every thirty days.
Parallax is a new feature that is introduced in iOS 7. As the user moves their device, the background image and icons move on the screen to match the movement of the device. Parallax gives the device a quasi-3D effect and adds depth to it, but some people prefer to use their iPhone, iPad, or iPod touch sans the motion.
If you are like these people on Apple’s Discussion forums, you might be getting dizzy from iOS 7’s new parallax feature.
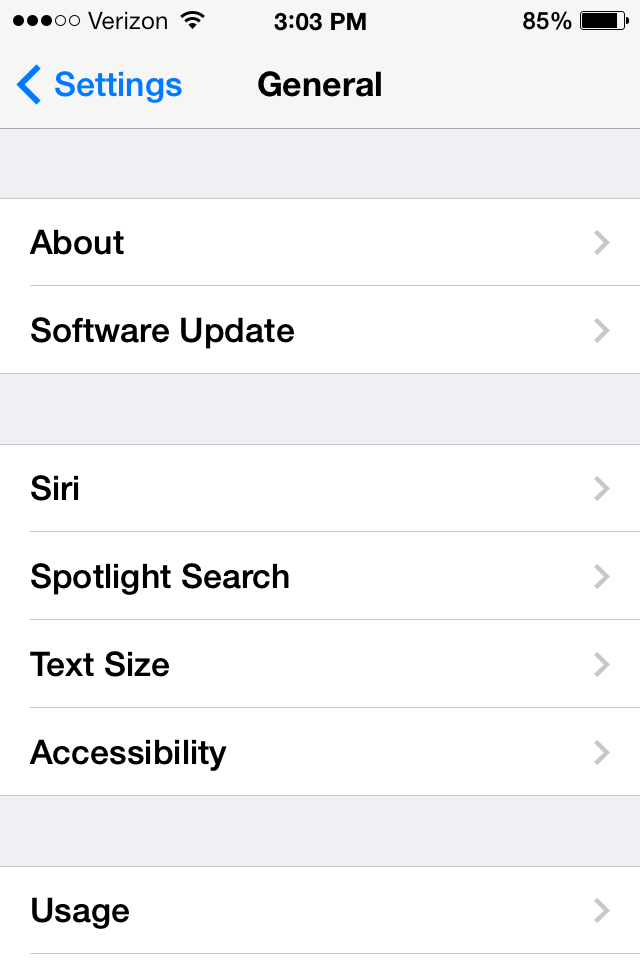
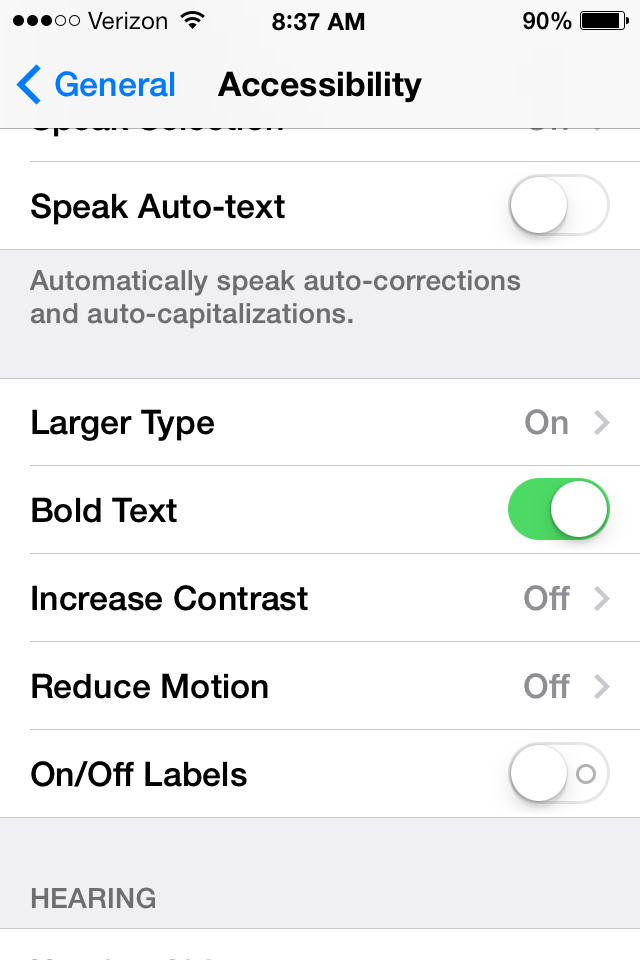
To disable Parallax go into Settings, then tap on General.
Then tap on Accessibility.
Scroll down until you see Reduced Motion.
Tap on Reduced Motion. By turning on Reduced Motion it will:
Reduce the motion of the user interface, including the parallax effect of icons and alerts.
To turn on Reduced Motion, tap on the white circle, and it will move the switch and it will green indicating it’s on.
iTunes gift cards are a great gift for iOS Device users. They can be used to purchase content from the iTunes Store, App Store, and iBookstore. However, entering in the string of characters to redeem the gift card balance has typically been a pain with the touch keyboards on iPads, iPhone, and iPod touches. Like iTunes 11 on the Mac, iOS 7 moves to solve this problem. You can now use your device’s camera to scan in the code.
Go to the main/featured page in whichever store you choose and to get to the redemption screen, scroll all the way down, and press on redeem:
Setting up your email in iOS 7 is just like setting it up in earlier versions of iOS. Just like before, you are able to have Gmail set up in the Mail app. To set up your email you would go to Settings, then tap on Mail, Contacts & Calendars, and then press Add Account. By default in iOS, Gmail is set to archive your emails as opposed to deleting them. Archiving email keeps the messages in an Archived folder, but Deleting moves them to the trash.
If you are viewing your inbox, and you swipe from right to left on the message, you do not get the option to delete the message. Rather, you get an Archive option or a More option. The More option gives you every other option except for deleting the message. You could always tap on More, then press Move Message, and then choose the Trash folder. That’s rather tedious for a simple task:
For some people, the font sizes on the iPad, iPhone, and iPod touch are too small. Sometimes, these small fonts prevent people from using or purchasing the iOS devices. Thankfully, there are multiple solutions to this potential issue. Below, we’ve rounded up the old fixes and new fixes in iOS 7: